OPERATING MANUAL Multiplex 72 / 55
Contents Installation 3 Location and function of controls Communicator / Internal generator charge Battery installation / Front panel / Side panel 4 Basic operation On and off / Programme selection Volume adjustment / Quick view / Mute function On screen language selection (option) 7 On 8 screen menus Menu selection up TV stations Auto programme tuning Manual programme tuning / Fine Tuning Programme edit / Favorite programme Calling the programme table 9 Setting Picture adjustment PSM (Picture
Installation Power This set operates on an AC mains supply, the voltage is as indicated on the label on the back cover. Never apply DC power to the set. In the event of thunderstorms ial and mains or powercuts, please pull out the aer- plugs. Warning To prevent fire moisture. or Do not make the others. It may shock hazard, do not expose the set to rain product stand by yourself. Get injuries.
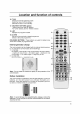
Location and function of controls All the functions can be controlled with the Communicator. Some functions can also be adjusted with the buttons on the front panel of the set. Communicator Before you use it, please select the TVCR or DVD buttons. TV, VCR or DVD function by press- ing 1 2 Comunicatr I/II SLEEP ARC SYSTEM TIMER PROG CLK/COUNT CLR/RST SP/LP REW PLAY FF PAUSE SKIP STOP SKIP REC SETUP DISC MENU TITLE RETURN AUDIO SUBTITLE ANGLE 3D 11 1.
Location and function of controls 16. TV/AV selects the remote operating mode. clears the menu from the screen. switches the set on from standby. 17. TELETEXT BUTTONS (option) These buttons are used for teletext. For further details, see the 'Teletext' section. POWER 18. LIST 19. Q.VIEW returns to the selects a previously viewed programme. favourite programme. COLOURED BUTTONS TELETEXT models) or These buttons programme edit. : TVCR/DVD 12 6 the programme table.
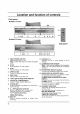
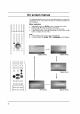
Location and function of controls Front panel 72 series Multiplex STOP ON/OFF PLAY OPEN/ CLOSE STOP/ EJECT DD PLAY RECIR R RC PM 310 TV STOP PLAY OPEN/ CLOSE STOP/ EJECT PLAY REC/ TR ON/OFF DVD TRK COPY 13 VCR REC PM TV 14 234 1 6 5 8 7 9 11 12 AV2 55 series Multiplex OPEN/ STOP PLAY STOP/ EJECT CLOSE ON/OFF PAY -BY RECR RECR RREC T Side STOP PLAY OPEN/ CLOSE STOP/ EJECT ON/OFF PLAY REC/ITR panel ST-BY REC/ITR TIMER/REC 1234 1. 2.
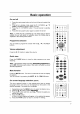
Basic operation On and off 1. Press the main power button 2. set on. If the set is in 3. 4. on the front of the set to switch the / I (POWER), Δ / Ε, standby mode, press the TV/AV or NUMBER buttons to switch it on fully. Press the / I (POWER) button. The set reverts to standby mode. Press the main power button again to switch the set off. Note : If, while the set is switched on, the mains plug is disconnected the set will switch to standby when the mains plug is replaced in the mains power socket.
On screen menus The an dialogue operator also between you and your set takes place on screen with The buttons required for the operating steps are menu. displayed. Menu selection 1. 2. 3. the MENU button to display each menu. Press the Δ / Ε button to select a menu item. The selected menu item changes from white to purple. Press the Γ button to change the setting of a menu item or OK button to display the sub menu. Repeatedly press Note : In the teletext mode, menus are not displayed. a. b.
Setting up TV stations Up to 100 TV stations can be stored in this set by programme numbers (0 to 99). Once you have preset the stations, you will be able to use the Δ / Ε or NUMBER buttons to scan the stations you programmed. Stations can be tuned using automatic or manual modes. Auto programme All stations that can ommended that you use Manual programme Programme edit Favourite programme Language ΔΕΦΓOKMENUTV/AV tuning be received Auto programme are stored auto programme by this method.
Setting up TV stations Manual programme Auto programme Manual programme tuning Programme edit Favourite programme Manual programme lets you manually tune and arrange the stations in whatever order you desire. Also you can assign a station name with five characters to each programme number. Language ΔΕΦΓOKMENUTV/AV 1. 2. 3. the MENU button to select the Station menu. Press the Δ / Ε button to select Manual programme. Press the Γ button to display the Manual programme Repeatedly press menu.
TV stations Setting up Assigning a station name 1. Repeat the 'Manual programme tuning' steps 2. Press the Δ / Ε button to select Name. 3. Press the Γ and then use Auto programme Manual programme 1 to 3. Programme edit Favourite programme Language the Δ / Ε button. You can use a 4. .,thenumeric0to9andthealphabetAtoZ. Select the next position by pressing the OK button 5. your choice of the second character, and Press the OK button. 6.
Setting up Auto programme Programme Manual programme Programme edit TV stations edit This function enables you to delete or skip the stored programmes. Also you can move some stations to other programme numbers or insert a blank station data into the selected programme number. Favourite programme Language ΔΕΦΓOKMENUTV/AV 1. 2. 3. the MENU button to select the Station menu. Press the Δ / Ε button to select Programme edit. Press the Γ button to display the Programme edit menu.
Setting up TV stations Favourite programme Auto programme Manual programme This function lets you select your favourite programmes 1. 2. 3. directly. Repeatedly press the MENU button to select the Station menu. Press the Δ / Ε button to select Favourite programme. Press the OK button to display the Favourite programme Programme edit Favourite programme Language ΔΕΦΓOKMENUTV/AV menu.
Picture PSM Dynamic 100 Contrast Brightness 50 Colour 70 Sharpness 50 adjustment PSM (Picture Status 1. 2. 3. Memory) Repeatedly press the MENU button to select the Picture menu. Press the Δ / Ε button to select PSM. Press the Φ / Γ button to select a picture setting on the PSM menu. ΔΕΦΓOKMENUTV/AV PSM Dynamic 100 Contrast ARC Brightness 50 Colour 70 Sharpness 50 ΔΕΦΓOKMENUTV/AV 4.
Sound SSM adjustment (Sound Status Memory) You can select your preferred sound Movie or Speech and you can also SSM Music Balance setting; Virtual (option), Flat, Music, adjust the sound frequency of the 0 AVL Off §Volume 30 equalizer. 1. 2. 3. press the MENU button to select the Sound Press the Δ / Ε button to select SSM. Press the Φ / Γ button to select a sound setting on the SSM Repeatedly SSM menu. ΔΕΦΓOKMENUTV/AV menu.
Sound adjustment Stereo/Dual C reception (option) Stereo/dual is an optional function. When a programme is selected, the sound information for the station appears after the programme number and station name disappear. I/II Broadcast On Screen Mono MONO Stereo STEREO Dual DUAL I Display Mono sound selection In stereo reception if the stereo signal is weak, you can switch to mono by pressing the I/II button twice. In mono reception the depth of sound is improved.
Other functions AV and DVD modes TV, be set for TV, AV or DVD modes. AV mode is used when a video cassette recorder (VCR), or other equipment is connected to the set. Inputs can Input TV Child lock Off Auto Off sleep Index On 0 Tilt Off Degauss ΔΕΦΓOKMENUTV/AV Note : When a VCR is connected via the aerial socket the set is used in TV mode. See the 'Connection of external equipment' section. 1. 2. the MENU button to select the Press the Δ / Ε button to select Input.
Other functions Input TV Child lock Off Auto Off sleep Index On 0 Tilt Off Degauss ΔΕΦΓOKMENUTV/AV LED DISPLAY You can 1. 2. 3. adjustment (option) switch LED DISPLAY on or off. Repeatedly press the MENU button to select the Press the Δ / Ε button to select Index. Press the Φ / Γ button to select On or Off. menu. AV1 Input Child lock Off Auto Off sleep Index SLEEP Special On 0 Tilt Off Degauss ΔΕΦΓOKMENUTV/AV When you select On mode, The LED DISPLAY illuminates brightly.
Time setting Clock Clock --:---.--.---- Off The time uses the 24 hour system and must be set to the correct time before operating the set. Time - OnTime -:- - --- Hold --:--Hold PR1VOL30 ΔΕΦΓOKMENUTV/AV 1. 2. 3. 4. the MENU button to select the Time menu. Press the Δ / Ε button to select Clock. Select and adjust hour and minute by pressing the Φ / Γ and Δ / Ε button. Select and adjust the day, the month and the year by pressing Repeatedly press theΦ/ΓandΔ/Εbutton.
Teletext (option) Teletext (or TOP text) is an optional function, therefore only with the teletext system can receive the teletext broadcast. a set free service broadcast by most TV stations which gives information on news, weather, television programmes, share prices and many other topics. Teletext is a up-to-the-minute The teletext decoder of this TV can support the SIMPLE, TOP and FASTEXT systems.
Teletext TOP text (option) (option) The user guide displays four fields-red, green, yellow and blue at the bottom of the screen. The yellow field denotes the next group and the blue field indicates the next block. Block / group / page selection 1. With the blue button you can progress from block to block. 2. Use the yellow button to proceed to the next group with automatic overflow to the next block. 3.
Teletext Special (option) teletext functions REVEAL Press this button to display concealed information, such as puzzles. again to remove the information from the solutions of riddles Press this button or display. ? SIZE Selects double 1 2 3 Press this 4 5 6 7 8 9 height text. enlarge the top button again to enlarge Press this button to 0 page. Press this button again half of the page. the bottom half of the to return to the normal display.
VCR operation Playing tapes To play back a VHS video cassette tape which has no safety tab in position (this means you cannot record on to it), insert it into the set in the standby mode.
VCR operation Pressing the FF ΓΓ button in the stop mode winds the tape forward at high speed. Then the display ΓΓ will appear on the screen. If you press and hold the FF ΓΓ button in this mode, the searching picture will appear. This enables you to see what is on the tape. To return to the FF mode, release the FF ΓΓ button. Com SYSTEM CLK/COUNT CLR/RST PLAY FF REW If the tape winds forward to the end, it will automatically rewind to the beginning and then eject the tape.
Recording Manual recording This is the function used to record a TV programme or signal from external equipment onto a video cassette tape. The set cannot record any programme in the NTSC system as the NTSC system is only for playback. 1. 2. 3. Insert a tape with the safety tab into the cassette compartment. Note : Select the recording tape speed SP or LP with the SP/LP button after inserting a tape with the safety tab. You'd better select the tape speed SP. Press the REC button once.
Recording Timer programme setting You can programme the set to start and end away. Up to 5 recordings within one month at the same time. are 1. TIMER PROG CLR/RST 2. 3. 4. PR Press the TIMER PROG button on the Communicator to display the Timer programme menu. The current time and the day of the week automatically appears under the display Timer programme. Press the Δ / Ε button to select a recording item. Select PR with the Γ button and set the programme number with the Δ / Ε button.
DVD Notes on operation discs On handling discs Do not touch the playback side of the disc. Do not attach paper or tape to discs. ? ? On storing discs Do not store discs in a place subject to direct sunlight or near heat sources. Do not store discs in place subject to moisture and dust such as a bathroom or near a humidifier. Store discs vertically in a case. Stacking or placing object on discs outside of their case may cause warping.
DVD Playing REW PLAY FF SKIP STOP SKIP PAUSE operation a disc Basic playback 1. Press the POWER button to switch the set on. 2. Press the OPEN/CLOSE button to open the disc tray. 3. Place the disc with the playback side down on the disc tray. 4. Press the OPEN/CLOSE button to close the disc tray. 5. Playback starts. To pause playback (still mode) 1. Press the PAUSE button during playback. 2. Press the PLAY button again to return to normal To stop playback Press the STOP button to stop playback.
DVD operation OSD (On-screen Display) display the playback status on TV screen as following; Title, Chapter number, Playing time. Press the OK button during playback. Title, Chapter information appears on screen. Each time you press the OK button, the OSD changes as follows. You can PLAY DISC MENU TITLE 2ch Playing Load 1. a MP3 discs MP3 disc MP3 menu MP3 disc's folder is displayed automatically depending (directory) structure as shown below. screen PR on VOL OK VOL PR .. 2. 3.
DVD operation Repeat playback You can play a track specific title, chapter, or segment repeatedly. Press the REPEAT button during playback. Each time you press the REPEAT button, the repeat mode as follows. REPEAT A-B DVD : Rep. Off Rep. Audio CD : Rep. Track PROGRAM MP3 1 2 3 4 5 6 7 8 9 0 PR Rep. Title Rep. Random Chapter Rep. Disc Repeat Off Rep. Track Rep. Dir Rep. Disc Rep.
DVD the Selecting If your scene was change 1. 2. camera the camera operation angle recorded from multiple angle of the scene you angles, you can easily are watching. Press the ANGLE button during playback. Repeatedly press the ANGLE button to select the desired ANGLE angle. 3. 3D ZOOM Press the PLAY button to return to normal TV viewing. Note : a. You b. c. can only change the angle for DVDs that provide multiple angles of scenes.
DVD operation Selecting a audio language (STOP mode only) Set this value to the preferred audio language. If an audio language is selected, whenever you start playing a new disc, the selected audio language is played. (If the selected language is contained in the disc.) SETUP AUDIO 1. SUBTITLE 2. Press the SETUP button and then use the Δ / Ε button to select Audio Language. Press the Γ button and then Δ / Ε button to select your desired language.
DVD Disc menu language operation selection You can select the language of the disc menu messages of DVDs. (If the selected language is contained in the disc.) 1. 2. Press the SETUP button and then use the Δ / Ε button to select Menu Language. Press the Γ button and then Δ / Ε button to select your desired SETUP language.
DVD operation To change 1. Press the SETUP button and then use the Δ / Ε button to select Rating Level. Press the Γ button and then use NUMBER buttons to input a 4- 2. the password digit password. 3. SETUP Press the Φ button and then use the Δ / Ε button to select New Password. Audio Language Language Language Level Rating Subtitle Menu New Password Γ ΩΩΩΩ TV Screen OSD 1 2 3 4 5 6 7 8 9 Language Digital Output Special ΔΕ 4. PR 5. VOL OK :Move Γ:Next 0 VOL 6.
DVD Disc OSD language selection operation (option) menu can be displayed on the screen in your desired language. First select your language. (If the selected language is contained in the disc.) The 1. 2. Press the SETUP button and then use the Δ / Ε button to select OSD Language. Press the Γ button and then Δ / Ε button to select your desired SETUP language. All the 3. on screen displays will appear in the selected language. Press the SETUP button to resume normal playback.
Connection of external You can connect additional equipment, such as equipment camcorders, video game set etc. to your set. Here shown may be somewhat different from your set. Connecting antenna Be careful for the bronze wire not to be bended in Apartments (connecting to wall antenna connecting to antenna input port.
Connection of external Digital audio equipment output setup Send the set's audio to external audio via the equipment (stereo system) Optical Output port. Digital Audio DIGITAL AUDIO OUT How to connect COAXIAL OPTICAL 1. Connect < Back panel of the set > an optical cable to Optical Output port. 2. Connect the other end of the optical cable to the digital audio optical input on the audio equipment. See the external audio equipment instruction manual for operation.
Memo
Troubleshooting check list Symptoms No picture, no sound Sound OK, poor picture Picture OK, poor sound Picture blurred Lines or streaks in Poor picture reception on some channels No colour Poor colour Communicator does not work Check these items and try to adjust these The mains plug-(plugged in and switched on) Is the TV switched Try on another channel (weak signal) Check aerial (plugged Check aerial (broken lead?) into TV?) Check aerial Check for local interference Adjust co
P/NO : 3828VA0477F (MV033A, 125B/112N TX) a