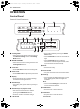
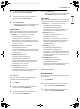
us_main.book.book Page 10 Tuesday, December 28, 2021 7:44 AM 10 OPERATION OPERATION Control Panel Control Panel Features a Cooking Mode • Select various microwave cooking functions. See Manual Cooking section and Cooking Mode section. b SENSOR COOKING • Select various sensor cooking functions. See Cooking Mode section. c Cook Time • Press Cook Time to enter the cooking time. d Power Level • Press Power Level to adjust the power level.
us_main.book.book Page 11 Tuesday, December 28, 2021 7:44 AM OPERATION 11 • Press and hold STOP/Clear for 3 seconds to lock the control panel. 2 n Light and Vent Functions • To set the ventilation: - Press On/Off to turn the vent fan on or off. - Press 4 Speed to set the vent fan speed. - Press Auto Timeset to set ventilation time. (Turns off after 1, 3, 5, 10 or 30 minutes) Control Panel Light On/Off The LEDs on the control panel turn off after a few minutes to save energy.
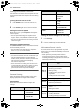
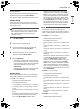
us_main.book.book Page 12 Tuesday, December 28, 2021 7:44 AM 12 OPERATION Setting Ventilation Functions Use this button to set the vent fan speed. The vent removes steam and other vapors from the cooking surface. Turning the Vent Fan On or Off 1 Press On/Off once to turn the vent fan on. 2 Press On/Off again to turn the vent fan off. Item 3 Scroll Speed • 3 Fast 4 Defrost Weight • The vent fan maintains the last setting if turned off and on again.
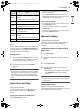
us_main.book.book Page 13 Tuesday, December 28, 2021 7:44 AM OPERATION 13 Power Level • Cooking ham, whole poultry and lamb. • Cooking rib roast and sirloin tip. 4 (40%) 3 (30%) 2 (20%) 1 (10%) • Thawing meat, poultry and seafood. • Cooking less tender cuts of meat. • Cooking pork chops and roasts. • Taking the chill out of fruit. • Softening butter. • Keeping casseroles and main dishes warm. • Softening butter and cream cheese.
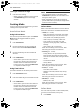
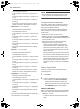
us_main.book.book Page 14 Tuesday, December 28, 2021 7:44 AM 14 OPERATION Cooking for 3 Minutes at High 1 Press 3 to start cooking • When cooking is complete, a chime sounds and COOK END appears in the display window. Cooking Mode Cook your favorite foods without having to select cooking times and power levels. Auto Defrost Mode NOTE • The countdown appears in the display after START/Enter is pressed. The oven chimes once during the defrost cycle.
us_main.book.book Page 15 Tuesday, December 28, 2021 7:44 AM OPERATION 15 2 4 Use the number keys to enter the desired amounts from the Soften Menu. Press START/Enter. • When the cook time ends, a melody sounds and COOK END appears in the display. 4 • When the cook time ends, a melody sounds and COOK END appears in the display. Melt Menu Refer to the information below to set the desired menu item and see the recommended amounts.
us_main.book.book Page 16 Tuesday, December 28, 2021 7:44 AM 16 OPERATION 4 Press START/Enter. • When the cook time ends, a melody sounds and COOK END appears in the display. Kids Meal Menu Refer to the information below to set the desired menu item and see the recommended amounts. • 1 Mac & Cheese (6 or 12 oz) - Cookware: Microwave-safe dish - Food temperature: Refrigerated • 2 Corn Dog (2 or 4 ea (2 - 2.
us_main.book.book Page 17 Tuesday, December 28, 2021 7:44 AM OPERATION 17 More Modes The product firmware may be updated to include additional functions through More Modes. Simmer Mode The Simmer function provides precise cooking performance for foods that require low heat for a long cooking time. CAUTION • Wear oven mitts and use care when removing the cookware from the oven. Cookware will be hot, and the hot water can spill and cause scalding or burns. 1 Press More Modes.
us_main.book.book Page 18 Tuesday, December 28, 2021 7:44 AM 18 OPERATION - Food temperature: Room - 1 serving (water 4-1/4 cups/1 L, lasagna 3 oz/ 85 g) 2 servings (water 4-1/4 cups/1 L, lasagna 6 oz/ 170 g) 3 servings (water 6-1/3 cups/1.5 L, lasagna 9 oz/255 g) - Instructions: Follow instructions for cooking Farfalle. Stir twice in the middle of cooking.
us_main.book.book Page 19 Tuesday, December 28, 2021 7:44 AM OPERATION 19 - Food temperature: Room - Instructions: Put the rice and water in the bowl as below. Rice 1 cup (192 g), water 2-1/4 cups (531 g) Rice 1.5 cups (288 g), water 3-1/4 cups (789 g) Rice 2 cups (384 g), water 4-1/2 cups (1062 g) Cover with vented plastic wrap. After cooking, let stand 5-10 minutes. • 2 Frozen Lasagna (10 - 21 oz) - Food temperature: Frozen - Instructions: Remove outer packaging. Slit cover.
us_main.book.book Page 20 Tuesday, December 28, 2021 7:44 AM 20 OPERATION WARNING • Be careful when handling the container. Microwave heating of beverages can result in delayed eruptive boiling. Therefore, care must be taken when handling the container. Sensor Potato Menu Refer to the information below to set the desired menu item and see the recommended amounts.
us_main.book.book Page 21 Tuesday, December 28, 2021 7:44 AM OPERATION 21 • 4 Canned vegetable (1 - 4 cups) - Cookware: Microwave-safe bowl - Food temperature: Room - Use bowls, cups, serving plates, pottery, stoneware, ceramic, and platters without metal rims or handles. Many containers made of these materials are microwave-safe, but test them before use. • Plastic Sensor Beverage Mode Setting the Sensor Beverage Function 1 Press Beverage. 2 Press START/Enter.
us_main.book.book Page 22 Tuesday, December 28, 2021 7:44 AM 22 OPERATION - Do not put plates with painted decoration in the oven, as the paint may contain metal and cause arcing. Microwave-Unsafe Cookware • Metal Containers/Metal Decoration - Never use metal or metal-rimmed cookware in the microwave oven. - Microwaves cannot penetrate metal. They will bounce off any metal object in the oven and cause arcing, an alarming phenomenon that resembles lightning.
us_main.book.book Page 23 Tuesday, December 28, 2021 7:44 AM OPERATION 23 arcing if it gets too close to the oven walls during cooking. • Undercooked Food - Covering: Cover food with a microwave-safe lid, parchment paper (not waxed paper), or plastic wrap to trap heat and steam and cook food more quickly. - Standing Time: Let food stand for several minutes after being removed from the oven to allow it to finish cooking and help flavors blend and develop.
us_main.book.book Page 24 Tuesday, December 28, 2021 7:44 AM 24 OPERATION • To program the oven, press the center of each button firmly. When a button is pressed correctly, a beep sounds and the oven is activated. Do not press several buttons at once. • Do not strike the control panel with silverware, utensils, etc. It may be damaged or broken. • Always be careful when taking cookware out of the oven. Some dishes absorb heat from the cooked food and may be hot.
us_main.book.book Page 25 Tuesday, December 28, 2021 7:44 AM SMART FUNCTIONS 25 SMART FUNCTIONS Before Using LG ThinQ Application This feature is only available on models with Wi-Fi. 1 The LG ThinQ application allows you to communicate with the appliance using a smartphone. • If the appliance is too far from the wireless router, the signal becomes weak. It may take a long time to connect or fail to install the application.
us_main.book.book Page 26 Tuesday, December 28, 2021 7:44 AM 26 SMART FUNCTIONS try to correct the interference by one or more of the following measures: NOTE • If the appliance cannot be connected due to problems with the wireless signal transmission, unplug the appliance and wait about a minute before trying again. • If the firewall on your wireless router is enabled, disable the firewall or add an exception to it.
us_main.book.book Page 27 Tuesday, December 28, 2021 7:44 AM SMART FUNCTIONS 27 Smart DiagnosisTM Feature Keep the phone in place until the tone transmission has finished. The display will count down the time. Once the countdown is over and the tones have stopped, the diagnosis will be displayed in the application. Use this feature to help you diagnose and solve problems with your appliance. NOTE NOTE • For best results, do not move the phone while the tones are being transmitted.
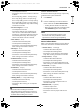
us_main.book.book Page 28 Tuesday, December 28, 2021 7:44 AM 28 MAINTENANCE MAINTENANCE Cleaning Cleaning the Interior 1 2 Use a damp cloth to clean the surfaces of the door and wipe out crumbs between the door and the frame. Cleaning the Accessories Wash the glass tray and rotating ring in mild, sudsy water. For heavily soiled areas, use a mild cleanser and scouring sponge. Dry completely before use. • The glass tray and rotating ring are dishwasher safe.
us_main.book.book Page 29 Tuesday, December 28, 2021 7:44 AM MAINTENANCE 29 6 ENGLISH 5 Soak grease filters in hot water and a mild detergent. 4 Slide a new charcoal filter into place. 5 Slide the bottom of the vent cover into place. Push the top until it snaps into place. Tighten the vent cover screw in place. 6 Close the oven door, plug in the power cord and set the clock. Rinse well and shake to dry. • Do not use ammonia or place in a dishwasher. The aluminum will darken.