NE9423CBPM_NAASLL_ENG DVD PLAYER OWNER'S MANUAL MODEL : NE9423P Before connecting, operating please read this instruction booklet or adjusting this product, carefully and completely.
CAUTION: The CAUTION (dripping as apparatus should not be exposed to water splashing) and no objects filled with liquids, such should be placed on the apparatus.
Repeat............................17 Contents 3DSurround......................17 TimeSearch........................17 Introduction...................4 SymbolusedinthisManual..............4 AbouttheSymbolDisplay............4 NotesonDiscs........................4 HandlingDiscs......................4 StoringDiscs........................4 CleaningDiscs......................4 TypesofPlayableDiscs.................5 Regionalcode........................5 Disc-relatedterms.....................6 FrontPanel.......
Introduction About the To proper use of this product, please read this owner's manual carefully and retain for future " reference. operation Symbol Display ensure " may appear on your TV display during and indicates that the function explained in this owner's manual is not available This manual provides information on the on that specific DVD video disc. operation and maintenance of your DVD player. Should the unit require service, contact an authorized service location.
Types of Playable Discs Regional code This DVD player is designed and playback of region DVD manufactured for (8cm/12cmdisc) encoded DVD software. This unit play only Video CD (VCD) (8cm/12cmdisc) Notes Audio CD ? (8cm/12cmdisc) DVD discs labeled "2" on Regional or a globe visible clearly on number must match your DVD code or the disc cannot play.
Disc-related terms PBC: DVD±R/DVD±RW version 2.0 disc formats. PBC allows you to interact with the system via menus, search functions, or other DVD -R and DVD +R Playback Control (Video CD only) Playback control is available for Video CD (VCD) are two different standards for recordable DVD drives and discs. This format allows information to be recorded onto the DVD disc DVD +RW and DVD -RW once.
Front Panel POWER Switches the player ON and OFF. PLAY(N) playback. Starts OPEN/CLOSE(Z) STOP(x) Stops playback. Opens Disc or closes the disc tray. Tray Insert a disc here. Remote Sensor Point the DVD Player remote control here. Display window Shows the current status of the player. Connect a Microphone jacks microphone to MIC sockets. Microphone volume control Adjusts microphone volume.
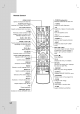
Remote Control OPEN/CLOSE Opens and closes the disc POWER Switches DVD Player tray. (DVD Player) ON and OFF. 0-9 number buttons Selects numbered items in a menu. CLEAR Removes track number on the program menu or a mark MARKER SEARCH on the a or forward. PAUSE/STEP(X) Pauses playback temporarily/ press repeatedly for frame-by-frame playback. PLAY(N) playback. Starts DVD MENU Accesses menu on a DVD disc. bBvV(left/right/up/down) Selects item in the an ENTER Confirms menu ? menu.
Installation and Setting The up the picture Setup Video and Audio Connections to Your TV Player and sound of a nearby TV, VCR, or radio may be distorted during playback. If this occurs, position the player away from the TV, VCR, or radio, or turn off the unit after removing Make sure the DVD TV and not to the disc. to the video in video cable Player Connections your TV and other equipment there are various ways you can connect the player.
Audio Connection to Connect the DVD for audio player Optional Equipment to your optional equipment output. Rear of DVD Amplifier equipped with 2-channel analog stereo or Dolby Pro Logic ll / Pro Logic: Connect the left and right AUDIO OUT jacks on the DVD player to the audio left and right IN jacks on your amplifier, receiver, or stereo system, using the audio cables (A).
On-Screen You can general playback status on the TV can be changed using the menu. on-screen display: the use the display Some items screen. To Display 1. Press DISPLAY 2. Press v / V to select Press b / B to an inputting the change the title Chapter highlighted. number). For some also functions, If no button is on-screen Playback provide all of the features pressed for 10 seconds, display disappears.
Initial LANGUAGE Settings LANGUAGE By using the Setup menu, you can make various adjustments to items such as picture and sound. You can also set a language for the subtitles and the Setup menu, among other things. For details on each Setup menu item, see pages 12 to 15. To display Menu English Language Disc Audio Original Disc Subtitle Off Disc Menu Original and exit the Menu: Press SETUP to display the Move Select A second press of menu. SETUP will take you back to initial screen.
Progressive Scan AUDIO Progressive Scan Video provides the highest quality pictures with less flickering. If you are using the Component Video jacks for connection to a TV or monitor that is compatible with a progressive scan signal, set Progressive Scan to Each DVD disc has Set the player's of audio system you Connect progressive component scan: out of the DVD player to the of your monitor/television, set your television monitor to Component Input. 1.
OTHERS The can DivX(R) PBC, Auto Play, B.L.E. and DivX(R) VOD settings be changed. You VOD DivX display the DivX DRM (Digital Rights Management) Registration code for your unit only. can OTHERS PBC Auto On Off Play B.L.E. On DivX(R) VOD Select The Select Move PBC Set Registration code is used for VOD (Video-OnDemand) service agent. You can purchase or rent an encrypt movie file. VCD Notes: Playback Control (PBC) On: Video CDs with PBC to On or Off.
LOCK (Parental Password Control) You LOCK Rating Unlock Password New Area Code US (Security Code) enter can 1. Select Password 2. Follow step "New" is Input Move that may not be suitable of these discs contain scenes Many parental control information that applies to the complete disc or to certain scenes on the disc. Movies and scenes are rated from 1 to 8, depending on the country.
Operation Playing a DVD or General Features Video CD Note: Unless stated Playback Setup Turn 1. on the TV and select the video connected to the DVD Turn 2. the on the audio input source input source player. system (if applicable) and select connected to the DVD player. Press OPEN/CLOSE to open the disc tray and load your chosen disc in the tray, with the 3. playback side down. tray.
Still Picture and Frame-by-Frame Playback Repeat You 1. 2. Press PAUSE/STEP the remote control during playback. Advance the picture frame-by-frame by pressing PAUSE/STEP repeatedly. To exit still motion on The DVD 2. player Use the SCAN (X) during playback. will (m or M) to select the speed: t 1/16, t 1/8, t 1/4, or t (backward), or T 1/16, T 1/8, T 1/4, (forward). With T 1/2 or To exit Slow Motion a desired Repeat Chapter/Title/Off chapter.
Zoom Use to zoom Press ZOOM 1. the video enlarge image. during playback or still playback to activate the Zoom function. The square frame appears briefly in the right bottom of the picture. Each press of the ZOOM button changes the TV in the sequence: 100% size → 400% size 2. screen → 1600% size → fit mode screen → the can Press when 3/4 Checking the contents of DVD discs: Menus DVDs may offer menus that allow you to access special features. To use the disc menu, press DVD MENU.
Playing Audio CD an or MP3/WMA MP3 / WMA disc limited Disc ? player can play MP3/WMA formatted recordings on CD-ROM, CD-R, or CD-RW discs. ? player is Sampling frequency: within 8 48 kHz (MP3), 48kHz (WMA) Bit rate: within 8 320kbps (MP3), 32 192kbps (WMA) The player cannot read an MP3/WMA file that has a file extension other than ".mp3" / ".wma". CD-R physical format should be ISO 9660 If you record MP3 / WMA files using software that cannot create a file system (eg.
Audio CD and MP3 / WMA Disc Random Features 1. Press RANDOM appears Pause 2. 1. Press PAUSE/STEP 2. To return to on the RANDOM menu screen. To return to normal repeatedly during playback. Random during playback. Playback begins immediately and playback, press RANDOM disappears from the until RANDOM menu screen. press playback, press PLAY, PAUSE/STEP again. ENTER or Tip: By pressing Moving Press SKIP 1. (.
5. Programmed Playback The program function enables you to store your favorite tracks from any disc in the player memory. A program 1. contain 30 tracks. can Insert Audio CD 6. MUSIC or menu 1. appears. 2. Note: Press PROGRAM again, to exit the Edit mode. Program then the mark will E disappear in normal select played once.
Viewing Using JPEG Disc a this DVD Player you view discs with JPEG can files. 1. Insert disc and close the a the TV on appears JPEG Zoom tray. The PHOTO menu screen. Use zoom (see page To rotate enlarge 18) picture photo image. JPEG picture Press v / V PHOTO the to during showing clockwise or a to rotate the picture counter clockwise.
Maintenance and Service Refer to the information in this contacting a shipping Please before the Unit Handling When chapter service technician. save the the unit original shipping carton and packing materials. If you need to ship the unit, for maximum protection, re-pack the unit as it was originally packed at the factory. the exterior surfaces clean Keeping Do not ? use near spray volatile liquids such as insecticide the unit.
Playing DivX Movie Disc a DivX disc as Using 1. this DVD Player Insert a menu appears can you disc and close the on the TV play tray. compatibility with this player is limited follows: DivX disc. ? The MOVIE Available resolution size of the DivX file is under 720x576 screen. ? The file (W x name H) pixel. of the DivX subtitle is available by 56 characters.
System Additional Features Last Scene This You must select the appropriate system mode for your system. If NO DISC appears in the display window, press and hold PAUSE/STEP for more than 5 seconds to be able to select a system (PAL, NTSC, or Memory TV memorizes last player that is viewed. The last if you even off the scene from the last disc AUTO). remains in memory the disc from the player or switch remove scene If you load scene is player.
Using VOICE: If you wish to sing a duet with the recorded karaoke singer, select a voice you the Karaoke Function 1. Load 2. Set the MIC VOL control to the minimum level to a karaoke disc. desire. prevent acoustic feedback (e.g. sound) before Connect 3. a connecting microphone Voice Select loud howling microphone. the a a microphone is not connected the karaoke menu Voice1 Voice1 V2 Voice2 Voice2 V1+V2 Voice1 Voice2 Off None voice None voice will not appear. 4. 5.
Language Codes Use this list to Disc input your desired language for the following initial settings: Audio, Disc Subtitle, Disc Menu.
Troubleshooting Possible Cause Symptom Correction No power. ? The power cord is disconnected. ? The power is on, but the DVD player does ? No disc is inserted. ? Plug the power securely. Insert picture. (Check that the DVD audio CD indicator in the not work. No disc. a cord into the wall outlet ? The TV is not set to receive DVD ? lit.) Select the appropriate mode signal output. ? window is The video cable is not connected or display video input the TV.
2.1CH Speaker System OWNER'S MANUAL MODEL NE9423P : (Sub woofer: NXW-930AT Speaker: NXS-915) Table of Contents Speakers...........................30 Antenna (Aerial) Connections 2.1 Channel Speakers . . . . Connections . . . . . . . . . . .31 .31 ConnectingtoDVDplayer...............31 Connecting to an optional equipment PresettingtheRadioStations. . . . . . . . . . . . . . . . .31 .32 ListeningtotheRadio.................32 Troubleshooting.....................
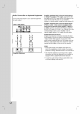
Speakers 1 1 Remote Sensor Point the subwoofer remote control here. 2 2 3 8 Display 3 7 - VOLUME Adjusts 4 window Shows the current status of the 4 - + volume of TUNING 5 speakers. + Selects the radio 5 player. frequency. MEMORY Selects and memorizes FM stations. 6 6 INPUT Selects the DVD/ AUX/ TUNER mode. 7 STANDBY/ON Switches the subwoofer ON and OFF. 8 Power indicator Lights green when the Subwoofer is turned on.
Antenna (Aerial) Connections Connect the supplied FM antenna for listening to the radio. FM external (aerial) (not supplied) antenna FM 75 FM wire antenna (supplied) Notes: ? Be ? After sure to fully 2.1 Channel Connecting 1. to DVD Player cords it as player Right AUDIO OUT to the audio left and jacks on right in jacks Connecting 1. on by matching those of the cords. To keep Connections Speakers your subwoofer (A). Connect the speakers using the (DVD) 3.
the Radio Stations Presetting You can make preset 50 stations of FM tuner. Before tuning, that you have turned down the volume to the minimum. 1. 1. Press INPUT 2. Press PRESET to select FM tuner mode. repeatedly sure Press INPUT repeatedly Select to select FM tuner mode. station you want by pressing (-)/(+) buttons on the remote control. Tuning in automatically Press TUNING (-)/(+) for more than 0.5 second. Scanning stops when the unit tunes in a station.
Troubleshooting Check the following guide for the possible of cause a problem before service. contacting Cause Symptom The audio cables No sound. are Correction not connected Connect the audio cable securely. securely. The power of the equipment connected with the audio cable is turned off. Turn Speaker cords securely. Connect them are not connected The volume control is set to MIN. Sound level is too low. Speaker correctly.
P/NO.