0 LG Life's Good User Guide Please read this manual carefully before operating your set and retain it for future reference. www.lg.
Contents Getting Started with LG webOS TV .Home . . . . Tutorial . . . . . . . . . . . . . . . . . . . . . . . . . . . . . . . . . . . . . . . . . . . . . . . . . . . . . . . . . . . . . . . . . . . . . . . . . . . . . 5. . . . . . . . . . . . . . . Home Manage . . . . . . . . . . . . . . . . . . . . . . . . . . . . . . . . . . . . . . . . . . . . . . . . . . . . . . . . . . . . . . . . . . . . . . . . . . . 6. . . . . . . . . . . . . . . Live Prepare . . . .TV . . . . . . . . . . . . . . . . . . . . . . .
Connecting External Devices .Using . . . . Home . . . . . Dashboard . . . . . . . . . . . . . . . . . . . . . . . . . . . . . . . . . . . . . . . . . . . . . . . . . . . . . . . . . . . . . . . . . . . . . . . 41 ......... . . . . . . . . . .Home Connecting . . . . .IoT . . .Devices . . . . . . . . . . . . . . . . . . . . . . . . . . . . . . . . . . . . . . . . . . . . . . . . . . . . . . . . . . . . . . . 43 ......... . . . . . . . . . .Smart Connecting . . . . .Devices . . . . . . . . . . . . . . . . . .
Troubleshooting .Perform . . . . . . Check-up . . . . . . . .with . . . .the . . Quick . . . . . Help . . . . . . . . . . . . . . . . . . . . . . . . . . . . . . . . . . . . . . . . . . . . . . . . . . . . . . .118 ......... . . . . . More Learn . . . . .About . . . . .Always . . . . . Ready . . . . . . . . . . . . . . . . . . . . . . . . . . . . . . . . . . . . . . . . . . . . . . . . . . . . . . . . . . . . .118 ......... . . . . . . . . . . . . . Power/Remote Troubleshooting . . . . . . . . . . . .
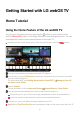
Getting Started with LG webOS TV Home Tutorial Using the Home Feature of the LG webOS TV You can open the Home screen by pressing the button on your remote control. Roll the Wheel (OK) button on the Magic Remote to scroll through the menu. You can open apps and content or use various features of the smart TV. • Standard remote control allows you to scroll through the menu with the / buttons. You can check weather information and useful TV features.
is turned on. To change the Home screen display, change the setting of Home Auto Launch in General ➔ System ➔ Additional Settings ➔ Home Settings. • • The availability of and access to Contents and Services in LGE Device are subject to change at any time without prior notice. Available features vary depending on the region or service. Manage Home Manage LG webOS TV Home You can change the order of the displayed apps or content lists by pressing the button on the remote control.
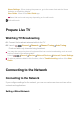
Home Settings : When turning the power on, go to the screen that sets the Home behavior or advertising display. User Guide : Move to the User Guide app. • Items that can be set may vary depending on the edit mode. ct Exits edit mode. Prepare Live TV Watching TV Broadcasting 01 Connect the broadcast antenna/cable to the TV. 02 Launch General ➔ Channels ➔ Channel Tuning ➔ Auto Tuning. Finds and adds only channels being broadcast.
01 Connect the LAN port of the TV and the router using a LAN cable. The router should be connected to the Internet beforehand. you connect the TV to the network with a LAN cable, the TV is automatically • When connected to the network if the router supports DHCP. If the Network Is Not Automatically Connected 02 Press the button on the remote control. General ➔ Network ➔ Wired Connection (Ethernet). 03 Select To see the details, click the Settings ➔ Network ➔ Wired Connection (Ethernet) in User Guide.
button on the remote control. 03 Select General ➔ Network ➔ Wi-Fi Connection. 04 When the network search is complete, the list of networks available for connection is shown. 05 Select a network to connect. If your Wireless Router is password protected, enter the password configured for the router. To see the details, click the Settings ➔ Network ➔ Wi-Fi Connection in User Guide.
• To solve a problem related to this function, refer to Troubleshooting section of the User Guide. Managing Your LG Account LG Membership You can receive customized recommendations and utilize various app services with your LG Account. In LG Account, you can sign up for LG membership with an email address. Alternatively, you can create and log in to an LG membership using the ID and password of an external service account. 01 Select General ➔ System ➔ LG Account.
Using Always Ready Using Always Ready Turning off the TV switches it to Always Ready and displays the selected screen wallpaper, and then you can use voice recognition or output sound from your smart device to the TV speaker. 01 Set the Enable the function of • General Always Ready to On. Turning this option On may increase energy consumption. 02 Press the button on the remote control. The wallpaper is displayed.
Select the screen to display with Always Ready. Clock : You can display the time and weather information of the region for which the TV is set. Weather is displayed as the local weather of the region set on the Home screen. Art Piece : You can set various art as your wallpaper. Movements : You can set various media art as your wallpaper. Moments : You can set a photo saved in a connected external device or a photo of a smart device connected to the LG ThinQ as the wallpaper.
TV is Always Ready with the screen off. The wallpaper is displayed. Using Always Ready Without Screen Wallpaper Even when the screen is off, you can play music using voice recognition or by connecting to a smart device via Bluetooth. Users can turn off only the screen in Always Ready using the below method. ● ● ● • • • Method 1. When the TV is Always Ready with the screen on, press the button on the remote control once more. Method 2. Set the Screen Off time in the Always Ready settings menu.
• • The images and information in the User Guide may differ depending on the model and operating environment. Product specifications may be changed without prior notice due to upgrade of product functions. How to Operate TV Pairing the Magic Remote Learn More about Magic Remote You can select the functions you want easily and conveniently by moving and clicking the cursor on the TV screen, just as you would use a mouse on a computer screen.
time for more than 5 seconds until instructions appear. 02 The previously registered remote control is deregistered and then registered again. Unregistering Magic Remote If you have multiple LG Smart TVs and want to register the Magic Remote currently in use to another TV, you must unregister the previous one. 01 If you press the button and the button at the same time for more than 5 seconds, the lamp on Magic Remote will blink and the registration will be canceled.
For buttons with @, please long-press (hold for more than a second). ● ● ● ● ● ● ● ● ● ● ● ● ● 9 @ : Launch Quick Help. GUIDE : Launch Guide. GUIDE @ : Checking the saved channels. 0 @ : The QUICK ACCESS edit screen appears. : Display the additional buttons on the remote control. ••• @ : Configures SAP. : Adjust the volume level. : Select to turn off the sound from the TV. : Enter the Accessibility menu. : You can change the channel. : Check out the recommended contents.
then re-appear. The pointer will disappear if you press / / / buttons, and the remote will work as a standard remote control. 04 You can control the TV by scrolling or pressing Wheel (OK) button in the middle of / / / buttons. When viewing a screen that requires scrolling, you can easily move up and down by scrolling the Wheel (OK) button. When watching a video, you can press the Wheel (OK) button to pause/play.
03 Say the feature you want. Example) Find something to watch/Channel number OO/Turn up the volume/Turn on OOO/How is the weather today?/Voice Recognition Help, etc. When the TV is off Even when the TV is off, you can use TV features through Hands-free Voice Control. Set General Always Ready to On. The Standby Light on the front of the TV will change to white. 01 When you say “Hi LG” to the TV, the Standby Light on the front of the TV will blink and the TV will produce an alert sound.
● ● ● When set to the store mode If the TV has not been turned on for more than 96 hours When pixel cleaning is running Precautions When Using Hands-free Voice Control • • • • • • • • • • Some models do not support this function. The operation may be limited depending on the country and language settings. When updating the TV, the existing functions or operations you have used may change. The Hands-free Voice Control function enables the TV body to recognize the user's voice.
\I • • • • • • • Some models may not be supported. Menu Language must be set as the official language of the country in Location to see correct search results. If Menu Language is not set as the official language, some functions may be limited. You can change the language in General ➔ System ➔ Language ➔ Menu Language. The languages available for voice recognition features may be changed in accordance with Service Operation Policy. Details of service may vary by model.
• • • The rate of speech recognition may vary depending on the characteristics of the user (voice volume, pronunciation, accent, and talking speed) and the surroundings (noise and TV volume). To achieve accurate recognition of your speech, you must pronounce words in a slow and accurate manner at an appropriate voice volume at a distance of about 10 cm (4 inches) away from the Magic Remote’s microphone.
04 If there are words similar to that which you spoke out loud, you may see a list of multiple results as shown below. If you do not get the results you want, press RETRY to try again. Select a result and it will be displayed on the text box. Cautions When Using Speech to Text • • Check the network connection before using the Speech to Text function.
• • • • - Language. To temporarily switch to another speech recognition language, press the button in the voice recognition information display window. You can use this function only when you agree to the Voice Recognition terms. The Speech to Text rate may vary depending on the user’s characteristics (voice, pronunciation, intonation and speed) and the environment (noise and TV volume).
• • • -- Press the alexa (Amazon Alexa) button on the remote control to access the settings and help information for Amazon Alexa. Different services may run in countries where Amazon Alexa is not supported. Service operation and supported countries may change in accordance with Amazon’s policies. To View More Features of the Remote Control To View More Features of the Remote Control You can control more features or external devices connected to your TV by using the buttons displayed on your TV screen.
• The types of buttons appearing on the More Actions vary, depending on the region and the type of connected device. Using Universal Remote Control Automatically Setting the Universal Remote Control When you set up the universal remote control, you can control the peripherals (Bluray/DVD player, home theater, set-top box, etc.) with the Magic Remote rather than using their dedicated remote controls. Connect the devices to be set to the TV's HDMI IN, and turn the power of the device on.
• • • • • When changing settings on a device, make sure it is powered on first. To set up a universal remote control with the latest information, connect to the network and accept the User Agreements. The manual setting feature for universal remote control is not supported for a game console. Some buttons may not work depending upon the model of the external device. Point the Magic Remote at the device you want to control.
Edit Quick Access To add Quick Acu_,c_,<, 4, :JfPSS thP Ok ~ 2 3 (D, 5 6 7 8 {) App, Help
• • on the external device. Use of any product other than those specified may cause problems during operation. To use SIMPLINK, you need to use a high-speed HDMI® cable with CEC (Consumer Electronics Control) function. The High-Speed HDMI® cable has the pin 13 for enabling information exchange between devices. To output sound from an external audio device, connect the audio device to the TV's HDMI (ARC) port with an HDMI cable. Set Sound Out to HDMI(ARC) Device and set SIMPLINK (HDMI-CEC) to On.
Press and hold the button on your remote control. In Accessibility, you can set up High Contrast, Grayscale, Invert Colors, etc. Connecting an Input Device to USB Using a USB Wired/Wireless Mouse Connect your mouse to the USB port. Use the mouse to move the pointer on the TV screen and select the menu you want. • • The right button and the special buttons on the mouse do not work.
Controller, Logitech F310, Logitech F710 Connecting Bluetooth Input Devices You can connect and use devices such as a Bluetooth-enabled keyboard, mouse, or a gamepad with your TV. To see the details, click the Settings ➔ Devices ➔ External Devices ➔ Connect Bluetooth Controller in User Guide. Enjoy Live TV Making the Most of Live Menu Using Live Menu You can use the relevant features with ease when watching TV broadcasts. Press and hold the GUIDE button on the Magic Remote.
TV Scheduler : You can set the date and time of the desired broadcasting program, and watch the program. To see the details, click the Enjoy Live TV ➔ Using TV Scheduler in User Guide. • • • • The channels displayed in Channel List are a configuration of channels provided by the broadcast service provider. Therefore, if the broadcast service provider has changed its channel configuration without notice, the channels displayed in Channel List may differ from the actual TV channels.
Select the CD button or the title of the desired program. You can view more information on the program and perform Watch/Record (only available on certain models) or Reminder/Scheduled Recording (only available on certain models), etc. You will be taken to the program list for the current date and time. Channel Manager : Launch Channel Manager. Channel Row : You can change the size of the program list to adjust the number of channels displayed on the screen. Filters : Sets the filter.
0 It displays the information about the program you are watching. Select a channel banner to enter the detailed information pop-up to see the detailed program information or run additional features related to the banner. You can view broadcast information about other channels using the / buttons. You can view broadcast information about the channel you are currently watching using the ◄► / buttons. • The features can be controlled only within the detailed information pop-up. f) Launch More Actions.
Entering Who.Where.What? Method 1. Press the Wheel (OK) button on your remote control. Press Who.Where.What? on the channel banner. Method 2. If the information is recognized while you are watching a program, a notification will appear automatically. Please click on the displayed notification. • To receive automatic recommendations, you must set Recommendation ➔ Alarm ➔ Who.Where.What? to On. General ➔ AI Service ➔ AI Method 3. It can also be used with the speech recognition feature.
0 You can use additional features such as changing the sorting options, deleting, or sharing. • • Available in Live TV or HDMI. However, some OTT devices with universal remote control settings are not supported. It is not available if you are watching an LG Channels (IP channel) or when no image is shown on the screen. Viewing Information about the Content with Who.Where.What? Press the button on the remote control and select Who.Where.What?.
• To use the sharing feature, the smart device must have the latest version of the LG ThinQ app installed on it and must be connected to the TV. Using TV Scheduler Using TV Scheduler This function is used to set the time and date for watching a specific program. on the remote control to select Live TV and view the live broadcast. 02 Press the button on the remote control and select TV Scheduler. The TV Scheduler screen will be displayed. 01 Press 0 You can set the New Reminder.
03 Select the program you want. If you want to watch a live broadcast, click the Watch button. In case of an upcoming program, click the Reminder button. • Applies to digital broadcasting. Manual Scheduling You can select the date, time, and channel to watch the channels. 01 Run Live TV by pressing 02 Press the . button on the remote control and select TV Scheduler. 03 Select the . 04 Select CREATE MANUALLY. 05 Set the date, time, and channel to watch. • Some models may not be supported.
Watching Internet Channel You can watch real-time broadcasts through this service over the Internet. You can see information on new Internet Channels or manage the channels you like in LG Channels. Press the button on the remote control and select LG Channels. You can also watch LG Channels by pressing the (Channels) /\V / buttons on the remote control. You can use the ’Interactive Channel’ service that enables users to conveniently enjoy content related to the current channel without having to switch apps.
You can install apps in a variety of categories such as games, education, and news and conveniently use them on your TV. button on the remote control. Launch Apps. Select a category or press the button to search for an app. Select an app to install. Read the details of the app and then press Install. When the installation is complete, you can run the app immediately. 01 Press the 02 03 04 05 06 0 Searches for content. To see the details, click the Apps and Content ➔ Content Search in User Guide.
Content Recommendation Content Recommendation You can get content recommendations based on the program you are watching or TV viewing patterns. If you are watching the TV using a set-top box, you must complete the setup of the universal remote control to use the recommendation feature normally. For more information, see How to Operate TV ➔ Using Universal Remote Control in User Guide. 01 Press the button on the Magic Remote. The Content Recommendation screen appears.
Content Search Searches for content by title, actor/actress, and genre. 01 Press the button on the remote control. 02 Launch . 03 Search for a variety of content and information using the desired search terms. Enter a search term. Shows recent searches. You can select one from the suggested keywords and proceed to search. You can browse content by genre. • • You must connect to the network to use the search feature.
You can select or control a device (mobile, external device, Home IoT Devices, etc.) connected to the TV. Run Home Dashboard by pressing the button on the remote control. You can also press and hold the button on Magic Remote. 0 You can check and select the external device connected through the external input port or network. Connect your mobile device to TV to share the mobile screen and enjoy the stored contents.
Automatic device discovery : Shows devices that are available for connection on the screen. Universal Control Settings : Move to the Universal Control Settings app. User Guide : Move to the User Guide app. Quit App : Turns off the app from running in the background. Closes the app. Available settings vary depending on the model or region. • Connecting Home IoT Devices Connecting Home IoT Devices You can check and control the status of the connected Home IoT Devices.
0 You can check the connection guide for each type of Home IoT Devices. You can connect and see devices registered with your LG ThinQ account or IoT devices. Once the device is connected, the card will be changed to a smaller size and appear at the bottom of the device connection list. f) Select Edit home IoT devices. Edit List : You can hide or show the connected Home IoT Devices and rearrange the list. Delete devices : You can delete the connected device. You can only delete certain devices from the TV.
02 Connect your TV and smart device to the same Wi-Fi network. You can check the Wi-Fi network of TV at General ➔ Network ➔ Wi-Fi Connection. 03 Run the LG ThinQ app installed on your smart device. 04 Follow the instructions from LG ThinQ app to connect your smart device to the TV. When your account information of LG ThinQ is linked to the TV, you can manage the IoT devices linked to your account using Home Dashboard of the TV.
'" 100% I 12:58AM Q f- 'll1 00'1, 12:58AM Q f- Remote Control TV I TV ·-------------Remote Control View All G][iJ~ [ + VOL ) l ·--------------· ·---------------· ------------· ,I Share View Other Shares > □ ·•LJ • Mirror Mobile Screen to TV ·-----------------· Apps Inputs Q ,cJll live TV HDMll • II I D ) D 0 Simple remote control operation is possible.
Some controls may be limited in external input mode. The app’s screen and functionality are subject to change without prior notice. Available features may differ depending on your country and OS. • • • Connecting Smart Devices using NFC Tagging Connecting Smart Devices using NFC Tagging Near Field Communication (NFC) is a technology that allows you to conveniently send and receive information without any separate settings.
• • • • • This feature is available for NFC-enabled smart devices only. Depending on the smart device, the NFC location may be different. For more information, refer to the user manual of the device. Features connected via NFC may differ depending on the smart device. This feature is only available if the remote control has an NFC logo. Some remote controls have on the back of the remote. Watching Smart Device Screen on TV Watching Smart Device Screen on TV 01 Enable Screen Share mode on the smart device.
• Guide for more information. If the connection fails repeatedly, turn off the TV and the device you are trying to connect. Then turn them back on and try again. Playing Sound from a Smart Device through the TV’s Speakers Playing Sound from a Smart Device through the TV’s Speakers Connect a smart device to the TV via Bluetooth to play sound from the smart device through the TV’s speakers. 01 Turn the smart device’s Bluetooth on, then select the TV from the list of devices.
• • • • • • • • • • • If you use a USB extension cable, the USB storage device may not be recognized or may not work properly. Please use only USB storage devices formatted with the FAT32, exFAT or NTFS file system provided by Windows OS. It is recommended that you use an external USB HDD with a rated voltage of 5V or less and a rated current of 500 mA or less. If you use a device requiring a higher voltage/current than the rated voltage/current, it may not operate properly due to lack of current.
03 Select a device to use from the device list. 04 Select the content to play. 0 You can select a device connected to your TV. f) Displayed only when music is playing. Press the h.l to access the Play Music screen. t) Launch Search. G View Type : Selects a content display mode. Sort : Select the option to sort content. Group : If you filter by Music, you can group content into categories such as Artist and Album. Selection Play : You can select and play multiple pieces of content.
You can use more features by pressing the viewing a photo. button on the remote control while 0 Shows the previous content. f) Starts the slide show. • Shows the next content. ct Rotates photos. 0 Enlarges or reduces the photo. 0 360-degree photos can be viewed in 360 degrees. • • Using the 360° VR Play on a normal photo may distort the image. Some models may not be supported. Plays a music file selected from the storage device as background music.
playing a video. 0 Shows the previous video. f) Plays or pauses the video. • Shows the next video. ct You can change subtitle settings. 0 Rotates videos. 0 Fast-rewinds the video at higher speeds. • You can do the settings related to play on repeat of the video. G Fast-forwards the video at higher speeds. 0 360-degree videos can be viewed in 360 degrees. • • Using the 360° VR Play on a normal video may distort the image. Some models may not be supported.
You can select a song from the Media Player app and play the song. You can use more features by pressing the button on the remote control while playing a song. 0 You can set the random play mode. f) You can set the repeat play mode. • Lyrics are available for music files that provide them. In some music files, you can choose a lyric section and move the playback position. • • The lyrics feature is only supported on some devices.
Browse the content on your PC to watch on TV (Windows 10) 01 Connect your TV and PC to the same network. 02 Right-click the file you want to play and select “Cast to Device”. 03 Select the name of the TV you want to watch from the displayed list, and playback will start on that TV. • • Even when multiple TVs or devices are connected, the selected file is played through only one device. The playback rate may vary depending on the network connection.
• • • • • • • manufacturer. Captions are only supported on some connected devices. If you have added a caption file afterward, disable the shared folder on the PC and then enable it again. The DRM files in the connected device will not play. Even for the file format supported by the TV, the supported file format may differ depending on the connected device environment. If there are too many folders or files in a folder, it may not work properly.
Then turn them back on and try again. Connect Wired 01 Connect your PC to the TV using an HDMI cable. 02 Switch the current input source to the port where the HDMI cable is connected in the Home Dashboard. 03 After the connection is established, the TV will display the screen of the connected PC. • If there is a problem with your connection, refer to Troubleshooting ➔ Troubleshooting PC Connection Issues in User Guide.
• • • You can also use this feature by pressing and holding the OK button on the standard remote control. Available features vary depending on the region or service. Some models may not be supported. Using Multi View Using Multi View You can split the screen and use two apps simultaneously. button on the remote control. on the screen. 01 Press the 02 Select 0 You can select a screen layout. Side by Side : You can view two apps on a split-screen.
Using PIP Mode 0 You can move the position of the sub-screen. f) You can change the size of the sub-screen. • You can operate the main screen. ct You can operate the sub-screen. 0 You can select the screen of which to output sound. 0 Change to Side by Side mode. 8 Closes the app. Using Side by Side Mode 0 You can operate the selected screen. f) The sound of the selected screen is output. • Change to PIP mode. ct Closes the app.
Using the Room to Room Share Using the Room to Room Share By connecting multiple TVs in your house, you can connect the video you are watching to a TV in another room or bring up the TV screen from another room. button on the remote control. 02 Run the Room to Room Share app. 03 Select Connect TV and follow the on-screen instructions to connect. 01 Press the 0 You can view the TV you are currently using. f) Enters the Edit screen. You can view the connected TV and block or delete the connection.
• • • It can only be viewed on the TV that has gotten the screen. For some broadcasts, you cannot send or bring up a screen. When bringing up a screen, the TV from which the screen is being loaded can be turned on automatically, and the screen is automatically turned off while the screen is being transmitted. Making the Most of Art Gallery Making the Most of Art Gallery You can enjoy a high-definition image provided for each theme. button on the remote control. 02 Run the Art Gallery app.
Using the Web Browser You can enter the website when you input the web address on the URL bar. If you input the search word, it will find the information about search word base on the search engine. 01 Press the button on the remote control. 02 Run the Web Browser application.
Recommended Sites may vary by country and is only available in certain countries. • The Web Browser app on your TV is a browser for TV, so it may work differently than the browser for your PC. ● ● ● ● ● ● ● ● ● • • Some contents may not be played properly. Flash Plug-in is not supported, and only HTML5 media is supported. Plug-in installation is not supported. Media in formats other than JPEG/PNG/GIF may not be played. Apps may be forced to shut down if the TV runs out of memory.
Always Show Address Bar When set to On, the address bar and menu bar area at the top will always be displayed. Automatic Web Browser Issue Report When it is set to On, if a failure (malfunction, media playback failure, page loading failure, abnormal shutdown, delay in response due to insufficient memory, etc.) occurs while using the web browser, the relevant information will be automatically sent to the web browser development team at the LG Electronics headquarters (Korea).
Cookies Settings Enables the website to store and use cookie data. Clear Browsing Data Clear Cookies : Deletes cookie data. When deleted, you are logged out of most sites. Clear All Browsing Data : Deletes all browsing history, including cookies. Connecting a Camera to the TV Connecting a Camera to the TV By connecting a camera to the TV, you can use it for video conferencing, etc. 01 Connect the camera to the USB IN port. 02 Run Home Dashboard by pressing the button on the remote control.
Using Sports Alert Using Sports Alert 01 Press the button on the remote control. 02 Run the Sports Alert app. 03 You can view the list of teams by league and detailed information. 04 Press Add to register your preferred team or player. By registering a team or player, you can view live scores and upcoming match schedules. You can receive notifications while watching TV by setting a game match alarm.
• This service is only provided for select content with contracted partners. Settings Quick Settings To Use Setting Function Quickly Displays a set of light-weight controls quickly and simply such as Picture Mode, Sound Out, Game Optimizer and so on. Press the button on the remote control. '@-<:D ,:@:<(D @<@ @~ ,g<(B i9<@ @<(I) 0~ ~<® 0 You can set the Picture Mode. ., f) You can set the Sound Mode. You can choose the Sound Out. G Directs to the Game Optimizer settings. • • Launch Multi View.
You can add/delete the quick setting items or change their order. • Move to an item that can be set up, press the remote control's Wheel (OK) button once, and then press and hold the Wheel (OK) button to move to the menu. • The configurable items differ depending upon model. Game Dashboard During a game, you can quickly change the Game Genre and check the settings status in real-time. Press the • button on the remote control.
G Launch User Guide. • The configurable items differ depending upon model. Picture Selecting Picture Mode Picture Select Mode Select the picture mode that is best suited to your viewing environment, preferences or video type. Select a picture mode. By adjusting and setting each item in more detail based on the mode, your video is better optimized for its characteristics. • The configurable items differ depending upon model.
Game Optimizer Suitable picture for gameplay. FILMMAKER MODE Provides optimized Cinema Picture quality certified by UHD Alliance, the standard setting body for UHD-related technologies. • To auto-switch to FILMMAKER MODE when a signal that can be operated with this mode is entered, set FILMMAKER MODE Auto Start to On. Expert (Bright space, daytime) / Expert (Dark space, night) This mode is suitable for movies, etc. viewed in a dark environment.
• • • • • To auto-switch to FILMMAKER MODE when a signal that can be operated with this mode is entered, set FILMMAKER MODE Auto Start to On. If an HDR/Dolby Vision video signal is input to the models that do not support the HDR/Dolby Vision technology, normal signal picture mode options will be made available. Depending upon the input signal, the available picture modes may be different. When watching online service content, the Picture Mode may be changed to match the content being shown.
• • • • The picture may get distorted while zooming in or out. Selecting a different screen size from the original size may cause the image to look different. Depending on the combination of picture format and screen size, the edges may be hidden or shown in black, or both sides of the picture may flicker. Also, when selecting an item shown on the broadcast screen, the outline may not be aligned correctly. Depending upon the input signal, the available screen sizes may be different.
• Saving ➔ Energy Saving Step and set to Off or Minimum. Depending on your TV model, it might not have the OLED Pixel Brightness setting. Adjust Contrast Adjusts the contrast of the bright and dark areas of the picture. The closer to 100, the higher the contrast will be. Black Level Adjusts the brightness of dark areas of the screen. The closer it is to 100, the lighter the screen becomes.
• Turning this option Off may increase energy consumption. Motion Eye Care Automatically adjusts brightness and reduces image blur based on image data which reduces eyestrain. • • • Turning this option Off may increase energy consumption. Depending upon the input signal or the selected picture mode, the available options may differ. The configurable items differ depending upon model.
Sets the Color Gamut to Adobe RGB standards. Fine Tune This is used when experts control it by using a test pattern. You can control it by selecting areas of six colors (Red/Green/Blue/Cyan/Magenta/Yellow). For normal images, adjustments may not result in noticeable Color changes. Color Adjustment To make the image more colorful and lively adjust the Color and saturation of the picture. Select Color From Red/Green/Blue/Cyan/Magenta/Yellow, select a tone to adjust.
Signal Level(%) Select screen brightness for color temperature adjustment. If Method is set to 10 Points Signal Level(%); you can select brightness using numbers indicating 10 levels. When the Method is set to 22 Points Signal Level(%), you can select the brightness with the 22 levels of brightness. Show brightness level at the maximum signal level(%) Adjusts the luminance of the highest 100% signal level.
Removes small dots that stand out so as to make the image clean. MPEG Noise Reduction Reduces the noise produced during the creation of digital video signals. Smooth Gradation It reduces the phenomenon that the outline of the image is rugged and in a staircase pattern and displays a smoother screen. Real Cinema Optimize display for movies. TruMotion Suitable the image quality of fast-moving pictures. ● ● ● ● ● Off : Turns off the TruMotion.
Resetting Picture Mode Picture ➔ Advanced Settings ➔ Reset If you want to reset the image settings to the factory defaults after configuring the image settings, select reset for each image mode. FILMMAKER MODE Auto Start Picture ➔ Advanced Settings ➔ FILMMAKER MODE Auto Start If set to On, Picture Mode will automatically be changed to FILMMAKER MODE when a signal that can be operated with FILMMAKER MODE is entered.
Depending on the content you watch, you can enjoy the optimized sound and virtual surround in real time. Standard Optimizes the sound for all types of content. Cinema Optimizes the sound for cinemas. Clear Voice / Clear Voice Pro Boosts voice clarity. Sports / Soccer / Cricket Optimizes the sound for sports games. • The name of the sport may differ depending on region. Music Optimizes the sound for music. Game Optimizer Optimizes the sound for gameplay.
Wirelessly connect a Bluetooth audio device to enjoy TV sound more conveniently. Refer to the user manual of the Bluetooth audio device for details on how to connect and use the device. Press to view the connected devices or any devices that can be connected and connect to any one of them. For some Bluetooth devices, the device volume can be controlled by selecting from the connection list. LG Sound Sync devices will automatically try to connect to the recently used devices when you turn the TV on.
• • • To use the WiSA speakers, you need to connect the exclusive dongle. Connection issues between the WiSA Dongle and WiSA Speaker may occur in environments with wireless interference. In this case, contact the speaker manufacturer. For more information on the purchase of WiSA authorized products, check on www.wisaassociation.org. Mobile Device If you install the LG ThinQ app on a smart device and connect it to your TV, you can use the device as a speaker for the TV.
Sound ➔ Sound Out ➔ Use External Speakers with TV Speaker Audio can be played through multiple devices simultaneously. Bluetooth Device + TV Speaker Both the internal speaker of the TV and the Bluetooth speaker can be used to output the sound at the same time or a surround sound can be used. Up to two Bluetooth devices of the same model can be connected. to connect a Bluetooth speaker. 02 Run Audio Delay to synchronize the TV's internal speaker with the Bluetooth speaker.
Dolby Atmos Sound ➔ Advanced Settings ➔ Dolby Atmos Dolby Atmos is based on the concept of audio objects. Any sound can be mixed as a single audio element, an object, that’s independently placed in three-dimensional space. Your new LG TV has been enabled with the latest Dolby Atmos sound technology. Dolby Atmos is the ultimate sound experience which creates moving audio that flows around you using TV speakers. The menu, which acts as On/Off, the default value is On.
Restores the detailed effect settings for the Standard sound mode to the initial settings. • This setting only applies to the internal speakers of the TV or HDMI (ARC) connected devices that support TV Sound Mode Share. Installation Type Sound ➔ Advanced Settings ➔ Installation Type This mode optimizes the sound based on the TV setup. Stand Select this if the TV is installed in stand-type. Wall-mounted Select this if the TV is installed in wall-mounted type.
Select HDMI Input Audio Format Sound ➔ Advanced Settings ➔ Select HDMI Input Audio Format You can set the audio format for each HDMI input. When connected to devices or content that support the latest surround sound technology, setting to Bitstream will enable you to listen to the intended sound quality. When the voice delivered through the HDMI port is not synchronized, set it to PCM.
Setting Digital Sound Output Sound ➔ Advanced Settings ➔ Digital Sound Output You can configure the Digital Sound Output settings. • This setting is only available when @ ➔ 8 ➔ Sound ➔ Sound Out ➔ Use Wired Speaker is set to Optical Out Device/HDMI(ARC) Device. • • When Pass Through is enabled, sound effects may not be output. The codec output with a device may differ from input signals.
Sound ➔ Advanced Settings ➔ eARC Support eARC is a technology that can send and receive more sound information faster thanks to its wider bandwidth than that of the conventional ARC. You can enjoy TV sound with higher quality than ARC through a connected audio device. 01 Connect an audio device that supports eARC to the HDMI (ARC) port. 02 Go to Sound Out ➔ Use Wired Speaker and choose HDMI(ARC) Device. 03 Set eARC Support to On. Always Ready Always Ready General Always Ready Set Enable the function to On.
General ➔ AI Service ➔ AI Picture Pro When set to On, artificial intelligence, which has been trained with LG Electronics’ deep learning techniques, finds the most suitable resolution according to the video type and displays it using vivid, realistic, and rich colors. • • • It is supported for only digital broadcasting, videos of a USB memory device, and HDMI video input. If Picture ➔ Select Mode is Game Optimizer, you cannot set up this feature. It does not work with copy protected content.
With the AI Acoustic Tuning feature, you can detect the space where your TV is installed using your Magic Remote’s microphone to optimize the audio of your TV for your environment. Select Start New Sound Tuning to measure the space in which the TV is installed. When the initial detection is complete, you can select your desired audio mode. ● ● ● ● • • Off : This option disables the use of AI Acoustic Tuning-adjusted audio.
Alarm Who.Where.What? You can get recommendations for the information related to the broadcast you are watching. • This feature may not be available in some countries. Smart Tips You can get an introduction to smart features you can use when watching TV or using an app. Next Picks You can get recommendations based on your TV viewing patterns. • This feature may not be available in some countries. Sports Alert Move to the Sports Alert app. You can check information about sports events and set alarms.
button on the remote control. 02 Select Game Optimizer. 03 Selecting On turns on all related settings. 01 Press the • • It only works with HDMI inputs. If you set Picture ➔ Select Mode to a mode other than Game Optimizer, some items in Game Optimizer cannot be set. • • If you turn this feature On, you cannot change some video settings items. When Game Optimizer is set to On, audio delays may occur if you set Sound Out to Bluetooth Device/WiSA Speakers/Optical Out Device/HDMI(ARC) Device.
AI Game Sound Optimizes the sound for gameplay. • When this feature is set to On, Optimizer. • This setting only applies to the internal speakers of the TV or HDMI (ARC) connected devices that support TV Sound Mode Share. Sound ➔ Select Mode is changed to Game VRR This reduces screen cracking and video lagging during game play. VRR & G-Sync NVIDIA's display adaptive sync technology adjusts frames to minimize screen tearing and stuttering.
You can fine-tune light areas. Adjust Contrast Adjusts the contrast of the bright and dark areas of the picture. Black Level Adjusts the overall screen brightness. You may use the Black Level settings specifically to set the dark part of the image. Adjust Sharpness Adjusts the sharpness of the image. Color Depth Tones down or up the colors displayed on the screen. Dynamic Tone Mapping Suitable contrast settings based on image brightness of the HDR content. Reset You can reset the settings.
General OLED Care It provides various premium care services for OLED TV users. Care Picture Settings It sets the screen mode suitable for your viewing pattern. • Picture ➔ Select Mode cannot be set while using the Care Picture Settings. Off Turns off the Care Picture Settings. Comfort Mode Displays the picture with normal contrast, brightness and sharpness levels. Theater Mode Suitable picture for movies. Kids Care Mode It adjusts the blue light to make the screen easier for children to view.
If there are no problems in the test, check the connected external device or broadcast signal. Energy Saving Reduces power consumption by adjusting peak screen brightness. Energy Saving Step ● Auto : TV sensor detects the ambient lighting and automatically adjusts the screen brightness. • ● ● Some models may not be supported. Off : Turns off the Energy Saving Step. Minimum / Medium / Maximum : Use the power saving feature according to Energy Saving Step set on TV.
It calibrates any issues that may arise on the screen when your TV has been turned on for a long time. Calibration takes more than an hour. • • Do not unplug the power cord while it is in progress. If you power on the TV, the Pixel Cleaning will stop operating. Screen Move This moves the screen slightly at regular intervals to prevent image sticking on the display panel. Adjust Logo Brightness Adjust the luminance of static images such as logos within content to correct potential picture quality issues.
Set Enable this function to On. A screen with lowered blue light is displayed for the protection of your eyes. • Using Eye Care Mode sets to On. Picture ➔ Advanced Settings ➔ Reduce Blue light Volume Limit Mode General ➔ Family Settings ➔ Volume Limit Mode Set Enable this function to On. The volume cannot be raised above a certain level for the protection of your hearing. • Volume Limit Mode may not work for audio devices connected to the optical digital/HDMI (ARC)/headphone port.
Edit Channels You can edit the selected channels from all the stored channels or add/delete them to/from the favorite channels. Edit All Channels List General ➔ Channels ➔ Channel Manager ➔ Edit All Channels You can lock or unlock the selected channels from all the stored channels or you can set them to be skipped when switching channels. 0 Lock / Unlock : Lock the selected channels or unlock the locked channels.
0 Select the desired channels from the all channels list and press the button to add them to the favorite channels list. Delete the selected channels from the favorite channels list. Move : Select one or more channels in the Preferred Channels list, press the Move button, and then select the position to move it to. The selected channels will move to the position you selected. Change Group Name : Change the name of the favorite channels list. Sort by Channel : Sorts the list of favorite channels by channel.
● ● The Live Playback function (only available on certain models) is in use. Certain other applications are in use. Network Setting a Wired Network General ➔ Network ➔ Wired Connection (Ethernet) If the router connected to the network supports the DHCP feature, connecting the TV and router by wire will automatically connects to the network. If the automatic setup is not supported, you can select Edit to manually set up the network connection. • Some models may not be supported.
Advanced Wi-Fi Settings Once you connect to a wireless network you can view connection information such as detailed IP address information. In addition, you can change the IP address and DNS server address you want to connect to by pressing the Edit button. • For more information on how to connect to the network, see Getting Started with LG webOS TV ➔ Connecting to the Network in User Guide.
Connect Bluetooth Controller You can connect and use devices such as a Bluetooth-enabled keyboard, mouse, or a gamepad with your TV. Turn on the device, set it to pairing mode, and then click Connect on your TV screen. When a device you've connected before is turned on, it automatically connects to your TV. To disconnect the existing connection, click Disconnect. • • • • • • • It is recommended that you use a product that has been tested for compatibility with LG TVs.
• • • • the feature. Turn on via Bluetooth is only available on some smartphones. The TV must be plugged in. To connect for the first time make sure the device to be used is ready to connect. Some models may not be supported. Delete Connection History You can delete the connection history of the devices connected to the TV on the wireless network. Setting HDMI External Input General ➔ Devices ➔ HDMI Settings You can apply settings to ensure a clear picture and easy control for the HDMI connected devices.
YCbCr 4:4:4 1) - - RGB 4:4:4 1) - - 4K @ 100/120 Hz Support Format (120 Hz models only) Resolution 3840 × 2160p 4096 × 2160p Frame rate (Hz) 50 59.
To see the details, click the How to Operate TV ➔ Connecting to SIMPLINK (HDMICEC) in User Guide. System Configuring Language Settings General ➔ System ➔ Language You can choose the menu language displayed on the screen and the audio language of the digital broadcast. Menu Language You can select one of the menu languages to be displayed on the screen. The language for the speech recognition will be automatically set to the selected language for the menu.
This function is used to set the broadcast location of the TV by entering your zip code. LG Services Country If you haven't selected Set Automatically, you can select the country manually. • • You must set the country manually when you are not connected to the network. The configurable items differ depending upon model. Time & Timer General ➔ System ➔ Time & Timer You can check the time or configure related settings.
● can be set only when Input is set to TV. Volume : Set audio volume to use when the power is turned on. Power Off Timer Set Power Off Timer to On. The TV is turned off at the set time. ● ● Time : Set the time at which to turn the TV off. Timer Repeat : Set the day of the week. Set the option to None to operate the feature only once.
● ● ● ● • under 14.) TV-MA (Adults Only. Not suitable for children under 17.) Sexually Suggestive Dialogue : TV-PG or TV-14 Adult Language (Violent Language) : TV-PG, TV-14 or TV-MA Sexual Situations (Sexually Explicit) : TV-PG, TV-14 or TV-MA Violence : TV-PG, TV-14 or TV-MA The configurable items differ depending upon model. Movie Lock Blocks films that are broadcast and contain inappropriate content, based on the Motion Picture Association of America (MPAA) rating.
You can lock or unlock the Inputs. Reset Password Set or change the password for the TV. • The default password is set as “0000”. Resetting a Lost Password If you lose the password you set, you can reset it as follows: button on the remote control. 02 Select General System Safety. (Channels) (Channels) (Channels) 03 Press (Channels) on the remote control. The master password input window will appear. 04 Enter the numbers “0313” in the master password input window, then press Enter.
TV Rating French Select Canadian French Rating System. ● ● ● ● ● ● ● • E : Exempt G : All ages admitted 8+ : Children aged 8 or older 13+ : Suitable for 13 years and over 16+ : Suitable for 16 years and over 18+ : Adults only Off : View all programs The configurable items differ depending upon model. Downloadable Rating This function is only enabled when the TV receives the Region5 rated data. The name of the rating option may differ. • Supported only in the digital mode.
button on the remote control. 02 Select General System ➔ Safety. (Channels) (Channels) (Channels) 03 Press (Channels) on the remote control. The master password input window will appear. 04 Enter the numbers “0313” in the master password input window, then press Enter. The password will be reset. 01 Press the Managing Your LG Account In LG Account, you can use your email address to create a new LG account. For more information, see Getting Started with LG webOS TV ➔ Managing Your LG Account in User Guide.
General ➔ System ➔ Additional Settings ➔ Home Settings Home Auto Launch You can set Home to launch automatically when turning on the TV. Home Promotion You can turn on or off the advertisements on the Home screen. • The configurable items differ depending upon model. To Set Power Indicator General ➔ System ➔ Additional Settings ➔ Standby Light You can turn the standby light on or off. • Some models may not be supported.
Reset AD ID User interest information is newly collected, and advertisements are provided according to the information. • Some models may not be supported. Using the Live Plus Live Plus is a service that provides a variety of information about the programs you watch. To see the details, click the Making the Most of Smart TV ➔ Live Plus in User Guide. • Some models may not be supported.
General ➔ System ➔ Reset to Initial Settings Return TV to its initial settings. After reset, the TV will automatically turn off and on. Reset All All items on the TV are changed to their default settings. Reset all except network settings All items except the network settings are changed to their default settings. • • • If Safety is set to On; you should type the password to Reset to Initial Settings. Do not turn off the power during initialization.
• Setting the Audio Guidance to On automatically switches the TV Power Sound (only available on certain models) to On as well. TV Power Sound General ➔ Accessibility ➔ TV Power Sound This feature lets you turn on/off the sound effects that you hear when your TV is switched on or off. • • Some models may not be supported. Setting the Audio Guidance to On automatically switches the TV Power Sound to On as well.
General ➔ Accessibility ➔ Invert Colors To enhance the visibility of the menus on the screen, you can invert and calibrate certain colors in some menus. Set to On. To Set Closed Caption General ➔ Accessibility ➔ Closed Caption View closed captions when the TV station provides closed captioned programming. Closed caption broadcasting is only available for digital/analog broadcasts. Change Closed Caption to On and select caption setting.
Uses software update to check and obtain the latest version. Auto Update When it is set to On, updates are automatically made without a separate confirmation procedure except for some important updates. Check for Updates When checking for the latest update version, you can perform updates only if an update file of a later version is available. The TV automatically checks your software version but, if necessary, you can perform a manual check. • • • • • The configurable items differ depending upon model.
Perform Check-up with the Quick Help Perform Check-up with the Quick Help When the TV malfunctions, you can get help to solve the problem. Press button on the remote control and select Support ➔ Quick Help. You can also long-press the number 9 button of the remote control to run the Quick Help. Optimization Settings You can automatically check the overall status of your TV and view and change the recommended setting values.
What is the difference between Always Ready and the power off? Unlike the power off, you can operate the TV with Hands-free Voice Control, connect Bluetooth, and receive responses from a reserved Home IoT Devices. However, standby power may be consumed more than when the power is turned off. mu How can I use Always Ready? • • Set the Enable the function of General ➔ Always Ready to On. When watching TV Press the button on the remote control to switch to Always Ready with the screen on.
For more information on Hands-free Voice Control, please refer to How to Operate TV ➔ Using TV features with Hands-free Voice Control in User Guide. Troubleshooting Power/Remote Control Issues Troubleshooting Power/Remote Control Issues If you experience any of the problems below while using the product, please check the following. There may not be a problem with the product. I cannot turn on the TV. • Check that the power Standby Light on the TV is red.
I cannot turn the TV on with the remote control. • Please make sure your TV power plug is correctly connected to the outlet. Replace the batteries in the remote control. (Use alkaline batteries.) Check if there is an obstacle blocking the signal in front of the TV's remote control receiver. If there is an obstacle, such as a soundbar, in front of the receiver at the bottom of the TV, it may interfere with the remote control signal reception.
Self-diagnosis to check for any abnormalities in the TV. If you are using a set-top box, turn it off, and then turn it back on. Make sure that the set-top box is correctly connected to your TV. It says there is no signal on the screen. • Check whether the antenna or the cable connected to the external device is properly connected to the TV. Go to to choose the connected input. Check if your external device, such as set-top box or Blu-ray player, is turned on. (12D I cannot see some channels.
There is a difference in image quality from those seen at the store. • Depending on the type of video provided by the broadcasters, there may be a difference in image quality from those displayed at the store. Run Screen Self-diagnosis first. If it is normal, there may be a problem with the broadcast signal. (12D A digitally broadcasted program stops or its screen is broken. • This happens when a signal is weak or reception is unstable. Adjust the antenna direction or check the cable connection.
Switch Motion Eye Care to Off. This applies to the current input mode only. General ➔ OLED Care ➔ Device Self Care ➔ Energy Saving Switch Energy Saving Step to either Off or Minimum. Picture ➔ Advanced Settings ➔ Reduce Blue light Switch Reduce Blue light to Off. ULTRA HD video does not display. With some HDMI cables, signals may not be received. Change the settings of the connected device to the supported signal.
• Adjust the balance as necessary with the Navigation button in Balance. When you are connecting to the AV IN, check if the audio left/right (white/red) cables are correctly connected. (AV IN port is available in certain models only.) The TV sound is not synchronized with the picture, or the sound sometimes breaks up. • If this happens on only some of the channels, it may be caused by the broadcasting company’s transmission signal.
following. There may not be a problem with the product. The screen remains blank after it is connected to a PC. • Check that the PC is properly connected to the TV. Turn the TV off and back on using the remote control. Restart the PC with the TV on. Make sure that the output resolution set on the PC is set to the HDMI-PC supported resolution of the TV. To use dual monitors, check that the PC or notebook supports dual-monitor mode. Reconnect the high speed HDMI cable.
Information ➔ Supported Video File Formats in the User Guide. (llj) I cannot find a file in the Media Player. • • Check whether the files saved on your USB storage device can be read by the PC. Check that the file extension is supported. Change the filter to All. (llj) I see a message that says the file is not supported. • Check that the file plays without any problems on the video player on a PC. (Check for file damage.) Check that the file extension is supported.
• • If subtitles encoding is incorrectly set, subtitles may not be displayed properly. Press the button on the remote control during video playback actions. Select and change the Code Page value. If you play a video file stored on another device by using the content sharing feature, subtitles may not be available depending on the program you use. Subtitles are not supported if you are playing video through an NAS unit. Consult your NAS manufacturer.
• • CUD Check the connection status of the TV, AP (Router) and Cable Modem. Power off and power on in the following order; 1. Turn your cable modem off and back on, and wait for the device to reset. 2. Turn the wired/wireless router off and back on, and wait for the device to reset. 3. Turn the TV off and on. If you want to establish a wired LAN connection check whether an IP address can be obtained from your router properly.
consult your router’s manufacturer or your Internet service provider. Troubleshooting LG Account Issues Troubleshooting LG Account Issues signed up for the membership on TV. Do I have to sign up again on the website mu I’ve (www.lgappstv.com)? • You can use the website with the membership information that you used when signing up on TV. mu I forgot my password. What should I do? On the TV's login screen, select the FORGOT PASSWORD? button to go to the find password page.
02 Select Account Management for the account you wish to set up. 03 Select Usage Data Management. 04 Pressing DELETE will delete the usage history. (nj) I wish to close my account on the TV. You can also close your LG account on the TV as follows. General ➔ System ➔ LG Account. 02 Select Account Management for the account you wish to set up. 03 Select Terminate My Account. 04 Enter your password and press OK to close your account. 01 Select • In some countries, access to the website (www.lgappstv.
Troubleshooting Internet Browser Issues Troubleshooting Internet Browser Issues If you experience any of the problems below while using the product, please check the following. There may not be a problem with the product. CUD Some parts of a particular website are not visible when I am using the Internet. • • • • The Web Browser supports only HTML5 media, it does not support Flash Plug-in. The Web Browser does not support plug-in installation.
Supported Photo File Formats Supported Photo File Formats File Format jpeg, jpg, jpe Format JPEG Resolution png PNG Minimum : 64 × 64 Maximum : 5760 (W) × 5760 (H) bmp BMP Minimum : 64 × 64 Maximum : 1920 (W) × 1080 (H) avif, heic, heif AVIF/HEIF Minimum : 64 × 64 Maximum : 4800 (W) × 3600 (H) 9600 (W) × 7200 (H) (8K models only) Minimum : 64 × 64 Maximum Normal Type : 15360 (W) × 8640 (H) Progressive Type : 1920 (W) × 1440 (H) Supported Video File Formats Supported Video File Formats Maximum D
● ● ● HFR video (HFR support models only) HEVC 3840 × 2160@120P Main/Main10@L5.2 Maximum 60Mbps Dolby Vision video (Dolby Vision support models only) HEVC 3840 × 2160@60P Main/Main10@L5.1 Maximum 50Mbps HEVC 7680 × 4320@60P Main/Main10@L6.1 Maximum 100Mbps (8K models only) 8K video (8K models only) AV1 7680 × 4320@60P HEVC 7680 × 4320@60P Main/Main10@L6.1 Maximum 100Mbps VVC 7680 × 4320@60P Supported External Subtitles smi, srt, sub (MicroDVD, SubViewer 1.0/2.
3gp 3g2 Video H.264/AVC, MPEG-4 Audio AAC, AMR-NB, AMR-WB Video MPEG-2, MPEG-4, H.264/AVC, VP8, VP9, HEVC, AV1 Audio Dolby Digital, Dolby Digital Plus, AAC, PCM, MPEG-1 Layer I, II, MPEG-1 Layer III (MP3) ts trp tp mts Video H.
Some codecs can be supported after a software upgrade. • • • • • Extension Codec mkv/mp4/ts Video H.264/AVC, HEVC Audio Dolby Digital, Dolby Digital Plus, AAC Only Window Media Audio V7 and later are supported. The AAC main profile is not supported. Video files created by some encoders may not be played. Video files in a different format than specified may not be played properly. Video files stored on a USB storage device that does not support High Speed may not be played properly.
ogg wma flac • Support PCM Channels mono, stereo Bit rate 64 kbps ~ 320 kbps Sample freq. 8 kHz ~ 48 kHz Support Vorbis Channels mono, stereo Bit rate 128 kbps ~ 320 kbps Sample freq. 8 kHz ~ 48 kHz Support WMA Channels up to 6 ch Bit rate - Sample freq. 8 kHz ~ 96 kHz Support FLAC Channels mono, stereo The number of supported channels may vary depending upon the sample frequency.
HDMI-DTV Supported Mode Resolution Horizontal Frequency (kHz) Vertical Frequency (Hz) 640 × 480p 31.46 59.94 31.5 60 31.46 59.94 31.5 60 720 × 576p 31.25 50 1280 × 720p 37.5 50 44.95 59.94 45 60 28.12 50 33.71 59.94 33.75 60 26.97 23.97 27 24 28.12 25 33.71 29.
1920 × 1080p (ULTRA HD, 8K models only) 2560 × 1080p 4) 5) (ULTRA HD, 8K models only) 3840 × 2160p (ULTRA HD, 8K models only) 33.75 30 56.25 50 67.43 59.94 67.5 60 112.5 100 134.86 119.88 135 120 66 60 131.74 120 53.94 23.97 54 24 56.25 25 67.43 29.97 67.5 30 112.5 50 134.86 59.
3840 × 2160p 1) 2) 3) (ULTRA HD, 8K models only) 4096 × 2160p (ULTRA HD, 8K models only) 4096 × 2160p 1) 2) 3) (ULTRA HD, 8K models only) 7680 × 4320p 2) (8K models only) 225 100 269.73 119.88 270 120 53.94 23.97 54 24 56.25 25 67.43 29.97 67.5 30 112.5 50 134.86 59.94 135 60 225 100 269.73 119.88 270 120 107.89 23.
131.87 29.97 132 30 220 50 263.74 59.94 264 60 1) Supported when HDMI Deep Color is set to 4K. 2) Supported when HDMI Deep Color is set to 8K. 3) (ULTRA HD models only) Only some HDMI input ports are supported. 4) Supported when Wide Aspect Ratio is set to 21:9. 5) Supported when Wide Aspect Ratio is set to 32:9. Supported Resolution : HDMI-PC HDMI-PC Supported Mode Resolution Horizontal Frequency (kHz) Vertical Frequency (Hz) 640 × 350 31.46 70.09 720 × 400 31.46 70.08 640 × 480 31.
1024 × 768 48.36 60 1152 × 864 54.34 60.05 1360 × 7683) 47.71 60.01 1280 × 1024 63.98 60.02 1920 × 1080 67.5 60 1920 × 1080 (ULTRA HD, 8K models only) 134.86 119.88 135 120 66 60 131.74 120 2560 × 14401) (ULTRA HD, 8K models only) 182.99 119.99 3840 × 1080 5) (ULTRA HD, 8K models only) 66.62 60 137.25 120 3840 × 1600 4) (ULTRA HD, 8K models only) 99.41 60 3840 × 2160 (ULTRA HD, 8K models only) 53.94 23.97 54 24 56.
3840 × 2160 1) (ULTRA HD, 8K models only) 4096 × 2160 (ULTRA HD, 8K models only) 4096 × 2160 1) (ULTRA HD, 8K models only) 67.43 29.97 67.5 30 112.5 50 134.86 59.94 135 60 225 100 269.73 119.88 270 120 53.94 23.97 54 24 56.25 25 67.43 29.97 67.5 30 112.5 50 134.86 59.
7680 × 4320 2) (8K models only) 269.73 119.88 270 120 107.89 23.97 108 24 110 25 131.87 29.97 132 30 220 50 263.74 59.94 264 60 1) Supported when HDMI Deep Color is set to 4K. 2) Supported when HDMI Deep Color is set to 8K. 3) Supported when HDMI Deep Color is set to Off. 4) Supported when Wide Aspect Ratio is set to 21:9. 5) Supported when Wide Aspect Ratio is set to 32:9. • Supported HDMI-PC port may differ by model. Refer to the manual that is provided with the product.
Supported licenses may differ by model. Dolby Manufactured under license from Dolby Laboratories. Dolby, Dolby Vision, Dolby Vision IQ, Dolby Audio, Dolby Atmos, and the double-D symbol are trademarks of Dolby Laboratories Licensing Corporation. HDMI The terms HDMI and HDMI High-Definition Multimedia Interface, and the HDMI Logo are trademarks or registered trademarks of HDMI Licensing Administrator, Inc. in the United States and other countries.
www.lg.com -LG 1 lllllllll lllll ll lll lllll llllllilllllllllllll l llll llllll ll l ll ll:lll lll.
1 3 2 /
\
G] [fil . ..i••------0:::...C . ( =! ANTI:NNA/ • www.lg.com/us/support OPTICAL DIGITAL AUDIOOLIT ENGLISH r~ Easy 1V Connect Guide (Animation) ~ ~ [a~] CABLE IN ·•·- -·• 1~~~1 .... HDMIIN eARC/ARC ~=----------•-=§] ~ ESPANOL Gufa Rapida de Conexi6n del televisor (S61o en Ingles) I FRAN~IS O 0 QI 1~.,,,,11~ Guide simplifie pour la connexion du televiseur (Offert en anglais seulement) ra GB- ~~~ 1~~11~ I~ QI I~ Ql/iffiJ J 0 sit @8 • 9LG ~-, l.
el m ...: (I . m,m, (I, ID,IJ, (J : m, C) : m ' ..-..I.I) 90• ~ m mm (inches / pulgadas / po) kg (lbs /libras /lb) ► . . . 90~ .... ··IIJ I I (lbs/ libras / lb) (lbs / libras / lb) Power consumption MODELS m '"" MODELOS m m 8 (I m Cl m Consumo de potencia Consommation ~ u e MODELES 0 LEDSSG2 PUA 1,222 (48.1) 1 222 (48,1) 703 (27.6) 703 (27,6) 27.2 (1.0) 27,2 (1,0) 452 (17.7) 452 (17,7) 129 (5.0) 129 (5,0) 13 (0.5) 13 (0,5) 17.1 (37.6) 17,1 (37,6) 1.2 (2.
_index ENGLISH www.lg.com OWNER’S MANUAL Safety and Reference Printed in Korea Copyright © 2022 LG Electronics Inc. All Rights Reserved. Please read this manual carefully before operating your set and retain it for future reference. OLED55G2PUA OLED65G2PUA OLED77G2PUA OLED77Z2PUA OLED83G2PUA Supplier`s Declaration of Conformity The model and serial number of the product are located on the back and on one side of the product. Record them below in case you ever need service. Model Serial No.
Important Safety Instruction •• •• •• •• •• •• •• •• •• Read these instructions. Keep these instructions. Heed all warnings. Follow all instructions. Do not use this apparatus near water. Clean only with dry cloth. Do not block any ventilation openings. Install in accordance with the manufacturer’s instructions. Do not install near any heat sources such as radiators, heat registers, stoves, or other apparatus (including amplifiers) that produce heat.
Warning! Safety instructions CAUTION RISK OF ELECTRIC SHOCK DO NOT OPEN CAUTION: TO REDUCE THE RISK OF ELECTRIC SHOCK DO NOT REMOVE COVER (OR BACK). NO USER SERVICEABLE PARTS INSIDE. REFER TO QUALIFIED SERVICE PERSONNEL. The symbol is intended to alert the user to the presence of uninsulated dangerous voltage within the product’s enclosure that may be of sufficient magnitude to constitute a risk of electric shock to persons.
•• If any of the following occur, unplug the product immediately and contact your local customer service. -- The product has been damaged. -- If water or another substance enters the product (like an AC adapter, power cord, or TV). -- If you smell smoke or other odors coming from the TV -- When lightning storms or when unused for long periods of time. Even the TV is turned off by remote control or button, AC power source is connected to the unit if not unplugged in.
Mounting to the Wall •• Do not apply foreign substances (oils, lubricants, etc.) to the screw parts when assembling the product. (Doing so may damage the product.) •• If you install the TV on a stand, you need to take actions to prevent the product from overturning. Otherwise, the product may fall over, which may cause injury. •• Do not use any unapproved items to ensure the safety and lifespan of the product. •• Any damages or injuries by using unapproved items are not covered by the warranty.
Precautions for Safety (Except for OLW480B, LSW440B) •• Professional installers should read this manual carefully to ensure proper installation. •• Professional installers should forward this manual to customers after installation and encourage them to read and store it in a convenient place for future reference. After reading the installation manual, keep it in a convenient place for future reference. •• Ask a professional installer appointed by the store for installation of the product.
•• When tightening screws, tighten until fully snug. Avoid using excessive force when tightening the screws. Doing so may damage the wall and product or reduce the rigidity or performance of the product. •• Avoid installing a TV that exceeds the specified tensile load, and do not allow any external force to be applied to the product. •• Avoid accidents by using work tools with care during installation.
Antenna/Cable Connect an antenna, cable, or cable box to watch TV while referring to the following. The illustrations may differ from the actual items and an RF cable is optional. Copper wire (For example) •• Use cable management systems to arrange the cables at the bottom of the TV as shown below. Cable managements are not provided with the product, so purchase them separately. •• After installing the product, be sure to use it adhered to the wall.
Connections You can connect various external devices to the TV. For more information on external device’s connection, refer to the manual provided with each device. HDMI •• When connecting the HDMI cable, the product and external devices should be turned off and unplugged. •• Supported HDMI Audio format (Depending upon model): True HD (48 kHz), Dolby Digital / Dolby Digital Plus (32 kHz / 44.1 kHz / 48 kHz), PCM (32 kHz / 44.
Specifications Product specifications may be changed without prior notice due to upgrade of product functions. Estimated yearly energy consumption indicated on the FTC label is measured in accordance with the Test Procedures for Television Sets (USA only). The actual energy consumption depends on the usage environment (The content watched, TV settings, etc.). •• For information of the power supply and power consumption, refer to the label attached to the product.
Product Information Wireless module(LGSBWAX12)Specifications Wireless LAN (IEEE 802.11a/b/g/n/ac/ax) Frequency range Output Power (Max.) 2,400 to 2,472 MHz 17 dBm 5,150 to 5,725 MHz 15 dBm 5,725 to 5,850 MHz 15 dBm 5,945 to 7,125 MHz (Only USA) 11 dBm Bluetooth Frequency range Output Power (Max.) 2,400 to 2,483.5 MHz 9 dBm As band channels can vary per country, the user cannot change or adjust the operating frequency. This product is configured for the regional frequency table.
Troubleshooting Cannot control the TV with the remote control. •• Check if anything such as tape has been placed over the receiver. •• Check if there is any obstacle between the product and the remote control. •• Replace the batteries with new fresh ones. No image display and no sound is produced. •• Check if the product is turned on. •• Check if the power cord is connected to a wall outlet. •• Check if there is a problem in the wall outlet by connecting other products. The TV turns off suddenly.
Precautions for Protecting the OLED TV Screen Unlike regular LED/LCDs, OLED TVs produce images that emit light for each pixel, achieving a perfect black color and delivering clear images without blurring. Due to the nature of the organic materials used to achieve high-resolution image quality, OLED displays generally experience image retention on the screen, which can be a persistent phenomenon.
Regulatory ----- 14
(1) (2) (3) (4) NOTE TO CABLE/TV INSTALLER (For USA and Canada) This reminder is provided to call the CATV system installer’s attention to Article 820-40 of the National Electric Code (U.S.A.). The code provides guidelines for proper grounding and, in particular, specifies that the cable ground shall be connected to the grounding system of the building, as close to the point of the cable entry as practical. WARNING! (STABILITY HAZARD) A television set may fall, causing serious personal injury or death.
CHILD SAFETY: PROPER TELEVISION PLACEMENT MATTERS THE CONSUMER TECHNOLOGY INDUSTRY CARES Manufacturers, retailers and the rest of the consumer technology industry are committed to making products safe and enjoyable. As you enjoy your television, please note that all televisions – new and old- must be supported on proper stands or installed according to the manufacturer’s recommendations. Televisions that are inappropriately situated on dressers, bookcases, shelves, desks, speakers, chests, carts, etc.
OWNER’S MANUAL EXTERNAL CONTROL DEVICE SETUP Please read this manual carefully before operating the set and retain it for future reference. www.lg.
2 KEY CODES ENGLISH ENG KEY CODES • This feature is not available for all models.
EXTERNAL CONTROL DEVICE SETUP • Image shown may differ from your TV. Connect the USB to Serial(RS-232C) converter/RS-232C(Serial) input jack to an external control device (such as a computer or an A/V control system) to control the product’s functions externally. Note: The type of control port on the TV can be different between model series. * Please be advised that not all models support this type of connectivity. * Cable is not provided.
USB USB IN IN 4 EXTERNAL CONTROL DEVICE SETUP (PC) (PC) (TV) (TV) RS-232C IN (CONTROL SERVICE) • You need to purchase the phone-jack to RS-232 cable required for &the connection between the PC and the TV, which is specified in the manual. RS-232C IN (PC) (PC) (CONTROL & SERVICE) * For other models, connect to the USB port. * The connection interface may differ from your TV.
EXTERNAL CONTROL DEVICE SETUP 5 • Baud rate : 9600 bps (UART) • Data length : 8 bits • Parity : None ENGLISH ENG Communication Parameters • Stop bit : 1 bit • Communication code : ASCII code • Use a crossed (reverse) cable. Command reference list (Depending on model) COMMAND1 COMMAND2 DATA (Hexadecimal) 01. Power* k a 00 to 01 02. Aspect Ratio k c (p.7) 03. Screen Mute k d (p.7) k e 00 to 01 k f 00 to 64 06. Contrast k g 00 to 64 07. Brightness k h 00 to 64 08.
6 EXTERNAL CONTROL DEVICE SETUP ENGLISH ENG Transmission / Receiving Protocol Transmission [Command1][Command2][ ][Set ID][ ][Data][Cr] [Command 1] : First command to control the TV. (j, k, m or x) [Command 2] : Second command to control the TV. [Set ID] : You can adjust the [Set ID] to choose desired monitor ID number in option menu. Adjustment range in TV is 1 to 99. If [Set ID] value is selected to ‘0’, every connected set can be controlled.
EXTERNAL CONTROL DEVICE SETUP 7 01. Power (Command: k a) ►► To control Power *On or Off of the set. Transmission[k][a][ ][Set ID][ ][Data][Cr] Data 00 : Power Off 01 : *Power On Ack [a][ ][Set ID][ ][OK/NG][Data][x] ►► To Show TV is Power On or *Off Transmission [k][a][ ][Set ID][ ][FF][Cr] Ack [a][ ][Set ID][ ][OK][Data][x] * Similarly, if other functions transmit ‘FF’ data based on this format, Acknowledgement feedback presents status about each function. 02.
8 EXTERNAL CONTROL DEVICE SETUP ENGLISH ENG 08. Color/Colour (Command: k i) 13. Treble (Command: k r) ►► To adjust the screen Color(Colour). You can also adjust colour in the PICTURE menu. ►► To adjust treble. You can also adjust in the AUDIO menu. Transmission [k][i][ ][Set ID][ ][Data][Cr] Data Min : 00 to Max : 64 Ack [i][ ][Set ID][ ][OK/NG][Data][x] 09. Tint (Command: k j) ►► To adjust the screen tint. You can also adjust tint in the PICTURE menu.
EXTERNAL CONTROL DEVICE SETUP * Analog Antenna/Cable ►► Adjust EQ of the set.
10 EXTERNAL CONTROL DEVICE SETUP ENGLISH ENG * Analog Antenna/Cable Data 00 : Physical Channel Number - Antenna (ATV) : 02~45 (Decimal: 2 ~ 69) - Cable (CATV) : 01, 0E~7D (Decimal : 1, 14~125) [Data 01 ~ 04]: Major/Minor Channel Number Data 01 & 02: xx (Don't care) Data 03 & 04: xx (Don't care) Data 05: Input Source (Analog) - 00 : Antenna TV (ATV) - 01 : Cable TV (CATV) 2. Tune to the digital antenna (ATSC) channel 30-3.
EXTERNAL CONTROL DEVICE SETUP ►► To select input source for main picture. Transmission [x][b][ ][Set ID][ ][Data][Cr] * This feature is varied based on the model. Ack [a][ ][Set ID][ ][OK][Data 00][Data 01] [Data 02][Data 03][Data 04][Data 05] [x][a][ ][Set ID][ ][NG][Data 00][x] 21. Channel(Programme) Add/Del(Skip) (Command: m b) ►► To skip current channel(programme) for next time.
12 EXTERNAL CONTROL DEVICE SETUP ENGLISH ENG * [Data 02], [Data 03] functions depend on model and signal. * If [Data 00] is 00 (3D On), [Data 03] has no meaning. 3) When [Data 00] is 06, 07 00 : Off 01 : On * If [Data 00] is 00 (3D On) or 03 (2D to 3D), [Data 03] works when 3D Mode (Genre) is manual only.
2 1111111111111 111111 1111111111111 111111111111111 11111111111111111111111111111111111111111111 111111 1111111111111 •MFL714570112111REV01• lxs xs QJx2~ JI ► r!J [!]. . https://www.lg.
10-A 9 , _______________________ / 1Q-8 OLEDSS/65G2* ~ OLED77/83G2* - [JOG~OOOC@I 12 .... .... .... .... ' '\ \ \ I I I / .,,. ,,,, ----------- -----13 14 \ I_ _ _ _ _ _ _ _ _ _ _ / ____________ D I I I I I I I I ➔ , ___________________________ I / 15 ,,, ,,, / /
.. .. 1 ti OLED77/83G2* OLED55/65G2* , I I I :-t==H:.:::::ar.'""'-:'T '' ' 2-A ,, OLED55/65G2* ,' ' . ..... -· I I ····\~\ I ' ' '\. ,, 'I I -~ ..... --... ~ ...,.
2-B OLED77/83G2* -..'1 • \ \ .·, I \' ...q I ~_..ir::::_.--.,.• ,' I 3 ➔ .. ..
ENGLISH Using Magic Remote Control ~ e usr QUICK ACCESS c} = @ @- 0 o- @ e e- 9Note IIIIIIIII IIII IIIIII Ill llllll lllllllllllll lllll l lll lllll lllll l lll lllll lllll lllllll llll Ill 111111111111111111 * Microphone ~,oe Home Launches the last used apps. Wheel (OK) Press the center ofO button to select a menu. You can change channels by using O button. Wheel (OK) Accesses the [Magic Explorer]. You can run the [Magic Explorer] feature when the pointer color is changed to purple.
ENGLISH The descriptions in this manual are based on the buttons on the remote control. Please read this manual carefully and use the TV correctly. This remote uses infrared light. When in use, it should be pointed in the direction of the TV's remote sensor. (Some buttons and services may not be provided depending upon models or regions.) How to register the Magic Remote Control To use the Magic Remote, first pair it with your TV. 1 Put batteries into the Magic Remote and turn the TV on.
VDH01 LG Electronics U.S.A., Inc REGISTER YOUR PRODUCT ACTIVATE YOUR WARRANTY .LG □ REGISTER EASILY WITH YOUR PHONE D D ® ® Take a photo of the camera icon to the right :"l; ex UJ ..... U) Send it in: Text photo to 77228 .LG <.!) UJ er: 0 ..... 0 ::c 0.. Need help? Visit Photoregister.com/help or text HELP to 77228. ®- LGHE -® Other easy ways to register: ,r. •Jr, REGISTER ONLINE Visit https:l/www.lg.com/us/support/product-registration 0 Mr. Mrs. D Ms.
Please direct all service-related questions or comments to lgusa.com/support or call 1-800-243-0000 First-Class postage required. Post Office will not deliver without proper postage. VDH01 LG Electronics U.S.A., Inc 8 LG Electronics LG ELECTRONICS U.S.A. INC PO BOX 174355 DENVER, CO 80217-4355 .LG REGISTER YOUR PRODUCT ACTIVATE YOUR WARRANTY Thank you for purchasing an LG product.
ENGLISH MAGYAR This model has a built-in slim wall mount bracket. If you want to install a stand, you can purchase it separately through LG TV sales store and LG on line brand shop. Countries which have LG online brand shop in 2022: USA, France, Spain, Sweden, Germany, Netherlands, Austria, Switzerland, Poland, Italy, UK, Hungary, Czech, Russia, India, Egypt, Australia, Taiwan, Vietnam, Panama, Brazil, Chile, Mexico, Peru http://www.lg.com Ez a model! beepftett vekony fali rogzitokonzollal rendelkezik.
8LG Life's Good 1111111 1111111111 11111 1111111 1111111111 111 1111111111111111 1111111 * 3 8 4 0 T WL O 5 6 H * (2112-REV02) Printed in Mexico Limited Warranty- USA ONLY LG OLEO TV (Gl, G2, and 77Z2 Model) ARBITRATION NOTICE: THIS LIMITED WARRANTY CONTAINS AN ARBITRATION PROVISION THAT REQUIRES YOU AND LG TO RESOLVE DISPUTES BY BINDING ARBITRATION INSTEAD OF IN COURT, UNLESS YOU CHOOSE TO OPT OUT. IN ARBITRATION, CLASS ACTIONS AND JURY TRIALS ARE NOT PERMITTED.
PROCEDURE FOR RESOLVING DISPUTES: ALL DISPUTES BETWEEN YOU AND LG ARISING OUT OF OR RELATING IN ANYWAY TO THIS LIMITED WARRANTY OR THE PRODUCT SHALL BE RESOLVED EXCLUSIVELYTHROUGH BINDING ARBITRATION, AND NOT IN ACOURT OF GENERALJURISDICTION. BINDING ARBITRATION MEANS THAT YOU AND LG ARE EACH WAIVING THE RIGHTTO AJURYTRIAL AND TO BRING OR PARTICIPATE IN ACLASS ACTION. Definitions. For the purposes of this section, references to "LG" mean LG Electronics U.S.A., Inc.
Global Warranty .LG * .!i!.5 7jll : 1\:':! (~'El : 2\:':!) .!z!.g 7ll.l- gou ~~~'2! Af§ ~on 71~~.£1 ~~014 ~x1I:,f 4E.I-~~ III!, ..;i~~i- ~~~fAil.H. 01 .!z!.gg Ail~~ ,1DH~ :1 :X:IQ:l.£1 ,1DH:X:f0Pil'2_f Life's Good ~§-'§LI q * 1 Jahr Garantie (Europa. 2 Jahre) Falls Material oder Verarbeitung bei normaler Verwendung innerhalb des Garantiezeitraums Mangel aufweisen, wenden Sie sich an den Handler, von dem Sie das Gerat erworben haben.
* 1 anno di garanzia (Europa: 2 anni) Se ii prodotto risultasse difettoso nei materiali o nella manifattura nel corso del normale utilizzo durante ii periodo di garanzia, contattare ii rivenditore presso cui e stato effettuato l'acquisto. La garanzia e valida solo per chi ha effettuato l'acquisto del prodotto e nel paese in cui ii prodotto e stato acquistato.
AUSTRALIA& NEW ZEALAND Warranty For warranty service, please keep this warranty certifJCate and your receipt to validate proof ofpurchase.
HOW TO CLAIM To make a claim against this manufacturer's warranty, you must contact LG within one (1) year of purchase on: By telephone By post (Australia Only): Australia 1300 LG CARE (1300 54 2273) 24 Hours, 7 Days a Week Warranty Claims LG Electronics Australia PO Box 212 Horsley Park NSW 2175 New Zealand 0800 LG CARE (0800 54 2273) 7 Days, 9am-9pm When contacting LG for assistance please provide your name and address, model number, serial number, date of purchase, and a complete description of the