OWNER’S MANUAL Safety and Reference Please read this manual carefully before operating your set and retain it for future reference. OLED55GXPUA OLED55GXAUA OLED65GXPUA OLED65GXAUA *MFL71689232* (2006-REV02) OLED77GXPUA OLED77GXAUA www.lg.com Printed in Korea Copyright © 2020 LG Electronics Inc. All Rights Reserved.
Important Safety Instruction _index ENGLISH •• Read these instructions. •• Keep these instructions. •• Heed all warnings. •• Follow all instructions. •• Do not use this apparatus near water. •• Clean only with dry cloth. •• Do not block any ventilation openings. Install in accordance with the manufacturer’s instructions. •• Do not install near any heat sources such as radiators, heat registers, stoves, or other apparatus (including amplifiers) that produce heat.
Warning! Safety Instructions CAUTION: TO REDUCE THE RISK OF ELECTRIC SHOCK DO NOT REMOVE COVER (OR BACK). NO USER SERVICEABLE PARTS INSIDE. REFER TO QUALIFIED SERVICE PERSONNEL. The symbol is intended to alert the user to the presence of uninsulated dangerous voltage within the product’s enclosure that may be of sufficient magnitude to constitute a risk of electric shock to persons.
_index ENGLISH 4 •• Grounding (Except for devices which are not grounded.) -- TV with a three-prong grounded AC plug must be connected to a three-prong grounded AC outlet. Ensure that you connect the earth ground wire to prevent possible electric shock. •• Never touch this apparatus or antenna during a lightning storm. You may be electrocuted.
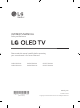
Preparing B B A A * A ≦ 8 mm (0.31 inches) * B ≦ 18 mm (0.7 inches) * C ≦ 8 mm (0.31 inches) •• Use a certified cable with the HDMI logo attached. If you do not use a certified HDMI cable, the screen may not display or a connection error may occur. •• Recommended HDMI cable types (3 m (9.84 ft) or less) -- Ultra High Speed HDMI®/™ cable _index C ENGLISH •• When the TV is turned on for the first time after being shipped from the factory, initialization of the TV may take approximately one minute.
Wall Mounting Bracket A _index ENGLISH (Depending upon model) Make sure to use screws and wall mount bracket that meet the VESA standard. Standard dimensions for the wall mount kits are described in the following table. •• Hold the side and bottom of the TV frame firmly. Make sure not to hold the transparent part, speaker, or speaker grill area.
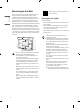
Mounting on the Table Securing TV to the Wall 1 Lift and tilt the TV into its upright position on a table. _index ENGLISH •• Leave a minimum of 10 cm (4 inches) space from the wall for proper ventilation. 10 cm 10 cm (4 inches) 10 cm 10 cm 10 cm (Depending upon model) 2 Connect the power cord to a wall outlet. • Do not apply foreign substances (oils, lubricants, etc.) to the screw parts when assembling the product. (Doing so may damage the product.
Mounting to the Wall _index ENGLISH An optional wall mount can be used with your LG Television. Consult with your local dealer for a wall mount that supports the VESA standard used by your TV model. Carefully attach the wall mount bracket at the rear of the TV. Install the wall mount bracket on a solid wall perpendicular to the floor. If you are attaching the TV to other building materials, please contact qualified personnel to install the wall mount.
Before Installation (Except for OLW480B) •• Do not use the product for any purpose other than installing the TV on a wall. •• Avoid product damage and safety accidents caused by careless installing or use of improper or unauthorized wall mount. •• Follow the instructions in the installation manual for a convenient installation of the wall mount. •• Immediately discontinue installation and contact the service center if you cannot fully understand the installation process.
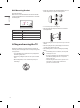
Securing TV to the Wall (Except for OLW480B) (For installation on concrete wall) 1 Drill holes in anchor locations with a drill bit of Ø 8 mm to a depth of 80 mm (3.15 inches) to 100 mm (3.94 inches). _index ENGLISH 2 Clean the drilled holes. •• Please use the TV close to the wall after installation. How to fix anchors and screws (Except for OLW480B) Please make sure that: •• Check that the material and thickness of the wall and finishing material comply with the installation manual.
(For installation on wood stud) Use the Ø 4 mm drill bit for wood to drill holes with the depth of 76 mm (2.9 Inches). (Clean the drilled hole.) 76 mm / (2.9 Inches) You can connect various external devices to the TV. For more information on external device’s connection, refer to the manual provided with each device. ENGLISH Drywall Connections _index Antenna/Cable Connect an antenna, cable, or cable box to watch TV while referring to the following.
HDMI _index ENGLISH •• When connecting the HDMI cable, the product and external devices should be turned off and unplugged. •• Supported HDMI Audio format (Depending upon model): True HD (48 kHz), Dolby Digital / Dolby Digital Plus (32 kHz, 44.1 kHz, 48 kHz), PCM (32 kHz, 44.
Using Button You can simply operate the TV functions, using the button. _index ENGLISH Basic functions Power On (Press) Power Off1 (Press and Hold) Menu Control (Press2) Menu Selection (Press and Hold3) 1 All running apps will close. 2 You can access and adjust the menu by pressing the button when TV is on. 3 You can use the function when you access menu control. Adjusting the menu When the TV is turned on, press the the Menu items using the button. button one time. You can adjust Turns the power off.
Using Magic Remote Control _index ENGLISH The descriptions in this manual are based on the buttons on the remote control. Please read this manual carefully and use the TV correctly. When the message [Magic Remote battery is low. Please change the battery.] is displayed, replace the batteries. To install batteries, open the battery cover, replace batteries (1.5 V AA) matching the and ends to the label inside the compartment, and close the battery cover.
User Guide How to register the Magic Remote Control For more information about this TV, read the USER GUIDE embedded in the product. How to deregister the Magic Remote Control Press the (BACK) and (HOME) buttons at the same time, for five seconds, to unpair the Magic Remote with your TV. * Press and hold the button for more than 5 seconds to disconnect and re-register the Magic Remote at the same time. • It is recommended that an Access Point (AP) be located more than 0.2 m (0.65 ft) away from the TV.
Abnormal Display _index ENGLISH •• If the TV feels cold to the touch, there may be a small flicker when it is turned on. This is normal; there is nothing wrong with TV. Some minute dot defects may be visible on the screen, appearing as tiny red, green, or blue spots. However, they have no adverse effect on the TV’s performance. Avoid touching the screen or holding your finger(s) against it for long periods of time. Doing so may produce some temporary distortion effects on the screen.
Specifications ENGLISH Product specifications may be changed without prior notice due to upgrade of product functions. Estimated yearly energy consumption indicated on the FTC label is measured in accordance with the Test Procedures for Television Sets (USA only). The actual energy consumption depends on the usage environment (The content watched, TV settings, etc.). _index •• For information of the power supply and power consumption, refer to the label attached to the product.
Open Source Software Notice Information _index ENGLISH To obtain the source code under GPL, LGPL, MPL, and other open source licenses, that is contained in this product, please visit http:// opensource.lge.com. In addition to the source code, all referred license terms, warranty disclaimers and copyright notices are available for download.
Important Information for Preventing Image Retention •• Still images or fixed images containing certain information that are displayed uninterrupted on the screen, such as channel numbers, station logos, program titles, news or movie subtitles, and headlines. •• Fixed menu or icons for video game consoles or broadcasting set-top boxes. •• Black bars shown on the left, right, top, or bottom of the screen, such as in images with a 4:3 or 21:9 ratio.
Regulatory _index ENGLISH ----- 20
WARNING! (3) (4) •• Using cabinets or stands recommended by the manufacturer of the television set. •• Only using furniture that can safely support the television set. •• Ensuring the television set is not overhanging the edge of the supporting furniture. •• Not placing the television set on tall furniture (for example, cupboards or bookcases) without anchoring both the furniture and the television set to a suitable support.
_index ENGLISH 22
_index ENGLISH CHILD SAFETY: PROPER TELEVISION PLACEMENT MATTERS THE CONSUMER ELECTRONICS INDUSTRY CARES • Manufacturers, retailers and the rest of the consumer electronics industry are committed to making home entertainment safe and enjoyable. • As you enjoy your television, please note that all televisions – new and old- must be supported on proper stands or installed according to the manufacturer’s recommendations.
Supplier’s Declaration of Conformity Trade Name LG Responsible Party LG Electronics USA, Inc. Address 1000 Sylvan Ave Englewood Cliffs, NJ 07632 Telephone (201)266-2215 The model and serial number of the product are located on the back and on one side of the product. Record them below in case you ever need service. Model Serial No. LG Customer Information Center For inquires or comments, visit www.lg.
OWNER’S MANUAL EXTERNAL CONTROL DEVICE SETUP Please read this manual carefully before operating the set and retain it for future reference. www.lg.
2 KEY CODES ENGLISH ENG KEY CODES • This feature is not available for all models.
EXTERNAL CONTROL DEVICE SETUP • Image shown may differ from your TV. Connect the USB to Serial(RS-232C) converter/RS-232C(Serial) input jack to an external control device (such as a computer or an A/V control system) to control the product’s functions externally. Note: The type of control port on the TV can be different between model series. * Please be advised that not all models support this type of connectivity. * Cable is not provided.
USB USB IN IN 4 EXTERNAL CONTROL DEVICE SETUP (PC) (PC) (TV) (TV) RS-232C IN (CONTROL SERVICE) • You need to purchase the phone-jack to RS-232 cable required for &the connection between the PC and the TV, which is specified in the manual. RS-232C IN (PC) (PC) (CONTROL & SERVICE) * For other models, connect to the USB port. * The connection interface may differ from your TV.
EXTERNAL CONTROL DEVICE SETUP 5 • Baud rate : 9600 bps (UART) • Data length : 8 bits • Parity : None ENGLISH ENG Communication Parameters • Stop bit : 1 bit • Communication code : ASCII code • Use a crossed (reverse) cable. Command reference list (Depending on model) COMMAND1 COMMAND2 DATA (Hexadecimal) 01. Power* k a 00 to 01 02. Aspect Ratio k c (p.7) 03. Screen Mute k d (p.7) k e 00 to 01 k f 00 to 64 06. Contrast k g 00 to 64 07. Brightness k h 00 to 64 08.
6 EXTERNAL CONTROL DEVICE SETUP ENGLISH ENG Transmission / Receiving Protocol Transmission [Command1][Command2][ ][Set ID][ ][Data][Cr] [Command 1] : First command to control the TV. (j, k, m or x) [Command 2] : Second command to control the TV. [Set ID] : You can adjust the [Set ID] to choose desired monitor ID number in option menu. Adjustment range in TV is 1 to 99. If [Set ID] value is selected to ‘0’, every connected set can be controlled.
EXTERNAL CONTROL DEVICE SETUP 7 01. Power (Command: k a) ►► To control Power *On or Off of the set. Transmission[k][a][ ][Set ID][ ][Data][Cr] Data 00 : Power Off 01 : *Power On Ack [a][ ][Set ID][ ][OK/NG][Data][x] ►► To Show TV is Power On or *Off Transmission [k][a][ ][Set ID][ ][FF][Cr] Ack [a][ ][Set ID][ ][OK][Data][x] * Similarly, if other functions transmit ‘FF’ data based on this format, Acknowledgement feedback presents status about each function. 02.
8 EXTERNAL CONTROL DEVICE SETUP ENGLISH ENG 08. Color/Colour (Command: k i) 13. Treble (Command: k r) ►► To adjust the screen Color(Colour). You can also adjust colour in the PICTURE menu. ►► To adjust treble. You can also adjust in the AUDIO menu. Transmission [k][i][ ][Set ID][ ][Data][Cr] Data Min : 00 to Max : 64 Ack [i][ ][Set ID][ ][OK/NG][Data][x] 09. Tint (Command: k j) ►► To adjust the screen tint. You can also adjust tint in the PICTURE menu.
EXTERNAL CONTROL DEVICE SETUP * Analog Antenna/Cable ►► Adjust EQ of the set.
10 EXTERNAL CONTROL DEVICE SETUP ENGLISH ENG * Analog Antenna/Cable Data 00 : Physical Channel Number - Antenna (ATV) : 02~45 (Decimal: 2 ~ 69) - Cable (CATV) : 01, 0E~7D (Decimal : 1, 14~125) [Data 01 ~ 04]: Major/Minor Channel Number Data 01 & 02: xx (Don't care) Data 03 & 04: xx (Don't care) Data 05: Input Source (Analog) - 00 : Antenna TV (ATV) - 01 : Cable TV (CATV) 2. Tune to the digital antenna (ATSC) channel 30-3.
EXTERNAL CONTROL DEVICE SETUP ►► To select input source for main picture. Transmission [x][b][ ][Set ID][ ][Data][Cr] * This feature is varied based on the model. Ack [a][ ][Set ID][ ][OK][Data 00][Data 01] [Data 02][Data 03][Data 04][Data 05] [x][a][ ][Set ID][ ][NG][Data 00][x] 21. Channel(Programme) Add/Del(Skip) (Command: m b) ►► To skip current channel(programme) for next time.
12 EXTERNAL CONTROL DEVICE SETUP ENGLISH ENG * [Data 02], [Data 03] functions depend on model and signal. * If [Data 00] is 00 (3D On), [Data 03] has no meaning. 3) When [Data 00] is 06, 07 00 : Off 01 : On * If [Data 00] is 00 (3D On) or 03 (2D to 3D), [Data 03] works when 3D Mode (Genre) is manual only.
MANUAL DEL USUARIO CONFIGURACIÓN DE DISPOSITIVOS DE CONTROL EXTERNOS Lea atentamente este manual antes de poner en funcionamiento el equipo y consérvelo para futuras consultas. www.lg.
2 CÓDIGOS DE TECLA ESPAÑOL ESP CÓDIGOS DE TECLA • Esta función no está disponible en todos los modelos.
CONFIGURACIÓN DE DISPOSITIVOS DE CONTROL EXTERNOS 3 • Es posible que la imagen que se muestra no sea exactamente igual a la de su TV. Conecte el conector de entrada USB a Serial (RS-232C) / RS-232C (Serial) a un dispositivo de control externo (como una computadora o un sistema de control A / V) para controlar externamente las funciones del producto. Nota: El tipo de puerto de control de la TV puede variar según la serie de los modelos.
USBIN IN USB 4 CONFIGURACIÓN DE DISPOSITIVOS DE CONTROL EXTERNOS (PC) RS-232C RS-232C IN IN (CONTROL • Para realizar la conexión entre la PC y la TV, que se especifica en &&elSERVICE) manual, debe comprar el cable de (CONTROL SERVICE) conector telefónico a RS-232. (PC) (TV) * Para otros modelos, conecte al puerto USB. * Es posible que la interfaz de conexión no sea exactamente igual a la de su TV.
CONFIGURACIÓN DE DISPOSITIVOS DE CONTROL EXTERNOS 5 • Velocidad en baudios : 9600 bps (UART) • Longitud de datos: 8 bits • Paridad: Ninguna • Bit de parada: 1 bit • Código de comunicación: código ASCII • Use un cable cruzado (reversa). Lista de referencia de comandos (según el modelo) COMANDO 1 COMANDO 2 01. Encendido* k 02. Relación de Aspecto a Datos (Hexadecimal) 00 a 01 k c (página 7) 03. Silencio de k pantalla d (página 7) e 00 a 01 f 00 a 64 g 00 a 64 04. Silencio de k volumen 05.
6 CONFIGURACIÓN DE DISPOSITIVOS DE CONTROL EXTERNOS ESPAÑOL ESP Protocolo de Transmisión/Recepción Transmisión [Comando1][Comando2][ ][ID del televisor][ ][Dato][Cr] [Comando 1] : Primer comando para controlar la TV. (j, k, m o x) [Comando 2] : Segundo comando para controlar la TV. [ID del televisor] : Puede ajustar [ID del televisor] para elegir el número de ID del monitor que desea en el menú de opciones. El rango de ajuste en la TV es de 1 a 99.
CONFIGURACIÓN DE DISPOSITIVOS DE CONTROL EXTERNOS 7 01. Potencia (Comando: k a) ►►Para controlar el encendido o apagado del dispositivo.
8 CONFIGURACIÓN DE DISPOSITIVOS DE CONTROL EXTERNOS ESPAÑOL ESP 07. Brillo (Comando: k h) ►►Para ajustar el brillo de la pantalla. También puede ajustar el brillo en el menú IMAGEN. Transmisión [k][h][ ][ID del televisor][ ][Dato] [Cr] Datos Mín. : 0 0 a Máx.: 64 Ack [h][ ][ID del televisor][ ][OK/NG][Dato][x] 08. Color (Comando: k i) ►►Para ajustar el Color de la pantalla. También puede ajustar el color en el menú IMAGEN. Transmisión [k][i][ ][ID del televisor][ ][Dato] [Cr] Datos Mín. : 0 0 a Máx.
CONFIGURACIÓN DE DISPOSITIVOS DE CONTROL EXTERNOS Transmisión [x][u][ ][ID del televisor][ ][Dato] [Cr] Datos Mín. : 0 0 a Máx.: 64 Ack [u][ ][ID del televisor][ ][OK/NG][Dato][x] 17. ISM Method (Método de ISM) (Comando: j p) (solo en televisores plasma) ►►Para controlar el método de ISM. También puede ajustar el Método de ISM en el menú OPTION. Transmisión [j][p][ ][ID del televisor][ ][Dato] [Cr] Datos Mín.
10 CONFIGURACIÓN DE DISPOSITIVOS DE CONTROL EXTERNOS ESPAÑOL ESP ID del televisor = Todo = 00 Datos 00 & 01 = Datos de canal es 1000 = 03 E8 Datos 02 = Satélite de TV digital = 40 Resultado = ma 00 03 E8 40 Ack [a][ ][ID del televisor][ ][OK][Dato 00] [Dato 01][Dato 02][x][a][ ][ID del televisor][ ] [NG][Dato 00][x] • Para los modelos de Corea del Sur, América del Norte, América Latina, excepto Colombia. ►►Para sintonizar los canales en el siguiente número físico/mayor/menor.
CONFIGURACIÓN DE DISPOSITIVOS DE CONTROL EXTERNOS 2. Sintonizar el canal BC (ISDB-BS) 30. ID del televisor = Todo = 00 Datos 00 = No conoce Físico = 00 Datos 01 & 02 = Mayor es 30 = 00 1E Datos 03 & 04 = No importa = 00 00 Datos 05 = TV BC Digital = 07 Total = ma 00 00 00 1E 00 00 07 * Esta función varía según el modelo. Ack [a][ ][ID del televisor][ ][OK][Dato 00] [Dato 01][Dato 02][Dato 03][Dato 04][Dato 05] [x][a][ ][ID del televisor][ ][NG][Dato 00][x] 21.
12 CONFIGURACIÓN DE DISPOSITIVOS DE CONTROL EXTERNOS ESPAÑOL ESP * Si [Dato 00] es 01 (3D apagado) o 02 (3D a 2D), [Dato 01], [Dato 02] y [Dato 03] no son relevantes. * Si [Dato 00] es 03 (2D a 3D), [Dato 01] y [Dato 02] no son relevantes. * Si [Dato 00] es 00 (3D encendido) o 03 (2D a 3D), [Dato 03] funciona solo cuando el modo 3D (género) es manual. * Es posible que todas las opciones del patrón de 3D ([Datos 01]) no estén disponibles según la transmisión/señal de video.