ENGLISH OWNER’S MANUAL DVD MINI HI-FI AUDIO Please read this manual carefully before operating your set and retain it for future reference. MODEL OM7550D *MFL68982111* OM7550D-FB.DPHLLLK_FULL BOOK_ENG_MFL68982111.indd 1 www.lg.
Getting Started Safety Information 1 CAUTION Getting Started RISK OF ELECTRIC SHOCK DO NOT OPEN CAUTION: TO REDUCE THE RISK OF ELECTRIC SHOCK DO NOT REMOVE COVER (OR BACK) NO USER-SERVICEABLE PARTS INSIDE REFER SERVICING TO QUALIFIED SERVICE PERSONNEL.
Getting Started 3 This device is equipped with a portable battery or accumulator. Safety way to remove the battery or the battery from the equipment: Remove the old battery or battery pack, follow the steps in reverse order than the assembly. To prevent contamination of the environment and bring on possible threat to human and animal health, the old battery or the battery put it in the appropriate container at designated collection points. Do not dispose of batteries or battery together with other waste.
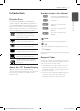
Table of Contents Table of Contents 1 Getting Started 2 Connecting 2 6 6 7 7 7 7 7 8 8 8 8 9 10 11 12 Safety Information Unique Features Accessories Introduction – Playable Discs – About the “7” Symbol Display – Symbols Used in this Manual – Regional Codes Playable file Requirement – Music file requirement – Photo file requirement – Video file requirement Remote control Top panel Front panel Rear panel 13 15 15 15 16 17 17 17 18 18 19 Use of Tripod Connecting the Power cord Connections to Your TV
Table of Contents 4 Operating 24 24 25 25 26 Using the Home Menu Basic Operations Playback Effect – AUTO DJ Using a BLUETOOTH® wireless technology – Listening to music of a BLUETOOTH device Radio Operations – Listening to the radio – Improving poor FM reception – Presetting the Radio Stations – Deleting all the saved stations – Deleting a saved station Sound adjustment – Setting the sound mode – Setting the USER EQ Advanced Operations – Displaying Disc Information on-screen – To display the DVD Menu – T
Getting Started Unique Features 1 BLUETOOTH® Accessories Please check and identify the supplied accessories. Getting Started Listens to music stored on your Bluetooth device. Portable In Listens to music from your portable device. (MP3, Notebook, etc.) Remote Control (1) Battery (1) Power cord (1) FM Antenna (1) LG Sound Sync Controls volume level of this unit by the remote control of your LG TV that is compatible with LG Sound Sync.
Getting Started Introduction Playable Discs DVD-VIDEO (8 cm/12 cm disc) Discs such as movies that can be purchased or rented. DVD±R (8 cm/12 cm disc) Video mode and finalized only. DVD-RW (8 cm/12 cm disc) Video mode and finalized only. DVD+R: Video mode only Supports the double layer disc also. DVD+RW (8 cm/12 cm disc) Video mode and finalized only. Audio CD: Music CDs or CD-R/CDRW in music CD format that can be purchased.
Getting Started Playable file Requirement 1 Getting Started Music file requirement MP3/ WMA file compatibility with this unit is limited as follows : yy Sampling frequency : within 32 to 48 kHz (MP3), within 32 to 48 kHz (WMA) yy Bit rate : within 32 to 320 kbps (MP3), 40 to 192 kbps (WMA) yy Support Version : v2, v7, v8, v9 yy Maximum files : Under 999 yy File extensions : “.mp3”/ “.
Getting Started Remote control B OPEN/CLOSE : Opens and closes the disc tray. m INFO/DISPLAY : Accesses OnScreen Display. n HOME : Displays the [Home Menu]. DISC MENU : Accesses the menu on a DVD disc. • • • • • • b • • • • • • W/S/A/D (up/ down/ left/ right) : Used to navigate on-screen displays. PRESET +/- : Selects programme of Radio. TUNING +/- : Tunes in the desired radio station. b ENTER : Acknowledges menu selection. Presetting the radio stations.
Getting Started Top panel *1 1 Getting Started *2 a 1/! POWER ON/OFF d USB Port : You can play or record sound files by connecting the USB device. HOME : Goes to Home menu. ENTER / SET : Acknowledges menu selection. Presetting the radio stations. USB REC / DEMO - Records to USB. - Shows Demo mode. *1 - Display window b LIGHTING : Turns on/off the lighting effects. FUNCTION : Selects the function and input source. ECHO VOLUME/CONTROL : Adjusts echo volume. LG EQ : Chooses sound impressions.
Getting Started 11 Front panel 1 Getting Started B a Disc tray d Remote sensor b MIC 1 e MIC 2 c PORT. IN f B : Opens and closes the disc tray. OM7550D-FB.DPHLLLK_FULL BOOK_ENG_MFL68982111.
Getting Started Rear panel 1 Getting Started a ANTENNA (FM) b AUX IN (L/R) AUX OUT (L/R) c HDMI OUT d Power cord >>Caution yy Connect the power cord to wall outlet directly if possible. Or when you use an extension cable, it is highly recommended to use an extension cable of 110 V / 15 A or 230 V / 15 A, otherwise the unit may not operate properly because of the lack of power supply. yy Do not overload the extension cord with excessive electrical load. OM7550D-FB.DPHLLLK_FULL BOOK_ENG_MFL68982111.
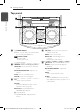
2 Connecting Connecting Use of Tripod You can mount the unit on a tripod. The tripod is an optional purchase. 13 3. Tighten up the Hand screw on the bottom of the unit. B >>Caution yy Extend the tripod legs as much as possible and tighten up the screw securely. yy Before connecting with the unit, you must set up the tripod completely to prevent shaking. 2 Connecting 1. Unfold the tripod on a flat surface. And then fix the tripod. Tighten up the tightening part of the tripod. 2.
Connecting ,,Note yy If you use a tripod, use the tripod only for speaker. yy Before buying a tripod, check the specifications for maximum bearing load of the center column. (Unit’s net weight : about 22.7 kg) ,,Note yy You should limit people around the unit while using this unit with tripod. Otherwise it may result in malfunction and causing personal injury or property damage. yy Standing on the stool to reach unit control panel is risky and might lead to injuries.
Connecting Connecting the Power cord 1. Connect the power cord to the unit. 2. Plug the power cord into an outlet. 15 Connections to Your TV HDMI Out Connection Unit 2 Connecting If you have a HDMI TV or monitor, you can connect it to this unit using a HDMI cable (Type A, High Speed HDMI™ Cable). Connect the HDMI OUT jack on the unit to the HDMI IN jack on a HDMI compatible TV or monitor. Set the TV’s source to HDMI (refer to TV’s Owner’s manual).
Connecting >>Caution yy Changing the resolution when the connection has already been established may result in malfunctions. To solve the problem, turn off the unit and then turn it on again. 2 Connecting yy When the HDMI connection with HDCP is not verified, TV screen is changed to black or green screen or the snow noise may occur on the screen. In this case, check the HDMI connection, or disconnect the HDMI cable. Resolution Setting The unit provides several output resolutions for HDMI OUT.
Connecting Optional Equipment Connection 17 AUX OUT Connection Connect an input of auxiliary device to the AUX OUT (L/R) connector. If your device has only one input for audio(mono), connect it to the left audio jack on the unit. AUX IN Connection Connect an output of auxiliary device (Camcorder, TV, Player, etc) to the AUX IN (L/R) connector. 2 Connecting If your device has only one output for audio (mono), connect it to the left audio jack on the unit.
Connecting PORT. IN Connection USB Connection Connect an output (earphone or line out) of portable device (MP3 or PMP etc) to the PORT. IN connector. Connect a USB device (or MP3 player, etc.) to the USB ports on the unit. USB device B 2 Connecting Portable cable ,,Note Removing the USB device from the unit : MP3 player etc. Listening to music from your portable player or external device 1. Choose a different function/mode or press Z STOP on the remote control or I on the unit twice in a row.
Connecting 19 Compatible USB Devices Antenna Connection yy MP3 Player : Flash type MP3 player. Connect the supplied FM antenna for listening to the radio. yy USB Flash Drive : Devices that support USB2.0 or USB1.1. yy The USB function of this unit does not support some USB devices. Connect the FM wire antenna to the FM antenna connector. USB device requirement yy Devices which require additional program installation connected to a computer, are not supported.
System Setting Adjust the setup settings By using the Setup menu, you can make various adjustments to items such as picture and sound. To display and exit the Setup menu 1. Press n HOME. Displays the [Home Menu]. You can also set a language for the subtitles and the Setup menu, among other things. For details on each Setup menu item, see pages 20 to 23.
System Setting Language Menu Language Select a language for the Setup menu and on screen display. Disc Audio / Disc Subtitle / Disc Menu Select the language you prefer for the audio track (disc audio), subtitles, and the disc menu. [Original] Refers to the original language in which the disc was recorded. To select another language, press numeric buttons and then b ENTER to enter the corresponding 4-digit number according to the language code list on the page 45.
System Setting Audio Lock (Parental Control) DRC (Dynamic Range Control) Initial Setting the Area Code: Make the sound clear when the volume is turned down (Dolby Digital only). Set to [On] for this effect. When you use this unit for the first time, you have to set the Area Code. HD AV Sync 3 Sometimes Digital TV encounters a delay between picture and sound.
System Setting 23 Password You can enter or change password. 1. Select [Password] on the [Lock] menu and then press D. 2. Press b ENTER. 3. Input a password and press b ENTER. To change the password, press b ENTER when the [Change] option is highlighted. Input a password and press b ENTER. Enter it again and press b ENTER to verify. 4. Press n HOME to exit the menu. ,,Note If you forget your password, you can clear it using the following steps: 3 System Setting 1.
Operating Using the Home Menu 1. Press n HOME. Displays the [Home Menu]. 2. Select an option by using AD. 3. Press b ENTER then selected option menu. [Music] – Displays [MUSIC] menu. [Movie] – Start video media’s playback or displays the [MOVIE] menu. [Photo] – Displays [PHOTO] menu. [Setup] – Displays the [Setup] menu. 4 ,,Note Operating You can not select the [Music], [Movie] or [Photo] option when the USB device is not connected or a disc is not inserted. Basic Operations 1.
Operating 25 To Do this Selecting Press 0 to 9 numerical buttons on a track/file the remote control to go to the directly desired file or track directly. Playback Effect AUTO DJ Auto DJ blends the end of one song into the beginning of another for seamless playback. It equalizes volume across tracks/files for uninterrupted playback. Press AUTO DJ on the remote control repeatedly, the display changes as followings.
Operating Using a BLUETOOTH® wireless technology About BLUETOOTH Bluetooth is wireless communication technology for short range connection. The sound may be interrupted when the connection interfered by the other electronic wave or you connect the Bluetooth in the other rooms. Connecting individual devices under Bluetooth wireless technology does not incur any charges.
Operating 27 ,,Note yy The sound may be interrupted when the connection interfered by the other electronic wave. yy You cannot control the Bluetooth device with this unit. yy Pairing is limited one Bluetooth device per one unit and multi-pairing is not supported. yy Depending on the type of the device, you may not be able to use the Bluetooth function. yy You can enjoy wireless system using phone, MP3, Notebook, headset, etc. yy When not connected the Bluetooth, “BT READY” appears on the display window.
Operating Radio Operations Presetting the Radio Stations Be sure that FM antenna is connected. (Refer to page 19) Before tuning, make sure to turn down the volume. Listening to the radio 1. Press P FUNCTION until FM appears in the display window. The last received station is tuned in. 2. Auto tuning : Press and hold TUNING(-/+) on the remote control or Y/U on the unit for about two seconds until the frequency indication starts to change, then release. Scanning stops when the unit tunes in a station.
Operating 29 Sound adjustment Setting the sound mode This system has a number of pre-set surround sound fields. You can select a sound mode you want by using SOUND EFFECT on the remote control. The displayed items for the Equalizer may be different depending on sound sources and effects. On Display Description NATURAL You can enjoy comfortable and natural sound.
Operating Advanced Operations Displaying Disc Information on-screen You can display various information about the disc loaded on-screen. 1. Press m INFO/DISPLAY to show various playback information. The displayed items differ depending on the disc type or playing status. 2. You can select an item by pressing WS and change or select the setting by pressing AD. Title – Current title number/ total number of titles. Chapter – Current chapter number/ total number of chapters. Time – Elapsed playing time.
Operating ,,Note yy The resume point may be cleared when a button is pressed (for example; 1 (POWER), B OPEN/CLOSE, etc). yy This function may not work on some disc or title/track. Changing subtitle code page y - Optional If the subtitle is not displayed properly, you can change the subtitle code page to view the subtitle file properly. 1. During playback, press m INFO/DISPLAY to display the On-Screen display. 2. Use WS to select the [Code Page] option. 3. Use AD to select desired code option. 4.
Operating Viewing a PHOTO file About help menu in the full screen Menu Buttons Operation Menu m INFO/ DISPLAY Displaying the Option menu. a/d Prev./ Next A/D Moving to another file. x BACK Returning to the [Photo] menu. i This unit can play discs with photo files. 1. Select [Photo] on the [Home Menu] and press b ENTER. Moving to the previous or next file list. x List Options while viewing a photo You can use various options during viewing a photo in full screen. 1.
Operating 33 Recording to USB ,,Note 1. Connect the USB device to the unit. yy You can check the recording percentage rate for the USB record on the screen during the recording. (Audio CD or MP3/ WMA CD only) 2. Select a mode in which you want to record. Playback a sound source first. yy During recording MP3/WMA, there is no sound. 3. Start the recording by pressing X REC. yy When you stop recording during playback, the file that has been recorded at that time will be stored.
Operating Other Operations Sleep Timer Setting Press SLEEP one or more times to select delay time between 10 and 180 minutes, after the unit will turn off. To check the remaining time, press SLEEP. To cancel the sleep function, press SLEEP repeatedly until “SLEEP 10” appears, and then press SLEEP once again while “SLEEP 10” is displayed. ,,Note You can check the remaining time before the Unit turns off. Press SLEEP The remaining time appears in the display window.
Operating 35 CHILDSAFE Mode VOCAL FADER This function helps to prevent you from being surprised when you turn on the unit in case that the volume of the unit is set at a high level. You can enjoy the function as karaoke, by reducing singer vocal of music in the various source. (MP3/ WMA/ CD/ etc.) Press the VOCAL FADER, and “FADE ON” will appear in display window. To turn on CHILDSAFE mode, press and hold ENTER / SET on the unit when the volume of the unit is “MIN”.
Operating LIGHTING MODE The function is to create a Club like atmosphere by operating speaker lighting. 1. Press LIGHTING on the unit. The mode changes each time you press it : OFF VOLCANO POLICE THUNDER PSYCHE CAOS OFF ,,Note yy Lighting function is available in all functions. yy Lighting mode retains its previous mode when you first press LIGHTING, press again to change modes. Setting the Clock 1. Turn the unit on. 2. Press and hold CLOCK on the unit. 3.
Operating 37 Using your player as an alarm clock Auto power down 1. Turn the unit on. This unit will be off itself to save electric consumption in the case main unit is not connected to external device and is not used for 20 minutes. So does this unit after six hours since Main unit has been connected to other device using analog input. 2. Press and hold ALARM. 3. Rotate MIC VOLUME/CONTROL knob on the unit to change the hours and minutes and press ALARM to save. 4.
Operating AUTO POWER On Auto function change This unit automatically turns on by an input source : LG TV or Bluetooth This unit recognizes input signals such as Bluetooth and LG TV and then changes suitable function automatically. If you try to connect your Bluetooth device, this unit turns on and connects your Bluetooth device. You can play your music. ,,Note yy Depending on the connected device, this function may not operate.
Operating 39 LG Sound Sync You can control some functions of this unit by your TV’s remote control with LG Sound Sync. It is compatible with the LG TV that is supported LG Sound Sync. Make sure of the LG Sound Sync logo on your TV. Controllable function by LG TV’s remote control : Volume up/down, mute Refer to the TV’s instruction manual for the details of LG Sound Sync. ,,Note yy You can also use the remote control of this unit while using LG Sound Sync.
5 Troubleshooting 40 Troubleshooting Troubleshooting Problem Cause & Solution yy Turn off the power of this unit and the connected external device (TV, Woofer, DVD-player, Amplifier, etc.) and turn it on again. The unit does not work properly. yy Disconnect the power cord of this unit and the connected external device (TV, Woofer, DVD-player, Amplifier, etc.) and then try connecting again. yy Previous setting may not be saved when device power is shut off. yy The power cord is not plugged in.
Troubleshooting Problem 41 Cause & Solution yy The antenna is positioned or connected poorly. Connect the antenna securely. Radio stations cannot be tuned in properly. yy The signal strength of the radio station is too weak. Tune to the station manually. yy No stations have been preset or preset stations have been cleared (when tuning by scanning preset channels). Preset some radio stations, see page 28 for details. yy The remote control is too far from the unit.
6 Appendix 42 Appendix Controlling a TV with the Supplied Remote Control You can control your TV using the buttons below. By pressing You can 1 (TV POWER) Turn the TV on or off. AV/INPUT Switch the TV’s input source between the TV and other input sources. PR/CH W/S Scan up or down through memorized channels. VOL +/– Adjust the volume of the TV ,,Note 6 Setting up the remote to control your TV You can operate your TV with the supplied remote control.
Appendix 43 Maintenance Notes on Discs Handling Discs Handling the Unit When shipping the unit Please save the original shipping carton and packing materials. If you need to ship the unit, for maximum protection, re-pack the unit as it was originally packed at the factory. Keeping the exterior surfaces clean yy Do not use volatile liquids such as insecticide spray near the unit. yy Wiping with strong pressure may damage the surface.
Appendix Area Code List Choose an area code from this list.
Appendix 45 Language code List Use this list to input your desired language for the following initial settings: [Disc Audio], [Disc Subtitle] and [Disc Menu].
Appendix Trademarks and Licenses All other trademarks are trademarks of their respective owners. Manufactured under license from Dolby Laboratories. Dolby and the double-D symbol are trademarks of Dolby Laboratories. Notes on Copyrights yy This product incorporates copyright protection technology that is protected by U.S. patents and other intellectual property rights.
Appendix 47 General specifications General Power requirements Refer to the main label. Refer to the main label. Power consumption Networked standby : 0.4 W (If all network ports are activated.) Dimensions (W x H x D) 430 mm x 665 mm x 468 mm Net Weight (Approx.) 22.7 kg Operating temperature 5 °C to 35 °C (41 °F to 95 °F) Operating humidity 60 % Bus Power Supply (USB) 5 V 0 500 mA Inputs / Outputs HDMI OUT (video/audio) 19 pin (Type A, HDMI™ Connector ) AUX OUT 2.
OM7550D-FB.DPHLLLK_FULL BOOK_ENG_MFL68982111.