PORTABLE CD PLAYER OWNER’S MANUAL MODEL : PCD-M700 PCD-M710 PCD-M710B PCD-M710R Before connecting, operating or adjusting this product, please read this instruction booklet carefully and completely.
Precautions CAUTION RISK OF ELECTRIC SHOCK DO NOT OPEN CAUTION:TO REDUCE THE RISK OF ELECTRIC SHOCK DO NOT REMOVE COVER (OR BACK) NO USER SERVICEABLE PARTS INSIDE. REFER SERVICING TO QUALIFIED SERVICE PERSONNEL.
Table of Contents Precautions . . . . . . . . . . . . . . . . . .2 Table of Contents . . . . . . . . . . . . . .3 Before Use . . . . . . . . . . . . . . . . . . .4 Control Names and Locations .5-7 Main Unit . . . . . . . . . . . . . . . . . . . .5 Function Display Window . . . . . . .6 Remote Control . . . . . . . . . . . . . . .7 Preparations Before Operation Battery Installations . . . . . . . . . . . 8 NiMH 1.2V Battery . . . . . . . . . . . . .8 1.5V Cell . . . . . . . . . . . . . . . . . . . .
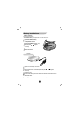
Before Use Handling the unit Notes on Discs When shipping the unit Handling discs The original shipping carton and packing materials come in handy. For maximum protection, re-pack the unit as it was originally packed at the factory. Do not touch the playback side of the disc. Hold the disc by the edges so that fingerprints will not get on the surface. Do not stick paper or tape on the disc. To keep the surfaces clean Do not use volatile liquids, such as insecticide spray, near the unit.
Control Names and Locations Main Unit Open switch POWER on button/ PLAY button/ PAUSE button/ Forward/ Backward SKIP, SCAN button. POWER off/ STOP button Volume control button Earphone/ Remote Control Connection jack( ) LINE OUT (Auxiliary output) jack : Connect the LINE OUT jack on the unit to an Auxiliary input jack on the external speaker or other audio unit. DC power adaptor connection jack (DC IN 4.
Control Names and Locations Function Display Window For the MP3 CD urrent track number - Total track number. Audio level indicators. Indicates current E.Q. (Equalizer) mode. (See page 22) Indicates elapsed time and stop mode. Indicates ID3 Tag mode is set to on. Disc type indicator. This product only plays MP3 disc, WMA disc and Audio CD. Volume level indicator. Repeat indicator. (See page 21). Bit rate indicator. Indicates Hold function active. (See page 10). Indicates sleep time is set.
Control Names and Locations Remote Control - POWER On / PLAY / PAUSE button - Forward/ Backward SKIP, SCAN button. - Button to move to the next screen or the previous screen in the Menu mode POWER Off / STOP button SEL.(Select) button MENU button RPT.(Repeat) A-B button Function Display Window (See page 6) +VOL. button: To move to the upper part in the Menu mode or to adjust volume up. Earphone Connection jack VOL.- button: To move to the lower part in the Menu mode or to adjust volume up.
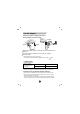
Battery Installations NiMH 1.2V Battery * The NiMH battery compartment is inside main unit. Open the NiMH battery compartment cover. Insert two NiMH batteries (1.2V, 1450mA) with correctly. , aligned Close the cover. 1.5V Cell Open the 1.5V battery case cover. Insert optional two 1.5V batteries(size AA) with correctly. and aligned Close the cover. Connect the battery case to the DC IN 4.5V terminal of the main unit as described above.
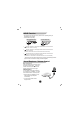
Use AC Adaptor Use the AC adaptor to supply power source. The AC adaptor is only for AC 230V. Booster AC 230V 3.5mm AC 110V Plug the AC adaptor power cord into the DC IN 4.5V terminal on the main unit. An other plug the AC adaptor power cord into an operating 230V AC outlet. > When using AC 110V area, use a booster. > Use only the supplied AC adaptor or epuivalent (4.5V, 600mA, 3.5mm) Time to use cell NiMH 1.2V (2EA) Exterior alkaline cell 1.
HOLD Function * This function locks the main unit to prevent it from operating when you accidentally press a button. * Unlock it before operating. Side of Remote Control Button of main unit > Indicator appears on the display window while the hold function of the remote control is working. > Indicator appears on the display window while the hold function of main unit is working. (However, the buttons on the remote control can be worked.
Basic Play Playable Disc: CD-DA, CD-R/RW that contains audio titles, MP3 or WMA files. (Only WMA 7.0 version supported) Only WMA 32kbps or more POWER Off / STOP button supported. Playable Recording Type: ISO-9660, Multi Session, POWER On / PLAY / PAUSE/ Forward/ Backward SKIP, SCAN button. Packet-Write, Joliet, Enhanced-CD (CD-Extra), Mixed-CD POWER On / CD PLAY Insert a CD to play after opening the CD door by pulling the CD door open switch to the right.
Basic Play POWER Off Press and hold STOP button on the main unit or the remote control for more than one second. > Power turns off. Forward/ Backward SCAN Rotate and hold PLAY/PAUSE button on the main unit or the remote control to the SKIP+ direction(forward) or SKIP- direction(backward) for more than a second during play. > SCAN play continues during holding PLAY/PAUSE to the SKIP+ direction or SKIP- direction. > Increase or reduction of the playing time can be identified on the display window.
Menu Operation Press MENU button of the remote control. > The menu list appears on the display window. Select the desired item by pressing the volume control of the main unit or the remote control. Select the desired item by pressing the volume control of the main unit or the remote control after entering into the lower menu by turning SKIP + button of the main unit or the remote control or by pressing SEL. button of the remote control.
Use Menu Navigation Navigation: It is developed so that the user can hear the desired song easily and conveniently by automatically classifying song Title, Artist, Genre, Directory or Playlist within the CD. Menu Navigation Repeat E.Q. Advantage of the Navigation If you edit MP3 or WMA CD to the CD player, you can hear the desired song by automatically classifying each Title, Artist, Genre, Directory or Playlist. To use the Navigation If you play files, make a name of the MP3 or WMA file.
Use Menu (continued) Title Mode This is method to search all songs within the disc by file (Title). Select the Title mode. > (See Menu Operation Method in page 13.) Navigation Title Artist Genre Make setup by SEL. Button after moving the desired song Title. > All songs selected are added to the play list if moving to the menu screen after selecting Title. > Selected items are highlighted. Title Selected Non-selected > The lower list selected is registered in the playlist.
Use Menu (continued) Artist Mode This is method used for adding playing song to the playlist or for play after selecting song by Artist to search all songs within the disc by file. Select the Artist mode. > (See Menu Operation Method in page 13.) Navigation Title Artist Genre Make setup by SEL. button after moving the desired Artist. > All songs selected are added to the playlist if moving to the menu screen after selecting the Artist. > Selected items are highlighted.
Use Menu (continued) Genre Mode This is method used for adding playing song to the playlist or for play after selecting song by Genre. Select the Genre mode. > (See Menu Operation Method in page 13.) Navigation Title Artist Genre Make setup by SEL. button after moving the desired Genre. > All Genre selected are added to the playlist if moving to the menu screen after selecting the Genre. > Selected items are highlighted.
Use Menu (continued) Directory Mode This is method used for adding playing song to the playlist or for play after selecting song by Directory. Select the Directory mode. > (See Menu Operation Method in page 13.) Navigation Directory Playlist Make setup by SEL. button after moving the desired Directory. > The lower list selected is registered in the playlist. > Selected items are highlighted.
Use Menu (continued) PlayList Mode This is method used for selecting or playing song by the Playlist. Select the Playlist mode. > (See Menu Operation Method in page 13.) Navigation Directory Playlist Appear 96 songs are currently selected. Press and select SEL. button after moving the desired playlist. > The lower list selected is registered in the Playlist. > Selected items are highlighted. Playlist Selected Non-selected > All songs are selected in the initial edition.
Use Menu (continued) All Selection and Cancel Mode Select Title, Artist, Genre or Directory item of the Navigation mode. > (See Menu Operation Method in page 13.) Navigation Title Artist Genre Enter into the lower menu of each item and then press SEL. button of the remote control for more than one second. > The menu screen appear.
Use Menu (continued) Repeat Select Repeat menu. > (See Menu Operation Method in page 13.) Press the SEL. button after selecting the desired Repeat play mode. > Press the SEL. button of the remote control for more than one second. You can use the menu conveniently since the repeat play mode is sequentially played. * The E.Q . mode is changed if pressing the SEL. button for more than a second. Normal 1 All Random Intro > Plays only once the current selected file.
Use Menu (continued) E.Q.(EQUALIZER) You can enjoy music in various sound quality appropriate for genre of the song played. Select the E.Q. menu. > (See Menu Operation Method in the page 13.) Menu Navigation Repeat E.Q. Make setup by pressing SEL. button after moving to the desired E.Q.. Selected Non-selected E.Q. Jazz Rock Pop To return to the normal play, press MENU button of the remote control. > Appears the display window. E.O.
Use Menu (continued) System Select the System menu. (See Menu Operation Method in the page 13.) Menu System Press SEL. button of the remote control after selecting the desired item of 9 lower items. > For the selected item, the right selection display window appears. Select the desired item by moving the volume control button of the main unit or the remote control. Select and setup the desired setting value by pressing SEL. button or SKIP + button of the remote control.
Use Menu (continued) ID3 Tag (MP3 function) Reads and displays information of singer and track from the ID3 tag on the play screen. * ID3 Tag display appears only when playing an MP3 file with ID3 Tag information. Sleep This is function to setup so that power turns off if the setup time passes. OFF: Sleep reservation function is cancelled. 30 min : Automatically turns off after 30 min. 60 min : Automatically turns off after 60 min. 90 min : Automatically turns off after 90 min.
Use Menu (continued) Backlight ON : The backlight is always maintained with turned on. 4sec : The backlight of the display turns on for 4 seconds whenever pressing the button. 8sec : The backlight of the display turns on for 8 seconds whenever pressing the button. 12sec : The backlight of the display turns on for 12 seconds whenever pressing the button. OFF : The backlight is always maintained with turned off. Contrast Adjusts screen brightness of the screen. Adjustable by 1-6 step.
Automatic Power-off Function Power automatically turns off after about a minute if no operation or use is done with stop status of the portable CD player. To Charge Self-charge function is convenient and extends or protects life of the battery since it includes overcharge-protection function. > Text "Charging" appears at the display since setup is done at the charge status if pressing the STOP button with the adaptor connected and the power turned off.
Firmware Upgrade What's Firmware? Means an operation system to operate the product. > This product has upgraded firmware for error correction or function improvement. You may upgrade the product by manufacturing the empty CD-R/RW after downloading the recent firmware appropriate for the product from the SW Data Room, LG Electronics Customer Service Center at http://www.lgservice.com. Caution > Check model name and version of the product.
Troubleshooting Symptom No operation is done even after pressing the button Character at the display operates wrongly Cause Correction Is the cell inserted in reverse? Correctly insert the cell after checking polarity (+, -). Is the cell consumed? Replace the cell. Is the lock apparatus placed at the lock position? Set the lock apparatus to cancel position. Is CD operation strange? Purchase cleaner for the CD lens from the shop for cleaning.
Specifications Power supply NiMH 1.2V, 2 batteries (NiMH 1.2V, 1450mA), 2pcs of A4-type cells (1.5V), power adaptor 4.5V, 600mA/ exterior battery (3.0V) Size (WxDxH) PCD-M700 . . . . . . . . . . . . . . . . . . . . . . . . . . . . . . . . . . . .134X141X19mm PCD-M710, PCD-M710B, PCD-M710R . . . . . . . . . . . . . .134X141X18.6mm Weight PCD-M700 . . . . . . . . . . . . . . . . . . . . . . . . . . . . . . . . . . . .190g PCD-M710, PCD-M710B, PCD-M710R . . . . . . . . . . . . . .
P/N : 3834RL0001A