
Install Instructions


Installation manual 11
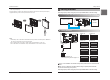
Installation Method
10 Modbus Gateway For Indoor Unit
ENGLISH
Installation Method
Installation
1) Loosen and remove two screws that secure the
product.
2) Position the rear case to the direction towards to the
connector for convenient cable arrangement.
3) Secure the rear case on the installation place using the
supplied fixing screws.
4) Remove knock out shapes on the rear case according
to the connector’s size and direction.
Installation inside of the indoor unit
1) Loosen and remove two screws that secure the product.
2) Loosen two screws that secure the PCB to separate rear of the case from the PCB.
3) Connect the connection wires properly according to the connection method. (Refer to the instruction
and set-up description)
4) Set the switch according to the setting method. (Refer to the instruction and set-up description)
5) Secure PCB on adequate space inside of the indoor unit.
*Note
1. Install the product on flat surface and install anchoring screws at more than 2 places. Otherwise
the central controller may not be anchored properly.
2. Do not tighten anchoring screws too tightly. It may cause deformation of the case.
3. Do not deform the case at random. It may cause malfunction of the central controller.
Installation Method