
Owner's Manual


INTRODUCTION
11
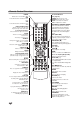
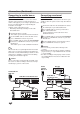
Front Panel
1. POWER (
11//
I)
Switches the Recorder ON or OFF.
2. Disc Tray
Insert a disc here.
3. PLAY/PAUSE (N/X)
Starts playback.
Pause playback or recording temporarily, press
again to exit pause mode.
4. STOP (x)
Stops playback or recording..
5. REC (z)
Starts recording.
Press repeatedly to set the recording time.
6. PROG. (V / v )
Scans up or down through memorized channels.
7. DUBBING
Press to copy DVD to VCR (or VCR to DVD).
8. Z DVD
Opens or close the disc tray.
9. Display window
Shows the current status of the Recorder.
10. Remote Sensor
Point the Recorder remote control here.
11. DVD/VCR
Toggles control between the DVD deck and the
VCR deck.
12. RES.
Sets the output resolution for HDMI and COMPO-
NENT OUTPUT jacks.
- HDMI: 1080i, 720p, 576p, 576i
- COMPONENT: RGB 576i, Y Pb Pr 576i/ 576p
13. Cassette Compartment (VCR deck)
Insert a video cassette here.
14. USB Port
Connect an USB Memory Stick.
15. DV INPUT
Connect the DV output of a digital camcorder.
16. AV3 IN (VIDEO IN/AUDIO IN (Left/Right))
Connect the audio/video output of an external
source (Audio system, TV/ Monitor, VCR,
Camcorder, etc.).
17. Z VCR
Ejects the tape in the VCR deck.
1 2 3 4 5 6 7 8 9 10 11 12 13 14 15 16 17