OWNER’S MANUAL LG DRYER Please read this manual carefully before operating your dryer and retain it for future reference. RC7064A / B / C RC7064AZ / BZ / CZ RC7064A1Z / B1Z / C1Z P/NO.
F eatures Energy Lower Energy Consumption LG dryers use less energy than conventional dryers due to the cutting-edge technology we have applied to the drying system and to the heat control mechanism. This LG Dryer has been designed to save your money. Reduced drying times save Drying times are now shorter due to the efficient air flow mechanism and optimised heater on this LG Dryer.
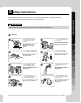
S afety Instructions To help reduce any risk of electric shock, fire, or other personal injury or property damage when using your dryer, please follow basic safety instructions. Safety Instructions WARNING Serious injury or death may occur when not observing the following rules. Hazards • Before plugging power cord, make sure cord is earthed and connected to circuit breaker. No Earthing may cause breakdowns or an electric shock. • Do not use a damaged power cord or place heavy objects on the cord.
S afety Instructions Safety Instructions • Do not use if power cord, plug or socket is damaged • Keep pets away from the dryer May cause fire or electric shock Pets may damage the dryer, or may receive an electric shock • Do not install or store the dryer where it will be exposed to the weather.
S afety Instructions • If this appliance is supplied from a cord extension set or an electrical connector, portable outlet device must be positioned so that is not subject to splashing or ingress of moisture. • Items that have been spotted or soaked with vegetable or cooking oil constitute a fire hazard and should not be placed in a tumble dryer.
Installation Instructions I nstallation Instructions The following instructions will guide you through the initial steps of setting up your dryer. Please note that every section of this manual provides important information regarding the preparation and use of your dryer, and it is important that you review this entire manual before proceeding with any installation or use. Be sure to observe all listed warnings and cautions. These installation instructions are intended for use by qualified installers.
I nstallation Instructions Washer Top plate size 21.7 inch (550 mm) 23.6 inch (600 mm) 3-1) 23.6 inch(600mm) Installation Instructions Shape and assembly direction 3. Align the stacking kit holes and the rear cover holes. WARNING • Incorrect installation can cause serious accidents. • The weight of the dryer and the height of installation makes the stacking procedure too risky for one person. This procedure should be performed by 2 or more experienced service personnel.
I nstallation Instructions Installation Instructions Earthing Instructions This appliance must be earthed. in the event of malfunction or breakdown, earthing will reduce the risk of electric shock by providing a path of least resistance for the electric current. This appliance is equipped with a earthed cord and an earthing plug. The plug must be plugged into an appropriate outlet that is properly installed and earthed in accordance with Standard.
I nstallation Instructions Level the Dryer 1. Levelling the dryer prevents undesirable noise and vibration. Place your dryer on a solid, level floor 2. If the dryer is not properly level, adjust the front levelling legs as necessary. Turn them clockwise to raise and counterclockwise to lower until the dryer is not wobbling both front-to-back and side-to-side.
A ppearance & Design RC7064AZ/BZ/CZ RC7064A1Z/B1Z/C1Z, RC7064A/B/C Control Panel Appearance & Design Water Container Glass Door Opaque Door Condenser Cover Air Ventilation Grill Control Panel LED Display • Time Display • Indicator Lamps & Left Time Additional Function Buttons • • • • • More Time Less Time Option Buzzer Time Delay/Favor.
O perating Your Dryer Cycle Selection Table Sensor Dry Cycle Detail Drying Level For thick and quilted fabrics Extra For thick and quilted fabrics that do not need to be ironed Very For fabrics that do not need to be ironed Cupboard For fabrics that do not need to be ironed Light For fabrics that do need to be ironed Iron For thick and quilted fabrics that do not need to be ironed Very For fabrics that do not need to be ironed For fabrics that do need to be ironed For polyamide, acrylic, and p
O perating Your Dryer Please read before using your LG Dryer for the first time After removing the packaging, please carry out the following checks to ensure the LG Dryer is correctly installed and ready for use. (see installation instructions) 1. Check the dryer is well balanced by using a spirit level. If not, adjust the feet of the LG Dryer until the machine is balanced. 2. Check the water container, condenser, control panel and drum to make sure everything is in place. 3.
O perating Your Dryer 5. Close the door. Select the desired cycle. Before you close the door, make sure fabrics are well placed inside and that foreign objects, especially flammable ones, are not caught around door. CAUTION - Be careful not to trap laundry between the loading door and rubber seal. 6. Select the drying cycle you want. Take out the laundry. 7. Press the start button. You will hear drum rotating. 8. After the cycle has finished, open the door and remove the laundry.
O perating your dryer Rack Dry The dryer Rack is placed inside the dryer like the picture. Remove and discard packing material before use, The Rack Dry is designed for use with items that you do not want to tumble dry including sweaters and delicate fabrics. Note Check the lint filter and remove any lint accumulated from items dried on the Rack. Operating Your Dryer To use the Rack Dry : 1. Open the door. 2. Do not remove the lint screen. 3. Place dryer Rack over the bottom of the dryer door opening.
A dditional Functions Additional Functions Time Delay Favor. You can use the Time Delay function to delay the finishing time of drying cycle. Maximum Time Delay is 19 hours. Minimum Time Delay is 3 hours. 1. Turn the dryer on 2. Select cycle 3. Set time delay hour 4. Press Start/Pause button If you have a series of settings that you always seem to come back to, you can store this as a unique drying programme. For example, if your Favor.
A dditional Functions Anti-Crease Option The Anti Crease function prevents creases that are formed when the laundry is not unloaded promptly at the end of the drying cycle. When Anti Crease is selected, the dryer repeatedly runs and pauses, giving you 2 hours to unload the washing. If the door is opened during the Anti-Crease cycle, the cycle is cancelled. Gentle - This function shortens or lengthens the cycle time by increasing or decreasing temperature.
C aring for Your Dryer Care and Cleaning is very Important Empty Water Container It’s not difficult to care for your dryer but it is important that you do care for it. Follow the instructions below Condensed water is collected in the water container. Empty the water container after every use. Not doing so will affect the drying performance. If the water container is full, the ‘’Empty Water’’ lamp glows and the buzzer sounds while the dryer is operating.
C aring for Your Dryer Condenser Condenser is also a very important part for efficient drying performance result so it needs a special care from you. It is recommended that condenser be cleaned three or four times a year or when the condenser clean lamp blinks. 1. Push the cap and open the condensing cover. 4. Clean the condenser thoroughly under a tap, letting the water flow through Caring for Your Dryer < Front > Condensing cover < Side > 2. Open seal by turning the locking lever 5.
C aring for Your Dryer Ventilation Grille and Cool Air Inlet Grille Vacuum the front ventilation grille 3-4 times a year to make sure there is no build up of lint or dirt that could cause improper air flow 3. Connect drain hose to the kit. Moisture Sensor? Note Caring for Your Dryer - Warm air is exhausted through the ventilation grill - Adequate ventilation has to be provided to avoid the back flow of gases into the room from appliance’s burning other fuels, including open fires.
A dditional Tips for Smart Use Drying Guide & Energy consumption Ca. of Dryer Display Drying Time (Including Cooling Time) 7 kg 4 kg 2 kg 2 kg 1.5 kg 2 kg Dress Shirts Max.4EA 1.5 kg 4.5 kg 1.5 kg 1 kg 2 kg 103 min 48 min 58 min 51 min 60 min 118 min 20 min 30 min 36 min 45 min 21 min 50 min PROGRAMME Light* Cotton Mixed Fabric Cupboard Cupboard Easy Care Iron Bulky Item Skin Care Refresh Sports Wear Jeans Delicate Wool Quick Dry Energy Consumption 3.92 kWh 1.70 kWh 0.93 kWh 0.54 2.85 2.85 0.50 0.69 1.
A dditional Tips for Smart Use Spare Parts Accessory Parts Spare parts that are required under the terms of warranty are provided free of charge. If the warranty has expired then spare parts must be purchased from the service centre. • Your dryer comes with accessories such as 1. Condensing Drain Hose Disposal of the Dryer 2. Hose Holder Additional Tips for Smart Use It is requested that you dispose of your dryer safely to protect your children and others from possible injury.
T roubleshooting Guidelines Troubleshooting Tips To save you time and money, the following page will help answer your questions before service call. Troubleshooting Guidelines Questions What to do Dryer won’t run 1. Check dryer is plugged in. 2. Check "Start" button is pressed. 3. Check door is properly closed. 4. Check Room temperature is below 5°C. 5. Check a fuse is not blown or the circuit breaker is tripped and replace them.
T roubleshooting Guidelines Error Mode • • : LED displays “ ” in case of the door open. The door must be closed and start Button must be pressed for re-operation. : If error message continues to occur, unplug the power cord and call the Service Centre for advice. Drum light does not work • Contact the customer service centre.
U sing SmartDiagnosis TM Note SmartDiagnosis™ function is available only for the products with a SmartDiagnosis™ mark. In case of a mobile phone with static option, the smart diagnosis function might not operate. Using SmartDiagnosis™ • Only use this feature when instructed to do so by the call center. The transmission sounds similar to a fax machine, and so has no meaning except to the call center. • SmartDiagnosis™ cannot be activated if the Dryer does not power up.
T echnical Data 3” (8cm) 60 in.2 (387 cm2) 850mm 60 in.2 (387 cm2) 3” (8cm) 640mm 1” (2.5 cm) 600mm 24” (61.0 cm) 1” (2.5 cm) Weight : 50 kg Ventilation Requirement Electrical Requirements Hertz Watts Alcove or undercounter Closet 220-240 V 50 Hz 2600 Ensure air flow of 112 cu.ft./min through dryer Closet door must have 2(louvered) openings, each having a minimum area of 60 sq. inches (387 sq.cm), located 3 inches (8 cm) from bottom and top of door.
W arranty Disposal of your old appliance 1. When this crossed-out wheeled bin symbol is attached to a product it means the product is covered by the European Directive 2002/96/EC. 2. All electrical and electronic products should be disposed of separately from the municipal waste stream via designated collection facilities appointed by the government or the local authorities. 3. The correct disposal of your old appliance will help prevent potential negative consequences for the environment and human health.
M emo 27