RH387H-W-BHKGLLK-ENG 6/23/08 6:22 PM Page 1 ENGLISH RH399H/RH387H P/NO : MFL56778751
RH387H-W-BHKGLLK-ENG 6/23/08 6:22 PM Page 2 CAUTION RISK OF ELECTRIC SHOCK DO NOT OPEN CAUTION: The apparatus should not be exposed to water (dripping or splashing) and no objects filled with liquids, such as vases, should be placed on the apparatus. WARNING: Do not install this equipment in a confined space such as a book case or similar unit.
RH387H-W-BHKGLLK-ENG 6/23/08 6:22 PM Page 3 Copyrights Recording equipment should be used only for lawful copying and you are advised to check carefully what is lawful copying in the area in which you are making a copy. Copying of copyright material such as films or music is unlawful unless permitted by a legal exception or consented to by the rights owner. This product incorporates copyright protection technology that is protected by method claims of certain U.S.
RH387H-W-BHKGLLK-ENG 6/23/08 6:22 PM Page 4 Contents Before you start . . . . . . . . . . . . . . . . . . . . . . . . . . . . . . . . . . .5-6 Remote control . . . . . . . . . . . . . . . . . . . . . . . . . . . . . . . . . . . .7 Main Unit . . . . . . . . . . . . . . . . . . . . . . . . . . . . . . . . . . . . . . . . .8 Hooking up the unit . . . . . . . . . . . . . . . . . . . . . . . . . . . . . .9-12 Operating USB Flash Drive . . . . . . . . . . . . . . . . . . . . . . . . . .12 Auto setup . . . . .
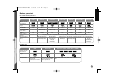
RH387H-W-BHKGLLK-ENG 6/23/08 6:22 PM Page 5 Before you start Recordable and Playable discs This unit can play and record all widely-used DVD types. The table below shows some specific compatibility differences depending on the disc types.
RH387H-W-BHKGLLK-ENG 6/23/08 6:22 PM Page 6 Notes on discs Restrictions on copying Depending on the conditions of the recording equipment or the CD-R/RW (or DVD±R/RW) disc itself, some CD-R/RW (or DVD±R/RW) discs cannot be played on the unit. Some video material is copy-once protected: Such material cannot be copied to HDD or DVD. You can identify copy-once protected material during playback by displaying disc information on-screen.
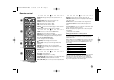
RH387H-W-BHKGLLK-ENG 6/23/08 6:22 PM Page 7 Remote control a AV/INPUT: Changes the input source (Tuner, AV1-2, or DV IN). a d TIMESHIFT: Activates pause live TV/playback (timeshift) for a live TV program. POWER: Switches the unit ON or OFF. CLEAR: Removes a track number on the Program List. DVD: Selects the unit’s mode to DVD. 0-9 numerical buttons: Selects numbered options in a menu.
RH387H-W-BHKGLLK-ENG 6/23/08 6:22 PM Page 8 Main Unit : Indicates when the unit is in timer recording or a timer recording is programmed. : Indicates clock, total playing time, elapsed time, title number, chapter/track number, channel, etc. RH387H a b c d e fghij k e Remote Sensor Point the remote control here. f N / X (PLAY / PAUSE) Starts playback. Pause playback or recording temporarily, press again to exit pause mode.
RH387H-W-BHKGLLK-ENG 6/23/08 6:22 PM Page 9 Hooking up the unit a Antenna connection Connect the Terrestrial TV antenna to the ANTENNA IN jack on the unit. b Antenna connection to your TV Connect one end of the RF cable to ANTENNA OUT jack on the unit and other end to ANTENNA IN jack on your TV. Passes the signal from the ANTENNA IN jack to your TV/monitor.
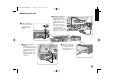
RH387H-W-BHKGLLK-ENG 6/23/08 6:22 PM Page 10 Hooking up the unit - more you can do Component connection Connect one end of the component (Y PB PR) cables to the COMPONENT OUTPUT jacks on the unit and other ends to the COMPONENT INPUT jacks on your TV. Connect one end of the audio cables (red and white) to the analog AUDIO OUTPUT jacks on the unit and other ends to the AUDIO INPUT jacks on your TV.
RH387H-W-BHKGLLK-ENG 6/23/08 6:22 PM Page 11 HDMI connection If your TV is not equipped with DTS decoder, set the [DTS] options to [OFF] on the setup menu (See page 16). To enjoy DTS multi channel surround, you must connect this unit to a DTS compatible receiver via one of this unit’s digital audio outputs. If there is noise or lines on the screen, please check the HDMI cable. Changing the resolution when the unit is connected with HDMI connector may result in malfunctions.
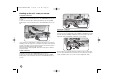
RH387H-W-BHKGLLK-ENG 6/23/08 6:22 PM Page 12 Connecting to the INPUT 1 or AV IN 2 Jacks Operating USB Flash Drive Connect the input jacks (INPUT1, AV IN 2) on the unit to the audio/video out jacks on your accessory component using audio/video cables. ON REMOTE Jack panel of Accessory Component (VCR, Camcorder, etc.) AUDIO OUTPUT R 1.
RH387H-W-BHKGLLK-ENG 6/23/08 6:22 PM Page 13 Auto setup When the first time to turn on the unit, the initial setup wizard sets the language, clock and channels automatically. ON REMOTE [Delete]: Delete the selected channel from programmed channel list. [Move]: Change the order of the channels and which numerical button they correspond to. [Station Rename]: change the name of the selected channel. [Program Edit]: Change the settings of a channel manually.
RH387H-W-BHKGLLK-ENG 6/23/08 6:22 PM Page 14 Using the Home Menu - more you can do MOVIE HDD – Displays the [Title List] menu, which shows recorded titles on HDD. (page 27) HDD DivX – Displays [Movie List] menu, which shows DivX® movie files on HDD. (page 21) DISC – Displays [Title List] menu, which shows recorded titles on the disc. (page 27) – Displays [Movie List] menu, which shows DivX® movie files on the disc. (page 21) – Plays DVD-Video disc (page 21).
RH387H-W-BHKGLLK-ENG 6/23/08 6:22 PM Page 15 Adjust the SETUP settings - more you can do Adjust the general settings Initialization – You can reset the unit to its original factory settings and format the HDD. [Factory Set]: You can reset the unit to all its factory settings. Some options cannot be reset (Rating, Password, and Area Code). The auto setup menu appears on the screen after the factory settings. [HDD format]: Everything recorded on the HDD will be erased.
RH387H-W-BHKGLLK-ENG 6/23/08 6:22 PM Page 16 Adjust the audio settings Adjust the lock settings Dolby Digital / DTS / MPEG – Selects the type of digital audio signal when using the DIGITAL AUDIO OUTPUT jack. To access the DVD Rating, Password or Area Code options, you must enter the 4-digit password. If you have not yet entered a password you are prompted to do so. Enter a 4-digit password. Enter it again to verify. If you make a mistake while entering number, press CLEAR to delete numbers.
RH387H-W-BHKGLLK-ENG 6/23/08 6:22 PM Page 17 Adjust the recording settings Time Shift – Setting this option to [ON] activates the Time Shift function automatically without pressing TIMESHIFT button. The timeshift will start in 5 seconds after TV tuner mode is started. Adjust the disc settings Record Mode Set – Select the picture quality for recording from XP, SP, LP, EP or MLP. See recording time of each mode on page 35. [XP]: Highest picture quality. [SP]: Standard picture quality.
RH387H-W-BHKGLLK-ENG 6/23/08 6:22 PM Page 18 Finalize – Finalizing is necessary before you can play a disc recorded with this unit on other DVD equipment. How long finalization takes depends on the disc condition, recorded length and number of titles. [Finalize]: The [Finalize] menu appears. The unit starts finalizing after confirmation. [Unfinalize]: The finalized DVD-RW discs can be unfinalized after confirming on the [Unfinalize] menu. After unfinalizing, the disc can be edited and rerecord.
RH387H-W-BHKGLLK-ENG 6/23/08 Moving to another title HDD 6:22 PM Page 19 Displaying information while watching TV DVD ALL When a disc has more than one title, you can move to another title. Press DISPLAY twice during playback then use v / V to select the title icon. Then, press the appropriate numbered button (0-9) or b / B to select a title number. Starting playback from selected time HDD DVD ALL During viewing the TV, Press DISPLAY to display the information displayed on-screen.
RH387H-W-BHKGLLK-ENG 6/23/08 6:22 PM Page 20 Play a disc - more you can do Slow down the playing speed HDD Playing a disc that contains a menu DVD While playback is paused, press SCAN(bb or BB) to slow down forward or reverse playback. You can change the various playback speeds by pressing SCAN (m or M) repeatedly. Press PLAY ( N)to continue play at normal speed. The menu screen may be displayed first after loading a DVD which contains a menu.
RH387H-W-BHKGLLK-ENG 6/23/08 6:22 PM Page 21 Divx file requirement Playing DivX® movie files ON REMOTE 1 Displays the HOME menu: HOME 2 Selects a [MOVIE] option: bB 3 Selects an option that contains DivX file: v V, ENTER 4 Selects a movie file from the menu: vV 5 Plays the selected movie file: PLAY 6 Stops the playback: STOP Available resolution size: 720x576 (W x H) pixel DivX file extensions: “.avi”, “.divx” Playable DivX subtitle: “.smi”, “.srt”, “.sub (Micro DVD format only)”, “.
RH387H-W-BHKGLLK-ENG 6/23/08 6:22 PM Page 22 Selecting multiple files or folders on the list Copying file(s) or folder(s) to the HDD You can select not only a single file but also multiple files using the MARKER button. Press MARKER at the desired files to select multiple files. You can copy file(s) or folder(s) to the HDD. Selecting all files and folders on the current list If you want to select all files and folders on the list, press CLEAR at any file or folder on the list.
RH387H-W-BHKGLLK-ENG 6/23/08 6:22 PM Page 23 Displaying MP3/WMA file information Listening to music ON REMOTE 1 Displays the HOME menu: HOME 2 Select a [MUSIC] option: bB 3 Selects an option that contains music: v V, ENTER 4 Selects a music from the menu: vV 5 Plays the selected music: PLAY 6 Stops the playback: STOP Press DISPLAY while the file you want to show the file information for is selected. The unit shows the ID3-Tag information of the file.
RH387H-W-BHKGLLK-ENG 6/23/08 6:22 PM Page 24 Rotate a photo Viewing a photo Use vV to rotate the photo while displayed in full screen mode.
RH387H-W-BHKGLLK-ENG 6/23/08 6:22 PM Page 25 Setting a timer record Recording Follow the instruction below to record a TV channel or other source. The recording continues until the media is full, you stop the recording or the progress of recording is more than 12 hours. This unit can be programmed to record up to 16 timer recordings within a month. The clock must be set correctly before setting a timer recording.
RH387H-W-BHKGLLK-ENG 6/23/08 6:22 PM Page 26 You can cancel a timer recording before the timer recording actually starts. Select a timer recording that you want to cancel on the [Timer Record List] menu and press CLEAR. Press REC repeatedly to set the recording mode (XP, SP, LP, EP or MLP) then press ENTER to set a timer recording. The “Rec OK” or “OK” on the [Check] field on the [Timer Record List] menu indicates the timer recording is programmed correctly.
RH387H-W-BHKGLLK-ENG 6/23/08 6:22 PM Page 27 Using time shift function This feature allow you to pause or rewind live TV, so you do not miss a thing if you were interrupted. Press TIMESHIFT then press PAUSE/STEP while watching live broadcast. The timeshift function will record the broadcast for later viewing. Before using this function, make sure that the unit is in HDD mode. If no button is pressed for 6 hours, the timeshift will stop automatically. You can use trick play functions (slow, scan, etc.
RH387H-W-BHKGLLK-ENG 6/23/08 6:22 PM Page 28 Before editing Chapter search HDD This unit offers various edit options for various disc types. Before you edit, check the disc type, and select the option available for your disc. You can select the start of a title by searching a chapter. Select a title that you want to search and press ENTER. Select [Chapter] in the [Search] option from the menu on the left of the screen, and press ENTER to display the [Chapter List] menu.
RH387H-W-BHKGLLK-ENG Time search HDD 6/23/08 -RWVR 6:22 PM -RWVideo +RW Page 29 +R -R RAM You can select the start of a title by searching through the time duration. Select a title that you want to search and press ENTER. Select [Time] in the [Search] option from the menu on the left of the screen and press ENTER to display the [Search] menu. Dividing a title HDD +RW Use this function to split a title up into two titles. Select a title that you want to divide and press ENTER.
RH387H-W-BHKGLLK-ENG 6/23/08 6:22 PM Page 30 Naming a title When a title is recorded by this unit, the title name will be named by a number. You can change a title name by using this function. The chapters that you want to combine are created by deleting a part from an Original title. The chapters that you want to combine are created from different titles. One of the playlist chapters that you want to combine has been moved.
RH387H-W-BHKGLLK-ENG 6/23/08 6:22 PM Page 31 About ‘Fast’ copying Dubbing a title Using the title list menu, you can dub video contents.
RH387H-W-BHKGLLK-ENG 6/23/08 6:22 PM Page 32 Language Codes Use this list to input your desired language for the following initial settings: Disc Audio, Disc Subtitle, Disc Menu.
RH387H-W-BHKGLLK-ENG 6/23/08 6:22 PM Page 33 Troubleshooting General The power does not turn on. b Plug the power cord into the wall outlet securely. There is no picture. b Select the appropriate video input mode on the TV so the picture from the unit appears on the TV screen. b Connect the video connection securely. Picture noise appears. b You are playing a disc recorded in a colour system that is different from your TV. b The video signal from the external component is copy-protected.
RH387H-W-BHKGLLK-ENG 6/23/08 6:22 PM Page 34 Recording Cannot record or does not record successfully. b Check the remaining space on the disc. b Check that the source you are trying to record from is not copy protected. b The power may have failed during recording. b Use a VR mode formatted disc for copy-once material. Timer record does not record successfully. b Clock is not set to correct time. b The start time of the timer recording is past.
RH387H-W-BHKGLLK-ENG 6/23/08 6:22 PM Page 35 Playback Specifications Frequency response General Power requirements Power consumption Dimensions (approx.) Net weight (approx.
RH387H-W-BHKGLLK-ENG 6/23/08 6:22 PM Page 36