
User guide


26
Cancelling a timer recording
You can cancel a timer recording before the timer recording actually starts.
Select a timer recording that you want to cancel on the [Timer Record List]
menu and press CLEAR.
Timer Recording Troubleshooting
Even though the timer is set, the unit will not record when:
– There is no disc loaded and there is not free space on the HDD.
– A non-recordable disc is loaded and there is not free space on the HDD.
–
[Disc Protect] option is set to [ON] in the Setup menu and there is not free
space on the HDD (see page 18).
– The unit is in operating (recording, copying, deleting etc.).
– There are already 99 titles (DVD-RW, DVD-R), 49 titles (DVD+R,
DVD+RW) recorded on the disc and there are already 255 titles recorded
on the HDD.
You cannot enter a timer program when:
– A recording is already underway.
– The time you’re trying to set has already passed.
– There are already 16 timer programs set.
If two or more timer programs overlap:
– The earlier program takes priority.
– When the earlier program finishes, the later program starts.
– If two programs are set to start at exactly the same time, the program
entered first takes priority.
Timer recording with G-Code number
G-Code is a registered trademarks of Gemstar Development Corporation.
The G-Code System is manufactured under license from Gemstar Development
Corporation.
A G-Code number is a series of numbers which you can use to automatically
program your unit to record a certain program. Most TV guides publish G-Code
programming numbers with their program details.
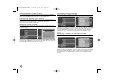
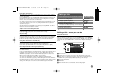
Press HOME and select TV option. Press
vv VV
to select the [G-Code System]
and press ENTER to display [G-Code System] menu. Enter the G-Code pro-
gramming number using numerical buttons then press ENTER to shows the
[Timer Record] menu. You can change the settings on the [Timer Record] menu
as required.
Press REC repeatedly to set the recording mode (XP, SP, LP, EP or MLP) then
press ENTER to set a timer recording. The “Rec OK” or “OK” on the [Check]
field on the [Timer Record List] menu indicates the timer recording is pro-
grammed correctly.
Simultaneous playback and record
You can play other contents while you are recording. Simply press HOME and
select the playable contents you want to play while recording. You cannot
playback other contents while copying or dubbing. The DivX file cannot be
played while recording. When you are recording on a DVD, other contents on
the DVD cannot be played.
Time Slip
You can watch the title that you are currently recording to HDD with this func-
tion. After the recording is progressed over 15 seconds, press PLAY to playback
the title that you are currently recording. If you stop playback the title, returns to
the current recording position.
Record from a camcorder
You can record from a DV-equipped camcorder to the HDD by connecting it
with a DV cable. You can also record from a digital camcorder connected to the
DV in jack on the front of the unit. Press AV/INPUT repeatedly to select the DV
input. Find the place on the camcorder recording that you want to begin record-
ing from and press REC to start recording. Depending on your camcorder, you
can use this recorder’s remote to control the camcorder using the STOP, PLAY
and PAUSE functions. Press STOP to end recording.
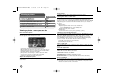
Recording From an external input
You can record from an external component, such as a camcorder or VCR,
connected to any of the recorder’s external inputs.
Each press of the AV/INPUT changes the input source as described below.
Make sure that the component you want to record from is connected properly to
the unit before recording an external source.
Tuner: Built-in tuner
AV1: INPUT 1 (VIDEO, AUDIO (L/R)) mounted on the rear panel
AV2: AV IN 2 (VIDEO, AUDIO (L/R)) mounted on the front panel
DV: DV IN mounted on front panel
RH387H-W-BHKGLLK-ENG 6/23/08 6:22 PM Page 26