
Owner's Manual


41
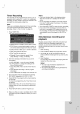
Recording
Timer
Recording
This recorder
can
be
programmed
to
record
up
to
16
programs
within
a
period
of
1
month.
For
unattended
recording,
the
timer
needs
to
know
the
channels
to
be
recorded,
the
starting
and
ending
time.
Note:
If
you
use
a
completely
blank
disc
for
timer
recording,
you
must
format
the
disc
before
starting
timer
recording.
(Refer
to
"Disc
Format"
on
page
22.)
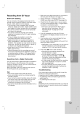
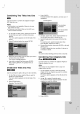
1.
Press
TIMER
REC.
The
Timer
Record
menu
will
appear.
[Media]
Choose
a
media
to
record
(HDD
or
DVD).
[PR]
Choose
a
memorized
program
number,
or
one
of
the
external
inputs
from
which
to
record.
[Date]
Choose
a
date
up
to
1
month
in
advance.
[Start
Time]
Set
the
start
time.
[End
Time]
Set
the
end
time.
[Repeat]
Choose
a
desired
repeat
(Once,
Daily
(Monday
-
Friday),
or
Weekly).
2.
Enter
the
necessary
information
for
your
timer
recording(s).
b
/
B
(left/right)
--
move
the
cursor
left/right
v
/
V
(up/down)
--
change
the
setting
at
the
current
cursor
position
Press
RETURN
(O)
to
exit
the
Timer
Record
menu.
Press
ENTER
after
filling
in
all
the
program
information.
Press
TIMER
REC
to
display
Timer
Record
List.
3.
Set
a
recording
mode
as
necessary
by
pressing
REC
MODE
repeatedly.
(HQ,
SQ,
LQ,
EQ)
4.
Press
ENTER,
the
program
will
be
memorized
by
the
recorder.
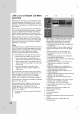
To
check
the
programming,
the
Timer
Record
List
will
appear.
Check
field's
"Rec.
OK"
on
the
Timer
Record
List
indicates
that
the
timer
recording
is
programmed
correctly.
5.
Press
RETURN
(O)
to
exit
the
Program
List.
6.
Make
sure
that
you
load
a
recordable
disc
for
DVD
recording
and
press
POWER
to
switch
your
unit
to
Standby.
Notes:
The
timer
indicator
lights
in
the
display
window
when
the
recorder
is in
standby
with
the
timer
active.
For
TV
recording
with
bilingual,
set
audio
channel
from
the
[TV
Rec
Audio]
in
sub-menu
of
the
Setup
menu
(see
page
22).
You
must
press
POWER
to
stop
the
timer
recording.
If
you
set
a
timer
recording
to
record
to
DVD
but
there
isn't
a
recordable
DVD
loaded
at
the
time
of
the
recording,
the
Recovery
Recording
feature
will
automatically
record
the
program
to
the
HDD
for
you.
Simultaneous
recording
and
playback
Playback
and
recording
for
both
DVD
and
built
in
hard
disk
drive
(HDD)
are
completely
independent.
For
example,
you
can
record
to
either
the
DVD
or
HDD
source
and
play
back
video
from
the
other
source
at
the
same
time.
1.
Start
recording.
2.
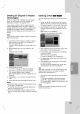
Press
HOME
to
display
the
Home
Menu
screen.
3.
Usethev/V/b/BandENTERbuttonsto
select
a
different
media
type
that
you
want
to
play
back.
4.
Start
Playback.
The
recording
will
continue
while
playing
back
the
media
from
the
other
mode.
Notes:
You
can't
use
simultaneous
playback
and
recording
while
copying.
You
cannot
edit
programs
during
simultaneous
recording
and
playback.