
Owner's Manual


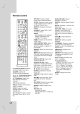

9
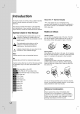
a
POWER
button
and
indicator
Switches
the
recorder
ON
or
OFF.
Lights
up
red
when
the
recorder
is
in
standby
mode.
b
HDD/DVD
Set
the
recorder's
mode
to
HDD
or
DVD.
cN/X(PLAY/PAUSE)
Starts
playback.
Pause
playback
or
recording
temporarily,
press
again
to
exit
pause
mode.
d
x
(STOP)
Stops
playback
or
recording.
e
z
(REC)
Starts
recording.
Press
repeatedly
to
set
the
recording
time.
f
PROG.
(V/v)
Scans
up
or
down
through
memorized
channels.
g
Disc
Tray
Insert
a
disc
here.
h
OPEN/CLOSE
(Z)
Opens
or
closes
the
disc
tray.
i
Display
window
Shows
the
current
status
of
the
recorder.
T/S:
Indicates
the
timeshifting
mode.
REC:
The
recorder
is
recording.
HDD:
The
recorder
is
HDD
mode.
DVD:
The
recorder
is
DVD
mode.
HDD
bBDVD:
The
recorder
is
dubbing.
:
Indicates
when
the
recorder
is
in
timer
recording
or
a
timer
recording
is
programmed.
:
Indicates
clock,
total
playing
time,
elapsed
time,
title
number,
chapter/track
number,
channel,
etc.
j
Remote
Sensor
Point
the
recorder
remote
control
here.
k
INPUT
2
(VIDEO
IN/AUDIO
IN
(Left/Right))
Connect
the
audio/video
output
of
an
external
source
(Audio
system,
TV/
Monitor,
VCR,
Camcorder,
etc.).
l
INPUT
2
(S-VIDEO
IN)
Connect
the
S-Video
output
of
an
external
source
(TV/
Monitor,
VCR,
Camcorder,
etc.).
mDVIN
Connect
the
DV
output
of
a
digital
camcorder.
Front
Panel
T/S
REC
HDD
DVD
abcde
f g
hi
j
kl
m