Colour Television OWNER'S MANUAL Please read this manual carefully before operating your set. Retain it for future reference. Record model number and serial number of the set. See the label attached on the back mation to your dealer when you Model number : Serial number : cover require and quote this infor- service.
Contents Installation 3 Location and function of controls Remote control handset Battery installation Front panel 4 Basic operation On and off / Programme selection Volume adjustment / Quick view Mute function / Auto Demonstration On screen language selection (option) 8 On 9 screen menus Menu selection up TV stations Auto programme tuning Manual programme tuning Fine tuning / Programme edit Favourite programme Calling the programme table Setting 10 Picture adjustment PSM (Picture Status Memory)
Installation Power This set operates on an AC mains supply, the voltage is as indicated on the label on the back cover. Never apply DC power to the set. In the event of thunderstorms ial and mains or powercuts, please pull out the aer- plugs. Warning To prevent fire moisture. Do not cause or shock hazard, do not expose the set to rain or of the set, this may place anything containing liquid on top a fire or could give an electric shock.
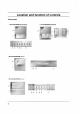
Location and function of controls POWER 1 TV/AV MULTIMEDIA 2 TURBO SOUND 34 PICTURE PIP 13 Remote control handset TEXT PR- PR+ SWAP MENU INPUT PR MUTE OK 14 Before you use the remote control handset, please install the batteries. See the next page. 15 1. POWER switches the set on from standby or off to standby. 16 5 VOL 12 All the functions can be controlled with the remote control handset. Some functions can also be adjusted with the buttons on the front panel of the set. 2.
Location and function of controls 12. MULTIMEDIA selects Component 1 or POWER Component 2 modes. 1 TV/AV 13. TURBO PICTURE BUTTON selects Turbo picture. 2 MULTIMEDIA TURBO SOUND PICTURE 12 13 3 14. TELETEXT BUTTONS (option) These buttons are used for teletext. For further details, see the 'Teletext' section. MENU 15. SWAP returns to the selects previously VOL 16. MUTE switches the sound on or 18. STILL freezes motion of the picture. the programme table.
Location and function of controls Front ? panel RT-44/49/54NA18/19 series ? 2 RT-44/49/54NA28 series 2 3 PR MUTE PR MENU VOL OK VOL PR MUTE PR MENU VOL OK VOL TV/AV OK MNU MUTE 1 TV/AV 8 OL PR TV/AV ON/OFF N/OFF MENU OK MUTE 14 VOL 675 4 ON/OFF PR 3 RT-44/49/54NA98 series ? 2 TV/AV MENU OK VOL PR 1 8 6 7 4 3 RT-40/45/57NZ88 series ? 2 TV/AV TV/AV MENU OK MUTE VOL MENU OK MUTE PR VOL PR 1 86754 6 TV/AV 3 5678
Location and function of controls Front panel RT-44/49/56NZ28 series ? AV3 S-VIDEOL/MN 2 TV/AV T/AV MNU OL OK MENU VOL OK PR 10 PR AUDIO 1 R 8674 ? 9 3 RT-44/49/54NA48/49 series 2 PR MUTE PR MENU 5678 3 VOL OK VOL 1 PR MUTE PR MENU VOL OK VOL TV/AV TV/AV POWR S-VIDEOL/MN 10 AUDIO R AV3 4 (Side panel) 1. MAIN POWER switches the set on or 8. TV/AV selects TV or AV mode. clears the menu / text from the screen. switches the set on from standby. 9.
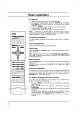
Basic operation On and off 1. 2. 3. 4. Press the main power button to switch the set on. If the set is in standby mode, press the POWER, D / E, TV/AV, MULTIMEDIA or NUMBER buttons on the remote control handset to switch it on fully. Press the POWER button on the remote control handset. The set reverts to standby mode. Press the main power button again to switch the set off.
On The an screen menus between you and your set takes place on screen with menu. The buttons required for the operating steps are dialogue operator also displayed. Menu selection 1. 2. 3. 4. Press the MENU button and then D / E button to display each menu. Press the G button and then D / E button to select a menu item. Press the G button to display the sub menu or the pull-down menu. Change the setting of an item in the sub or pull-down menu with F/GorD/E.
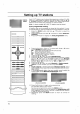
TV stations up Setting Station AutoOprogramme ManualOprogramme { ProgrammeOedit FavouriteOprogramme { Station Menu { { programme numbers (0 to 99). Once you have preset the stations, you will be able to use the D / E or NUMBER buttons to scan the stations you have programmed. Stations can be tuned using automatic or manual modes. Up to 100 TV stations Note : In some can by models up to 200 TV stations Auto programme ()O}{OOKOMENU be stored can be stored.
Setting Manual programme TV stations up Station tuning Manual programme lets you manually tune and arrange the stations in whatever order you desire. Also you can assign a station name with five characters to each programme number. 1. 2. Press the MENU button and then D / E button to select the Station menu. Press the G button and then D / E button to select Manual 3. programme.
Setting Station AutoOprogramme ManualOprogramme { ProgrammeOedit FavouriteOprogramme { { { Station Menu TV stations up Assigning a station name 1. Repeat the 'Manual programme tuning' steps 2. 3. 4. ()O}{OOKOMENU 5. 6. 7. 1 to 3. Press the D / E button to select Name. Press the G button on the Name pull-down menu. Press the D button. You can use a blank, +, -, the numeric 0 to 9 and the alphabet A to Z. With the E button you can select in the opposite direction.
Setting Programme TV stations up Station edit This function enables you to delete or skip the stored programmes. Also you can move some stations to other programme numbers or insert a blank station data into the selected programme number. 1. 2. 3. Station Menu Press the MENU button and then D / E button to select the Station menu. Press the G button and then D / E button to select Programme edit. Press the G button to display the Programme edit menu.
Setting Station AutoOprogramme ManualOprogramme { ProgrammeOedit FavouriteOprogramme { Station Menu { { TV stations up Favourite programme This function lets you select your favourite programmes 1. 2. directly. Press the MENU button and then D / E button to select the Station menu. Press the G button and then D / E button to select Favourite programme. ()O}{OOKOMENU 3. Press the G button.
Picture PSM 1. adjustment (Picture Status Memory) Picture Picture Menu 2. Press the MENU button and then D / E button to select the Picture menu. Press the G button and then D / E button to select PSM. Press the G button and then D / E button to select a picture setting on the PSM pull-down menu. 3.
Picture Picture PSM XD VM Contrast { Brightness { Colour { Sharpness Convergence { { { { Picture Menu Picture You adjustment adjustment adjust picture contrast, brightness, colour intensity, sharpand tint (NTSC input only) to the levels you prefer. can ness { 1. ()O}{O OKOMENU 2. Press the MENU button and then D / E button to select the Picture menu. Press the G button and then D / E button to select Contrast, Brightness, Colour or Sharpness.
Picture adjustment Picture Convergence (option) This function enables you to adjust the colour convergence of screen all area or 9 points during receiving the signals. When the set is first installed or it is relocated, the picture may be unstable with three colour ghosts (red, green, blue). This problem can be solved by adjusting the colour convergence. 1. 2.
Picture adjustment Picture format You can watch TV in various picture formats; 4:3, 16:9. In some models, you can watch TV in various picture formats; 16:9, 14:9, Zoom, Auto and 4:3. Repeatedly press the ARC button to select your desired picture format. 4:3 This picture format is 4 to 3 of general 16:9 You can enjoy the cinema (the picture programme through the 16:9 mode. TURBO TV.
Sound SSM You adjustment (Sound Status Memory) Sound Sound Menu SSM AVL DBS Balance X-WAVE select your preferred sound setting; Dolby Virtual (option), Flat, Music, Movie or Speech and you can also adjust the sound frequency of the equalizer. can { { { { { ()O}{OOKOMENU 1. 2. 3. Press the MENU button and then D / E button to select the Sound menu. Press the G button and then D / E button to select SSM. Press the G button and then D / E button to select a sound setting on the SSM pull-down menu.
Sound Sound SSM AVL DBS Balance X-WAVE { { { { { Sound Menu Sound You adjustment adjust AVL (Auto Volume Leveler), DBS (Dynamic Bass Sound), TV Speaker or balance. AVL automatically keeps on an equal volume level even if you change programmes. If you switch DBS to on, the set creates a dynamic bass sound. The Turbo sound can creates ()O}{OOKOMENU adjustment 1. 2. an all around sound in as a concert hall. Press the MENU button and then D / E button to select the Sound menu.
Sound adjustment Sound output selection In AV mode, you can select output sound for the left and right loud- speakers. press the I/II button to select the sound output. Audio signal from audio L input is sent to left loud-speaker and audio signal from audio R input is sent to right loud- Repeatedly L+R L+L : : R+R : speaker. Audio signal speakers. Audio signal speakers.
Time T ime Clock { { OffOtime OnOtime { Time Menu Clock 1. { AutoOsleep setting 2. 3. Press the MENU button and then D / E button to select the Time menu. Press the G button and then D / E button to select Clock. Press the G button and then D / E button to adjust the hour. Time ()O}{O OKOMENU C lock { OffOtime OnOtime { AutoOsleep { -i-o:o-i- { ()O}{O OKOMENU 4. 5. 6. Press the G button and then D / E button to adjust the minute. Press the OK button.
Other functions TV and AV modes Special Special be set for TV or AV mode. AV mode is used when a video Inputs cassette recorder (VCR), or other equipment is connected to the can Menu OOO O set. Note : When a VCR is connected via the aerial socket the set is used in TV mode. See the 'Connection of external equipment' section. 1. Press the MENU button and then D / E Special 2. 3. button to select the menu. Press the G button and then D / E button to select Input.
Other functions Special { { Language Input InputOOO( ) ChildOlock { Special Menu PIP Picture Source Selection 1. { 2. 3. ()O}{O OKOMENU (option) Press the MENU button and then D / E Special button to select the menu. Press the G button and then D / E button to select Input ( ). Press the G button and then D / E button to select TV, AV1, AV2, AV3 or AV4 (option). Special Language Input InputOOO( ChildOlock { { ) { { TV AV1 AV2 AV3 AV4 ()O}OOKOMENU 4. 5.
PIP Option PIP is operation (option) : an optional function, so that only the set with PIP function can operate. PIP (Picture in Picture) displays a picture within a picture. On and off Press the PIP button to switch on the sub Press this button again to switch it off. Input mode selection for sub Press the INPUT button to select the picture input Each time this button is pressed, each ture is displayed as shown below. Programme mode for the sub input picture.
Teletext (option) Teletext (or TOP text) is an optional function, therefore only with the teletext system can receive the teletext broadcast. a set free service broadcast by most TV stations which gives up-to-the-minute information on news, weather, television programmes, share prices and many other topics. Teletext is a The teletext decoder of this TV can support the SIMPLE, TOP and FASTEXT systems.
Teletext TOP text (option) (option) The user guide displays four fields-red, green, yellow and blue at the bottom of the screen. The yellow field denotes the next group and the blue field indicates the next block. Block / group / page selection 1. With the blue button you can progress from block to block. 2. Use the yellow button to proceed to the next group with automatic overflow to the next block. 3.
Teletext Special (option) teletext functions REVEAL Press this button to display concealed information, such as solutions of riddles or puzzles. Press this button again to remove the information from the display. SIZE Selects double Press Press height text. this button to enlarge the top this button again to enlarge page. Press this button again half of the page. the bottom half of the to return to the normal display. UPDATE PR Displays teletext the TV picture on page.
Connection of external You can connect additional equipment, such as equipment VCRs, camcorders etc. to your set. VIDEO Here shown may be somewhat different from your set. PB Y (L)-AUDIO-(R) PR COMPONENT 1 (480i/480p/576i) DVD INPUT COMPONENT 2 (480i/480p /576i) VIDEO Y PB PR VIDEO (L)-AUDIO-(R) (L)-AUDIO-(R) MONITOR OUTPUT Aerial socket ANT IN AV2 LL AV1 MONO 1. 2. 3. 4. 5. Connect the RF out socket of the VCR to the aerial socket on the back of the set.
Connection of external equipment S-Video / Audio in sockets AV3 When ity S-VIDEOL/MN 1. connecting will be further an (S-AV) (option) VCR to the S-VIDEO socket, the picture qual- improved. Connect the S-video socket of the VCR to the S-VIDEO socket of the set. AUDIO R 2. Connect the audio cable from the VCR to the AUDIO sockets of the set. S-VIDEO VCR 3. Select AV3 4.
Troubleshooting check list Symptoms No picture, no sound Sound OK, poor picture Picture OK, poor sound Picture blurred Lines or streaks in Poor picture reception on some channels No colour Poor colour Remote control does not work Check these items and try to adjust these The mains plug-(plugged in and switched on) Is the TV switched Try on another channel (weak signal) Check aerial (plugged Check aerial (broken lead?) into TV?) Check aerial Check for local interference Adjust c