LCD Colour Television OWNER'S MANUAL Please read this manual carefully before operating your set. Retain it for future reference. Record model number and serial number of the set. See the label attached on the back mation to your dealer when you Model number : Serial number : P/NO : 3828VA0411A (ML012C, cover require 091F and quote this infor- service.
Contents Installation 3 Location and function of controls Remote control handset Battery installation Side panel 4 Basic operation On and off / Programme selection Volume adjustment / Quick view Mute function / Auto Demonstration TV Swivel function On screen language selection (option) 7 On 8 screen menus Menu selection up TV stations Auto programme tuning Manual programme tuning Fine Tuning Programme edit Calling the programme table 9 Setting Picture adjustment PSM (Picture Status Picture adju
Installation Power This set operates on a DC supply provided by the AC-DC adaptor, the voltage is as indicated on the label on the back cover. Use only the AC-DC adaptor supplied with the set and never apply an AC mains to the set directly. The AC-DC adaptor operates on an AC mains supply, the voltage is as indicated on the label of the AC-DC a adaptor. a. Open the back panel cover. Connect the DC plug of the AC-DC adaptor to the 12V socket of the set. c. Connect the AC-DC adaptor and it's power cord. d.
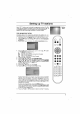
Location and function of controls All the functions can be controlled with the remote control handset. Some functions can also be panel with the buttons adjusted on the side of the set. Remote control handset 10 MUTE POWER 1 11 TV/AV TV/PC I/II Before you use the remote control teries. See the next page. 1. LIST Q.VIEW MENU 2. 13 3 MUTE switches the sound 12 2 on or off. TV/AV selects TV 4 handset, please install the bat- clears the or AV mode.
Location and function of controls 9. SLEEP sets the timer. sleep 10. TV/PC selects TV clears the or PC mode. menu switches the set from the screen. on from standby. on from standby 10 11. POWER MUTE switches the set or off to standby. 1 11 TV/AV 12. I/II selects the selects the language during dual language sound output (option). TV/PC I/II 12 2 broadcast. LIST Q.VIEW MENU 13 34 13. MENU selects POWER a menu. PR 14.
Location and function of controls Side panel 9 PR 6 VOL 5 OK 4 MENU 3 S-VIDEO VIDEO 10 L/MON AUDIO 2 TV AV/PC R AV3 1 /I ON/OFF MONO ST DUAL DPM STEREO 78 1. ON/OFF ( 8. /I) switches the set on from standby or LED : POWER/STANDBY indicator : MONO indicator : STEREO indicator DUAL : DUAL indicator DPM : DPM indicator standby. MONO ST 2. TV/AV/PC selects STEREO TV, AV clears the or menu switches the set PC monitor mode. from the on from screen.
Basic operation On and off 1. Press the POWER, to switch it 2. 3. on / , TV/AV, TV/PC or NUMBER buttons fully. Press the POWER button. The set reverts to Pull out mains plugs to switch the set off. standby mode. Note : If, while the set is switched on, the mains plug is disconnected the set will switch to standby or power on when the mains plug is replaced in the mains power socket. Programme selection You can select buttons.
On screen menus Menu selection 1. Repeatedly 2. Press the item. 3. Press the press the MENU button to display each menu. button and then button to select a menu / button to display the sub menu or the pull-down menu. 4. Change the setting of an item in the sub or pull-down menu with /or/. You can move to the higher level menu button and to move to the lower level by pressing the OK or menu by pressing the button. MENU Note : a. In the teletext mode, menus are not displayed. b.
Setting up TV stations Up to 100 TV stations can be stored by programme numbers (0 to 99). Once you have preset the stations, you will be able to use the / or NUMBER buttons to scan the stations you have programmed. Stations can be tuned using automatic or manual modes. Auto programme tuning Station Menu Station CH. AutoOprogramme ManualOprogramme { ProgrammeOedit { { ()O{OOKOMENU All stations that can be received are stored by this method.
TV stations Setting up Station Menu Station CH. AutoOprogramme ManualOprogramme { ProgrammeOedit { ()O{OOKOMENU { Manual programme tuning Manual programme lets you manually tune and arrange the stations in whatever order you desire. Also you can assign a station name with five characters to each programme number. 1. Repeatedly 2. Press the press the MENU button to select the Station menu. button and then button to select Manual / programme. 3.
Setting up Assigning a station name 1. Repeat the 'Manual programme tuning' steps 2. Press the 3. Press the button to select Name. / button on the Name pull-down 4. Press the button. You and the alphabet A to Z. can use a blank, TV stations AutoOprogramme ManualOprogramme { ProgrammeOedit { +, -, the numeric 0 to 9 With the button you can select in the opposite direction. Select the position by pressing the / button and then make your choice of the second character, and so on. 6.
Setting up Station Station Menu CH. AutoOprogramme ManualOprogramme { ProgrammeOedit { ()O{OOKOMENU { Programme TV stations edit This function enables you to delete or skip the stored programmes. Also you can move some stations to other programme numbers or insert a blank station data into the selected programme number. 1. 2. 3. Repeatedly Press the edit. Press the press the MENU button to select the Station menu.
Setting up Calling TV stations the programme table You can check the programmes stored in the memory the programme table. Displaying programme table Press the LIST button to display the by displaying Programme table menu. The programme table appears on the screen. One programme table contains ten programmes as below. Station -O -O -O 00O-O - 0500S069 TV/AV TV/PC 0100C003000600S017 0200C012000700S022 0300S066000800C009 LIST 0400S067000900C011 ()O}{OOKOMENU Note : PR a.
Picture Picture Menu Picture CH. PSM { User { adjustment PSM (Picture Status 1. Repeatedly 2. Press the Press the 3. setting the PSM on Memory) press the MENU button to select the Picture menu. button and then button to select PSM. / button and then button to select a picture / ()O{OOKOMENU pull-down menu. Picture CH. PSM { Dynamic User { Standard Mild Game User TV/AV TV/PC ()O}OOKOMENU MENU 4. Press the OK 5. Press the TV/AV You button.
Sound SSM adjustment (Sound Status Memory) Sound CH. You can select your preferred sound setting; Virtual, Movie or Speech and you can also adjust the sound the equalizer. 1. 2. 3. Flat, Music, frequency of press the MENU button to select the Sound menu. Press the button and then button to select SSM. / Press the button and then button to select a sound set/ ting on the SSM pull-down menu. SSM { Balance { AVL { Sound Menu Repeatedly ()O{OOKOMENU Sound CH.
Sound adjustment Stereo/Dual reception When a programme is selected, the sound information for the station appears after the programme number and station name disappear. I/II Broadcast On Screen Mono MONO Stereo STEREO Dual DUAL I Display Mono sound selection In stereo reception if the stereo signal is weak, you can switch to mono by pressing the I/II button twice. In mono reception the depth of sound is improved. To switch back to stereo, press the I/II button twice again.
Other functions TV, AV and PC modes Inputs can be set for TV, video cassette recorder AV Special CH. or (VCR), PC mode. AV mode is used when or other equipment a is connected to Special Input { ChildOlock { AutoOsleep Language { Menu { the set. Note : When a VCR is connected via the aerial socket the set is used in TV mode. See the 'Connection of external equipment' section. 1. 2. 3. ()O{OOKOMENU press the MENU button to select the Special menu.
Other functions Special Special Menu CH. Auto Input { ChildOlock { AutoOsleep Language { { sleep If you select On on the Auto sleep pull-down menu, the set will switch itself to standby mode approximately ten min- automatically utes after ()O{OOKOMENU TV station stops broadcasting. press the MENU button to select the Special menu. button and then button to select Auto sleep. / button and then button to select On or Off on / 1. Repeatedly 2. Press the 3.
Teletext (option) Teletext (or TOP text) is an optional function, therefore only with the teletext system can receive the teletext broadcast. Teletext is a set free service broadcast by most TV stations which gives information on news, weather, television programmes, share prices and many other topics. a up-to-the-minute The teletext decoder of this TV can support the SIMPLE, TOP and FASTEXT systems.
Teletext TOP text The user (option) (option) guide displays the bottom of the four fields-red, green, yellow and blue The at field denotes the next group and the blue field indicates the next block. screen. yellow Block / group / page selection 1. With the blue button you can progress from block to block. 2. Use the yellow button to proceed to the next group with automatic overflow to the next block. 3.
Teletext Special ? (option) teletext functions REVEAL Press this button to display concealed information, such as puzzles. again to remove the information from the solutions of riddles Press this button or display. SIZE Selects double height text. enlarge the top button again to enlarge Press this button to Press this page. Press this button again half of the page. the bottom half of the to return to the normal display. UPDATE Displays the teletext PR TV picture on page.
Connection of external You connect additional can etc. to your set. Examples equipment equipment, are such as VCRs, camcorders shown below. Aerial socket 1. Connect the RF out socket of the VCR to the aerial socket of 2. the set. Connect the aerial cable to the RF aerial in socket of the VCR. 3. VCR 4. 5. Store the VCR channel on a desired programme number using the 'Manual programme tuning' section. Select the programme number where the VCR channel is stored.
Connection of external S-Video/Audio in sockets When connecting picture quality will 1. an (S-Video) S-VIDEO VCR to the S-VIDEO be further equipment socket, the S-VIDEO improved. VIDEO L/MON Connect the S-Video socket of the VCR to the S-VIDEO sock- AUDIO R et of the set. 2. S-VIDEO VCR sockets of the set. 3. 4.
Connection of PC PC in socket 1. 2. 3. 4. PERSONAL COMPUTER (D-Sub jack) Connect the signal cable from the monitor output socket of the PERSONAL COMPUTER to the PC input socket of the set. Connect the audio cable from the PC to the PC SOUND sockets of the set. Press the TV/AV or TV/PC button to select PC. Switch on the PC, and the PC screen appears on the set. The set can be operated as the PC monitor.
Connection of PC Menu selection 1. 2. 3. Repeatedly Press the item. Press the press the MENU button to display each menu. button and then button to select a menu / button to display the sub menu or the pull-down menu. 4. Change the setting of an item in the sub or pull-down menu with /or/. You can move to the higher level menu by pressing the OK or button and to move to the lower level menu by pressing the button. Note : a. See 'Picture adjustment' section to adjust the picture. b.
Connection of PC Special Special Menu CH. Input Setup { PIP { Language { PC Setup You can { ()O{OOKOMENU adjust horizontal/vertical position, clock, configure and reset as you prefer. 1. Repeatedly 2. Press the Press the 3. picture clock auto- phase, press the MENU button to select the Special menu. button and then button to select Setup. / button and then button to select the desired / item.
PIP PIP PIP 1. 2. operation operation Press the Special Special (Picture in Picture) displays a picture within a picture in the PC mode. RepeatedlyG press the MENU button to select the Special menu. button and then / E button to select PIP. D CH. Input Setup { PIP { Language { Menu { PIPOMenu PIP { Input { PR { Position { SoundOselect { OOff OPIP(S) OPIP(M) OPIP(L) ()O{OOKOMENU ()O}{OOKOMENU 3. 4. 5.
Troubleshooting check list Symptoms No picture, no Sound sound OK, poor picture Picture OK, poor sound Picture blurred Lines or streaks in Poor picture reception on some channels No colour Poor colour Remote control does not work Incorrect position Vertical bars or stripes on background Horizontal noise Signal Cable message appears Check these items and try to these adjust The mains plug-(plugged in and switched on) Is the TV switched Try on another channel (weak signal) C