OWNER’S MANUAL WIRELESS SOUND BAR Please read this manual carefully before operating your set and retain it for future reference. Model S75Q (S75Q, SPQ7-W) S75Q (S75Q, SPQ7B-W) 2304_Rev04 www.lg.com Copyright © 2022-2023 LG Electronics Inc. All Rights Reserved.
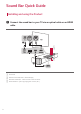
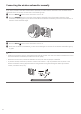
Sound Bar Quick Guide Installing and using the Product a Connect the sound bar to your TV via an optical cable or an HDMI cable. OPTICAL OUT a HDMI IN (ARC) HDMI IN a A B C D b HDMI OUT A Sound bar B Remote Control Receiver / Status Display C Wireless Subwoofer - Install it close to the sound bar. D External Device - (Blu-ray player, game console, etc.
b If you are using an external device (ex. Blu-ray player, game console, etc.), connect it to the sound bar via an HDMI cable. c Connect to power in the following order: wireless subwoofer [ sound bar. Then, turn on the sound bar. When the connection is automatically established with the sound bar, the LED on the wireless subwoofer will light up in green. ([ See “Connecting the Product” on page 6.
Manually connecting the sound bar to the wireless subwoofer ([ See “Connecting the wireless subwoofer manually” on page 8.) If you see a red LED on the back of the wireless subwoofer, it means that the sound bar is not connected to the subwoofer. If this is the case, connect them in the following order. A Press the Power button on the sound bar to turn it off. B Press the PAIRING button on the back of the disconnected wireless subwoofer. Check if LED blinks green.
Table of Contents Sound Bar Quick Guide 2 Installing and using the Product Installation 6 Connecting the Product 9 Enjoying enhanced sound Exploring the Product 17 Front 19 Back 20 Exploring Remote Control Connecting to the TV Mounting the Product to a Wall 43 Checking before mounting to a wall 45 Mounting the Product to a Wall Safety Precautions 47 Safety and Regulatory Before Reporting Product Malfunction 50 Troubleshooting Appendix 53 Specifications 28 Connecting with an Optical C
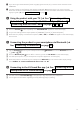
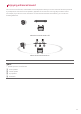
Installation Connecting the Product You can enjoy a richer sound by connecting the sound bar to the wireless subwoofer. Connecting the wireless subwoofer automatically After completing installation, the wireless subwoofer will automatically be connected to the sound bar. Connect the sound bar to the subwoofer in the following order. a Plug the power cable into the wireless subwoofer. b Plug the power cable connected to the wireless subwoofer into an outlet. c Plug the power cable into the AC adapter.
Checking the connection with the LED on the back of the wireless subwoofer You can check the connection status by looking at the LED on the back of the wireless subwoofer.
Connecting the wireless subwoofer manually If you see a red LED on the back of the wireless subwoofer, it means that the sound bar is not connected to the subwoofer. If this is the case, connect them in the following order. a Press the Power button on the sound bar to turn it off. b Press the PAIRING button on the back of the wireless subwoofer. Check if the LED on the back of the subwoofer is blinking green.
Enjoying enhanced sound The surround sound function and the Multi-channel Experience allow you to hear immersive 3D sound produced by multiple audio channels from the speakers, regardless of the channels in the originally recorded content. For example, if you listen to music recorded in 2.0 channels with standard sound effects, you can hear the following difference. When the surround sound is off When the surround sound is on Note • Speaker positions are as follows.
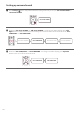
Setting up surround sound a Press Settings button. The product enters the setting mode and you can see “OFF-AUTO POWER” or “ON-AUTO POWER”. OFF-AUTO POWER b While the “OFF-AUTO POWER” or “ON-AUTO POWER” is scrolling in the status display, press Left/ Right button to select the surround sound setting. You can see the status of the surround sound, “OFFSURROUND” or “ON-SURROUND”.
Using Multi-channel Experience Plays sound from all speakers to enhance surround sound regardless of the channel configuration of the input source. You can control this function on the LG Sound Bar app. Note • It may not work depending on the selected sound effect.
Surround sound function ON When the surround sound function is turned on, sound is output from all connected speakers regardless of whether the Multi-channel Experience is turned on or off. Sound Effects Input All Sound Effects 2.0 channels 5.
Surround sound function OFF When the surround sound function is turned off, sound is output differently from the connected speakers depending on whether the Multi-channel Experience is turned on or off. Multi-channel Experience ON Sound Effects Input Output AI SOUND PRO Sound customized with artificial intelligence 2.0 channels 5.1 channels or more STANDARD You can enjoy optimized sound. 2.0 channels 5.1 channels or more CINEMA Cinematic 3D sound 2.0 channels 5.
Sound Effects Input GAME Optimized sound for game 2.0 channels 5.1 channels or more BASS BLAST (BASS BLAST+) Sound with reinforced bass 2.0 channels 5.
Multi-channel Experience OFF Sound Effects Input Output AI SOUND PRO Sound customized with artificial intelligence 2.0 channels 5.1 channels or more STANDARD You can enjoy optimized sound. 2.0 channels 5.1 channels or more CINEMA Cinematic 3D sound 2.0 channels 5.1 channels or more CLEAR VOICE PRO Voice sound clear, improving the quality of voice sound 2.0 channels 5.1 channels or more SPORTS Realistic sound like in a stadium 2.0 channels 5.
Sound Effects Input GAME Optimized sound for game 2.0 channels 5.1 channels or more BASS BLAST (BASS BLAST+) Sound with reinforced bass 2.0 channels 5.
Exploring the Product Front a a Power This turns the product on/off. Function Press the button repeatedly to select the desired function or input mode. • OPT/HDMI ARC: Connects the product to a TV that supports an optical cable, ARC, E-ARC, or LG Sound Sync • BT: Connects the product via Bluetooth • LG TV: Connects the product to a TV that supports LG Sound Sync (Wireless) • HDMI: Connects the product to an HDMI input port • USB: Connects the product to a USB storage device Volume Adjusts the sound volume.
Note • To reduce power consumption, the product will automatically turn off after 15 minutes of no input signal from an external device.
Back e a OPTICAL IN Plug in an optical cable to connect the TV to the product. b USB port Plug in a USB storage device to play music with the product. c HDMI IN Plug in an HDMI cable to connect an external device to the product. d HDMI OUT (TV eARC/ARC) Plug in an HDMI cable to connect the TV to the product. e DC IN Plug in the AC adapter with the product.
Exploring Remote Control You can use the remote to control all functions of the product, from turning the power on/off to enabling cinematic sound. a f b g c d h i j e k Replacement of Battery Use AA 1.5V batteries. Replace the two batteries by inserting them into the remote control in accordance with the directions indicated. A Open the battery cover on the back of the remote control. B Insert the batteries with the + and – ends corresponding to the markings. C Close the battery cover.
c Bluetooth pair It allows you to pair your Bluetooth device such as a smartphone to this product for three minutes. ([ See “Connecting via Bluetooth” on page 36.) It allows you to pair your LG TV to this product for three minutes. ([ See “Connecting with LG Sound Sync (Wireless)” on page 30.) d Sound Effects Press the button to select the desired sound field. • AI SOUND PRO: Artificial intelligence selects the optimal sound settings to suit your content. • STANDARD: You can enjoy optimized sound.
i Up/Down/Left/Right These buttons are used to adjust the settings of the convenient functions. Up/Down: This scrolls through the folders on the USB storage device. You can press the button to select the desired folder. Left/Right: If you play a previous song, press Left button. If you play a next song, press Right button. j Play/Pause If you play or pause a song, press this button.
Controlling the product with your TV’s remote control The product volume can be adjusted with LG TV Remote control as well as other brands. Functions controllable with a TV remote control Volume, mute on/off TV brands supported LG, Panasonic, Philips, Samsung, Sharp Electronics, Sony, Toshiba, Vizio Activating/Deactivating this function a Press Settings button. The product enters the setting mode and you can see “OFF-AUTO POWER” or “ON-AUTO POWER”.
Note • Press the Settings button on the TV remote control to check if the TV's audio output is set to [External Speaker]. • You cannot control the product with the LG TV's Magic Remote Control. • When the SIMPLINK or Sound Sync functions of the TV are turned on, this function may not work properly. Press the Settings button on the TV remote control to turn off this function. • This function may not work well when the unit and the TV are connected with an HDMI cable.
Using Night Time This reduces the general sound volume, but raises the volume of soft and delicate sounds. This is useful when enjoying music or a movie late at night. Activating/Deactivating the Night Time function a Press Settings button. The product enters the setting mode and you can see “OFF-AUTO POWER” or “ON-AUTO POWER”. OFF-AUTO POWER b While the “OFF-AUTO POWER” or “ON-AUTO POWER” is scrolling in the status display, press Left/Right button to select the Night time setting.
Using Display The status display can be controlled as auto, on, and off. Option Status display AUTO Dimmed after 20 seconds of button input. ON Always on OFF Turned off after 20 seconds of button input. Activating/Deactivating the Display function a Press Settings button. The product enters the setting mode and you can see “OFF-AUTO POWER” or “ON-AUTO POWER”.
c While the "AUTO-DISPLAY", "ON-DISPLAY" or “OFF-DISPLAY ” is scrolling in the status display, Press Up/ Down button to change the Display to “AUTO” or turn it on or off. AUTO-DISPLAY ON-DISPLAY OFF-DISPLAY Using Quick start This reduces booting time by staying standby mode using low power consumption. Activating/Deactivating the Quick start function Press and hold button on the product for 3 seconds when the product is turn on. Then you can see “ONQUICK START”.
Connecting to the TV Connecting with an Optical Cable Transmit your TV’s audio to the product by connecting it to the TV with an optical cable. You can add a variety of 3D effects to the original audio to fill the room with a deep, rich sound. Watching TV after connecting with an optical cable a If the digital cable terminal has a cover, first remove the covers from both ends.
c Press the Function button repeatedly until “OPT/HDMI ARC” appears on the status display. d Press the Settings button on the TV remote control to enter the [Speaker] menu and set the output speaker to [Optical] or [External Speaker]. Settings and menu items may vary depending on the TV manufacturer. Note • If the optical input signal and the ARC signal attempt to connect at the same time, the ARC signal will take priority.
Connecting with LG Sound Sync (Wireless) You can adjust the volume with the LG TV remote control if the TV is connected to the product with LG Sound Sync (Wireless). Check out the TV user manual to see if your TV is supported. Watching TV after connecting it wirelessly a Press the Function button repeatedly until “LG TV” appears on the status display. After a moment, it will show “BT READY”. Or Press the Bluetooth pair button. After a moment, it will show “BT READY”.
Connecting with an HDMI Cable You can transmit TV audio to the product by connecting the TV to the product with an HDMI cable. Add a variety of 3D effects to the original audio to fill the room with a deep, rich sound. Watching TV after connecting with an HDMI cable a Using the HDMI cable, connect the HDMI OUT (TV eARC/ARC) terminal on the back of the product to the HDMI IN (ARC) terminal on the TV as shown in the picture.
SIMPLINK • SIMPLINK refers to the HDMI-CEC function that allows you to use a single TV remote control to easily operate an audio device or player connected to an LG TV via HDMI. -- Functions controllable with a SIMPLINK-compatible LG TV remote control: Power on/off, volume control, mute on/off, etc. • For more information on how to set up SIMPLINK, consult your LG TV’s user manual. Note • The SIMPLINK function may not work properly depending on the status of the product or other connected devices.
Connecting to an External Device Connecting with an HDMI Cable Connect the TV and external device (game console, DVD player, etc.) with an HDMI cable and enjoy a deep and rich sound. Connecting an external device via HDMI a Connect an external device such as a DVD or Blu-ray player. Following the picture below, connect the HDMI OUT terminal of the device to the HDMI IN terminal on the back of the product.
c Press the Function button repeatedly until “HDMI” appears on the status display. d When the external device is properly connected to the product, you can listen to the sound of the device. When playing the video with Dolby Atmos® or DTS:X® technology, either “DOLBY ATMOS” or “DTS:X” will appear on the status display. Note • Dolby Atmos® or DTS:X® audio supports 3.1.2 channels. • Please check the audio output settings in the Settings menu of your external device (ex. Blu-ray player or TV).
Connecting with an Optical Cable Connect the TV and external device (game console, DVD player, etc.) with an optical cable and enjoy a deep and rich sound. Connecting an external device via optical cable a Use the optical cable to connect the OPTICAL IN terminal on the back of the product to the OPTICAL OUT terminal of your external device (ex. TV, Blu-ray player) as shown in the picture. b Press the Function button repeatedly until “OPT/HDMI ARC” appears on the status display.
Using the Product as an Audio System Connecting via Bluetooth You can play music files stored on a Bluetooth device, or run music apps to enjoy the music with this product. Please check the following first. • Bluetooth devices to be connected to the product should meet the following specifications. -- Bluetooth 4.2 technology -- Codec: SBC, AAC • Steps to connect the device to the product may vary depending on the Bluetooth device type and model.
(iPhone) d Turn on the Bluetooth function. ( Off > On) e You will see a list of connectable devices on your smartphone. Find and tap “LG S75Q (XX)”.
h Run a Music app and listen to music on the smartphone. Note • The closer the Bluetooth device is to the product, the better your connection. • If you pressed the Bluetooth pair button of the product and selected the “BT” option, but could not connect to the Bluetooth device, you will see “BT READY” on the status display. Check the status of the Bluetooth device. • When using Bluetooth, you should adjust the volume level to an appropriate level. • XX is the last 2 digits of the MAC address of the product.
Connecting with a Smartphone via LG Sound Bar app Please use the LG Sound Bar app to run various functions of the product conveniently. Please check the following first. • The LG Sound Bar app is available in the versions listed below. -- Android™ OS: Version 6.0 or higher -- iOS OS: Version 12 or higher -- Minimum supported versions for each OS may change later. Installing the app Install the LG Sound Bar app on your smartphone.
Downloading from Google Play or App Store Go to the Google Play or the App Store on your smartphone and search for the LG Sound Bar app to install it. (Android™ Phone) (iPhone) Note • Settings menu items may vary depending on the smartphone manufacturer and OS. • Google, Android and Google Play are trademarks of Google LLC.
Connecting to a USB Storage Device Enjoy high-quality sound by connecting a USB storage device containing music files to the product. Connecting the product to a USB storage device a Plug the USB storage device into the USB port on the back of the product. • The product cannot play any devices connected via a USB storage device hub or a USB storage device cable.
USB storage devices supported • MP3 player • Flash MP3 player • USB flash device • USB 2.0 This product may not recognize some USB storage devices. Playable file specifications File extension Sampling frequency / Bitrate MP3 32 kHz - 48 kHz / 8 kbps - 320 kbps WMA 32 kHz - 48 kHz / 56 kbps - 128 kbps AAC 32 kHz - 48 kHz / 8 kbps - 320 kbps OGG 32 kHz - 48 kHz / 64 kbps - 320 kbps File extension Sampling frequency FLAC (16 bit/24 bit) 32 kHz, 44.1 kHz, 48 kHz, 88.2 kHz, 96 kHz, 176.
Mounting the Product to a Wall Checking before mounting to a wall You can mount this product onto a wall. When mounting the product to the wall, follow the instructions below. Please check the following first. • It may be difficult to connect external devices and cables after wall-mounting. First, connect an external device with the proper connection cable to the product before mounting it to the wall. • Please note the following when you mount the product to the wall.
Sold separately Bracket screws Wall plugs Note • Screws and Wall Plugs are not supplied for mounting the product. We recommend the Hilti (HUD-1 6 x 30) for the mounting.
Mounting the Product to a Wall a Find the wall bracket installation guide in the product package. b Align the “TV Bottom Line” on the wall bracket installation guide with the bottom of the TV, and attach it to the wall. Align the center of the wall-mounted TV with the part marked “TV Center” in the installation guide. c With a pen, mark screw holes on the installation guide where the wall brackets will be attached. d Drill screw holes in the marked positions on the installation guide.
f Fix the brackets firmly to the wall using the wall plugs and screws. g Place the product on the brackets. Position the product on the brackets so the screw holes on the bottom of the product align with the screw holes on the wall bracket. h Firmly attach the product to the wall brackets using the screws provided.
Safety Precautions Safety and Regulatory CAUTION RISK OF ELECTRIC SHOCK DO NOT OPEN CAUTION: TO REDUCE THE RISK OF ELECTRIC SHOCK DO NOT REMOVE COVER (OR BACK) NO USERSERVICEABLE PARTS INSIDE REFER SERVICING TO QUALIFIED SERVICE PERSONNEL. This lightning flash with arrowhead symbol within an equilateral triangle is intended to alert the user to the presence of uninsulated dangerous voltage within the product’s enclosure that may be of sufficient magnitude to constitute a risk of electric shock to persons.
CAUTION concerning the Power Cord The Power Plug is the disconnecting device. In case of an emergency, the Power Plug must remain readily accessible. Check the specification page of this owner’s manual to be certain of the current requirements. Do not overload wall outlets. Overloaded wall outlets, loose or damaged wall outlets, extension cords, frayed power cords, or damaged or cracked wire insulation are dangerous. Any of these conditions could result in electric shock or fire.
For models using a battery This device is equipped with a portable battery or accumulator. CAUTION: Risk of fire or explosion if the battery is replaced by an incorrect type. For models using a built-in battery Do not store or transport at pressures lower than 11.6 kPa (0.116 bar) and at above 15,000 m (9.32 miles) altitude.
Before Reporting Product Malfunction Troubleshooting If you experience the following issues while using the product, please perform several checks, as they may not be malfunctions. General Errors Issue Solution The product does not work properly • Unplug the power cables and any external devices such as your TV, subwoofer, or amplifier from the product, then plug them in again.
The product volume is low • Check the following and change the settings accordingly. -- Run the LG Sound Bar app, tap the Settings button on the first screen, and change the [DRC] function to [Off] on the [Sound Settings] menu. -- When the product is connected to a TV, press the Settings button on the TV remote control, select the [Speaker] menu, and change the [Digital Sound Output] setting from [PCM] to [AUTO] or [BITSTREAM].
Problems in Wireless Connection Issue There is radio interference Solution • Install the product and the wireless subwoofer as close to each other as possible. • Do not install the product on metal furniture. • Wireless communication may not work properly in weak signal areas.
Appendix Specifications General Power Consumption Refer to the main label. • Model : DA-50F25 • Manufacturer : Asian Power Devices Inc. • Input : 100 - 240 V ~ 50 - 60 Hz AC adapter • Output : 25 V 0 2 A • Model : MS-Z2000R250-050D0-P • Manufacturer : MOSO POWER SUPPLY TECHNOLOGY CO., LTD. • Input : 100 - 240 V ~ 50/60 Hz • Output : 25 V 0 2 A Dimensions (W x H x D) Approx. 890.0 mm x 65.0 mm x 119.0 mm (including the base) (35.0 inch x 2.6 inch x 4.
Wireless Subwoofer Power Requirement Refer to the main label on the Wireless Subwoofer. Power Consumption Refer to the main label on the Wireless Subwoofer. Type 1-way 1 speaker Impedance 3Ω Rated power 220 W RMS Max. Power 440 W RMS Dimensions (W x H x D) Approx. 180.0 mm × 394.0 mm × 290.0 mm (7.1 inch x 15.5 inch x 11.4 inch) • Design and specifications are subject to change without notice.
Registered Trademarks and Licenses All trademarks and trade names are the property of their respective owners. Dolby, Dolby Vision, Dolby Atmos, and the double-D symbol are registered trademarks of Dolby Laboratories Licensing Corporation. Manufactured under license from Dolby Laboratories. Confidential unpublished works. Copyright © 2012–2021 Dolby Laboratories. All rights reserved. The Bluetooth® word mark and logos are registered trademarks owned by the Bluetooth SIG, Inc.
For DTS patents, see http://patents.dts.com. Manufactured under license from DTS, Inc. (for companies headquartered in the U.S./Japan/Taiwan) or under license from DTS Licensing Limited (for all other companies). DTS, DTS:X, and the DTS:X logo are registered trademarks or trademarks of DTS, Inc. in the United States and other countries. © 2022 DTS, Inc. ALL RIGHTS RESERVED.
Open Source Software Notice Information To obtain the source code that is contained in this product, under GPL, LGPL, MPL, and other open source licenses that have the obligation to disclose source code, and to access all referred license terms, copyright notices and other relevant documents, please visit https://opensource.lge.com.