OWNER’S MANUAL Wireless Sound Bar Please read this manual carefully before operating your set and retain it for future reference. MODEL SJ2 (SJ2, SPJ2B-W) *MFL70040403* www.lg.com Copyright © 2017 LG Electronics.
Getting Started Safety Information 1 CAUTION Getting Started RISK OF ELECTRIC SHOCK DO NOT OPEN CAUTION: TO REDUCE THE RISK OF ELECTRIC SHOCK DO NOT REMOVE COVER (OR BACK) NO USER-SERVICEABLE PARTS INSIDE REFER SERVICING TO QUALIFIED SERVICE PERSONNEL.
Getting Started CAUTION concerning the Power Cord The Power Plug is the disconnecting device. In case of an emergency, the Power Plug must remain readily accessible. Do not overload wall outlets. Overloaded wall outlets, loose or damaged wall outlets, extension cords, frayed power cords, or damaged or cracked wire insulation are dangerous. Any of these conditions could result in electric shock or fire.
Getting Started Symbols ~ 1 0 Refers to alternating current (AC). Refers to direct current (DC). Getting Started Refers to class II equipment. 1 Refers to stand-by. ! Refers to “ON” (power). Refers to dangerous voltage.
Table of Contents Table of Contents 1 Getting Started 2 6 6 6 7 8 8 9 10 11 Safety Information Unique features Introduction – Symbols used in this manual Remote control Front panel Rear panel About LED condition Installing the sound bar Mounting the main unit on a wall 2 Connecting 13 14 14 15 15 15 16 16 16 17 Wireless subwoofer connection Connecting to your TV – Using an OPTICAL cable Optional equipment connection – OPT. IN connection – PORT.
1 Getting Started Unique features Introduction Auto power down Symbols used in this manual Getting Started This unit supports to turn off by itself for saving energy consumption. Portable In Listen to music from your portable device. (MP3 player, Notebook, Smart phone, etc..) BLUETOOTH® Listens to music stored on your Bluetooth device. USB playback Listens to music stored on your USB device. ,,Note Indicates special notes and operating features.
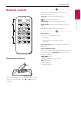
Getting Started Remote control 7 • • • • • • • • • • • • • • a• • • • • • • • • • • • • • 1 (Power) : Switches the unit ON or OFF F : Selects the function. OPTICAL : Selects the optical function. STANDARD : Selects standardized sound. BASS BLAST: Reinforces the treble, bass sound effect. VOL o/p : Adjusts speaker volume. • • • • • • • • • • • • • • b• • • • • • • • • • • • • • DRC ON/OFF : -- Turns on or off DRC function. (Page 18) -- Controls this unit using TV remote.
Getting Started Front panel 1 Getting Started A Standby LED (Red) D The buttons are located on the rear. B Function LED (White) C Remote sensor Rear panel A o/p (Volume) : Adjusts volume level F (Function) : Selects the function. 1 (Standby) B (USB) : Connect to a USB device. C PORT.IN (Portable) : Connect to a Portable device. D OPT. IN (Optical) : Connect to an Optical device.
Getting Started 9 About LED condition LED Condition Description OPTICAL function is selected. USB LED turns on. USB function is selected. USB LED blinks. Paused USB playback. Bluetooth LED turns on. Paired with Bluetooth device. Bluetooth LED blinks. Waiting for Bluetooth connection. PORTABLE LED turns on. PORTABLE function is selected. ,,Note yy When you press any button, standby LED (Red) on the main unit blinks. (Mute) button, standby LED (Red) blinks slowly.
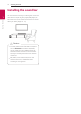
Getting Started Installing the sound bar 1 You can hear the sound by connecting the unit to the other device : TV, Blu-ray disc player, DVD player, etc. Getting Started Place the unit in front of the TV and connect it to the device you want. (Page 14- 17) >>Caution yy For best performance of wireless connection such as Bluetooth or wireless subwoofer, do not install the unit on Metallic furniture because wireless connection communicates through a module positioned on the bottom of the unit.
Getting Started 11 Mounting the main unit on a wall 1. Match the TV’s BOTTOM EDGE of Wall bracket install guide with the bottom of TV and attach to the position. 1 You can mount the main unit on a wall. Getting Started >>Caution Because it is difficult to make a connection after installing this unit, you should connect the cables before installation. 2. When you mount it on a wall (concrete), use the wall plugs. You should drill some holes.
Getting Started 4. Fix the brackets with screws (A) as shown in the illustration below. 6. Fix the unit with the screws firmly. 1 Getting Started ,,Note Screws (A) and Wall Plugs are not supplied for mounting the unit. We recommend the Hilti (HUD-1 6 x 30) for the mounting. 5. Put the unit on the brackets to match screw holes on the bottom of the unit. ,,Note To detach the unit, perform it in reverse order. >>Caution yy Do not install this unit upside down.
Connecting 13 Wireless subwoofer connection 1. Press Pairing button on the rear of the wireless subwoofer. LED indicator of wireless subwoofer Status Green (Blink) Attempting to make connection. Green The connection is completed. Red The wireless subwoofer is in standby mode or the connection is failed. Off (No display) The power cord of wireless subwoofer is disconnected. Setting up the wireless subwoofer for the first time 1.
Connecting Connecting to your TV Using an OPTICAL cable 1. Connect the OPT. IN jack on the back of the unit to OPTICAL OUT jack on the TV using an OPTICAL cable. 2 Connecting Optical cable 2. Select the input source to Optical by pressing OPTICAL button on the remote control or F button on the unit repeatedly. ,,Note yy Before connecting the optical cable, be sure to remove the protection plug cover if your cable has the cover. yy You can enjoy the TV audio through the speakers of this unit.
Connecting 15 Optional equipment connection PORT. IN connection OPT. IN connection Connect an optical output jack of external devices to the OPT. IN jack. Portable cable 2 Connecting To the digital optical output jack of external device Optical cable Listening to music from your portable player 1. Connect the OPT. IN jack on the back of the unit to OPTICAL OUT jack of your external device. The unit can be used to play the music from many types of portable players or external devices. 2.
Connecting USB connection USB device requirement Connect USB memory device to the USB port on the back of the unit. yy Devices which require additional program installation connected to a computer, are not supported. yy Do not extract the USB device while in operation. yy For a large capacity USB, it may take longer than a few minutes to be searched. yy To prevent data loss, back up all data. yy This unit is not supported when the total number of files is 999 or more.
Connecting 17 Playable file Sampling Frequency MP3 : within 32 to 48 kHz WMA : within 32 to 48 kHz ,,Note yy Folders and files on the USB are recognized as below. : Folder : File Bitrate MP3 : within 80 to 320 kbps WMA : within 56 to 128 kbps a D 2 E yy A protected file by DRM (Digital rights management) cannot be played on the unit. b F G c H I yy Depending on the performance of your USB device, playback may not work well. A d J B yy File will be played from file $A to file $J one by one.
Operating Basic operations Other operations USB operation DRC (Dynamic Range Control) 1. Connect the USB device to the USB port. Make the sound clear when the volume is turned down and prevent sudden increase of sound (Dolby Digital only). This function turns on or off when you press DRC ON/OFF. 2. Select the input source to USB by pressing F button on the remote control or unit repeatedly. To Playback Pause 3 Do this Press dM. During playback, press dM.
Operating 19 Auto power down This unit will turn itself off to save electric consumption if the main unit is not connected to an external device and has not been used for 15 minutes. This unit also turns off after six hours if the Main unit has been connected to another device using the analog input. (Ex : Portable, etc..) AUTO POWER On/Off This unit automatically turns on by an input source : Optical or Bluetooth.
Operating Auto function change This unit recognizes input signals such as Optical, Bluetooth and Portable and then changes suitable function automatically. When optical signal comes in When you turn on the external device connected to this unit by an optical cable, this unit change the function to optical. You can hear the sound from your device. When you try to connect Bluetooth device 3 Operating When you try to connect your Bluetooth device to this unit, Bluetooth function is selected.
Operating 21 Using BLUETOOTH® technology Listening to music stored on the Bluetooth devices Pairing your unit and Bluetooth device About Bluetooth Bluetooth is wireless communication technology for short range connection. The sound may be interrupted when the connection interfered by the other electronic wave or you connect the Bluetooth in the other rooms. yy Available Devices : Smart phone, MP3 player, Notebook, etc.. yy Version : 4.
Operating ,,Note yy When using Bluetooth technology, you have to make a connection between the unit and the Bluetooth device as close as possible and keep the distance. However it may not work well in the cases below : -- There is an obstacle between the unit and the Bluetooth device. -- There is a device using same frequency with Bluetooth technology such as a medical equipment, a microwave or a wireless LAN device.
Operating 23 Sound adjustment Setting the surround mode This system has two pre-set surround sound fields. You can select a desired sound mode by using each sound mode button. Sound effect Description STANDARD You can enjoy optimized sound. BASS BLAST Reinforces the treble, bass sound effect. yy In some of sound effect mode, some speakers, there’s no sound or low sound. It depends on the mode of sound and the source of audio, it is not defective.
Troubleshooting Troubleshooting General PROBLEM CAUSE & CORRECTION yy Turn off the power of this unit and the connected external device (TV, Woofer, DVD-player, Amplifier, etc.) and turn them on again. The unit does not work properly. yy Disconnect the power cord of this unit and the connected external device (TV, Woofer, DVD-player, Amplifier, etc.) and then try connecting again. yy Previous setting may not be saved when device power is shut off. No Power yy The power cord is unplugged.
Troubleshooting 25 PROBLEM CAUSE & CORRECTION Check the details below and adjust the unit according to them. When you feel the output sound of the unit is low. yy Switch [ON] state of DRC function to [OFF] by using remote controller. yy With the sound bar connected with TV, change the AUDIO DIGITAL OUT setting on TV Setup Menu from [PCM] to [AUTO] or [BITSTREAM].
Appendix Trademarks and licenses All other trademarks are trademarks of their respective owners. Manufactured under license from Dolby Laboratories. Dolby, Dolby Audio, and the double-D symbol are trademarks of Dolby Laboratories. 5 The Bluetooth® word mark and logos are registered trademarks owned by the Bluetooth SIG, Inc. and any use of such marks by LG Electronics is under license. Other trademarks and trade names are those of their respective owners.
Appendix 27 Specifications General Power requirements Refer to the main label. Power consumption Refer to the main label. Dimensions (W x H x D) Approx. 660 mm x 56 mm x 99 mm with foot Operating temperature 5 °C to 35 °C Operating humidity 5 % to 90 % Bus Power Supply 5 V 0 500 mA Available Digital Input Audio Sampling Frequency 32 kHz, 44.1 kHz, 48 kHz, 88.2 kHz, 96 kHz Available Digital Input Audio format Dolby Audio, PCM Inputs OPT. IN (Digital audio in) 0 dBfs, Optical jack x 1 PORT.
Appendix Maintenance Handling the unit When shipping the unit Please save the original shipping carton and packing materials. If you need to ship the unit, for maximum protection, re-pack the unit as it was originally packed at the factory. Keeping the exterior surfaces clean yy Do not use volatile liquids such as insecticide spray near the unit. yy Wiping with strong pressure may damage the surface. yy Do not leave rubber or plastic products in contact with the unit for a long period of time.