ENGLISH FRANÇAIS ESPAÑOL OWNER’S MANUAL BUILT-IN FREEZER Read this owner's manual thoroughly before operating the appliance and keep it handy for reference at all times. SKSCF1801P www.signaturekitchensuite.com MFL70339801_Rev.02 Copyright © 2017 Signature Kitchen Suite. All Rights Reserved.
TABLE OF CONTENTS TABLE OF CONTENTS 3 PRODUCT FEATURES 4 SAFETY INSTRUCTIONS 4 IMPORTANT SAFETY INSTRUCTIONS 8 PRODUCT SPECIFICATIONS 9 PRODUCT OVERVIEW 9 Interior 10 OPERATION 10 11 13 13 13 17 Before Use Control Panel Ice Compartment Automatic Icemaker Storing Food Adjusting the Shelves 18 SMART FUNCTIONS 18 20 21 SIGNATURE KITCHEN SUITE Application Smart Grid Function Smart Diagnosis™ Function 24 MAINTENANCE 24 25 Cleaning Replacing the Water Filter 30 TROUBLESHOOTING 30 31 FAQs:
PRODUCT FEATURES 3 PRODUCT FEATURES Depending on the model, some of the following functions may not be available. The Door Alarm function is designed to prevent freezer malfunctioning that could occur if a door remains open. If a door is left open for more than 60 seconds, a warning alarm sounds at 30-second intervals. ICE PLUS Ice production is increased when the freezer section is maintained at the coldest temperature for a 24-hour period.
SAFETY INSTRUCTIONS SAFETY INSTRUCTIONS READ ALL INSTRUCTIONS BEFORE USE Your safety and the safety of others are very important. We have provided many important safety messages in this manual and on your appliance. Always read and follow all safety messages. This is the safety alert symbol. This symbol alerts you to potential hazards that can kill or injure you and others. All safety messages will follow the safety alert symbol and either the word WARNING or CAUTION.
SAFETY INSTRUCTIONS 5 OPERATION ••DO NOT allow children to climb, stand, or hang on the freezer doors or on the shelves in the freezer. They could damage the freezer and seriously injure themselves. ••Do not allow children to climb into the freezer. They could be trapped and suffocated. ••Children should be supervised to ensure that they do not play with the freezer. ••Keep fingers out of pinch point areas when opening or closing doors. Be careful closing doors when children are nearby.
SAFETY INSTRUCTIONS MAINTENANCE ••Do not use a hair dryer to dry the inside of the freezer. ••Do not light a candle to remove odors in the freezer. ••In the event of a refrigerant leak, move flammable objects away from the freezer. Ensure the area is adequately ventilated and contact an authorized service center. ••Keep flammable materials and vapors, such as gasoline, away from the freezer.
SAFETY INSTRUCTIONS 7 CAUTION INSTALLATION ••Do not install the freezer where there may be a danger of the unit falling. ••The freezer must be properly installed in accordance with the Installation Instructions. OPERATION ••Do not use aerosols near the freezer. ••This appliance is intended to be used only in domestic and similar applications. ••Do not strike or apply excessive force to any glass surface. Do not touch glass surfaces if they are cracked or broken.
PRODUCT SPECIFICATIONS PRODUCT SPECIFICATIONS The appearance and specifications listed in this manual may vary due to constant product improvements. Electrical requirements: 115 V, 60 Hz Min. / Max.
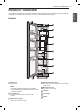
PRODUCT OVERVIEW 9 PRODUCT OVERVIEW Interior 1 2 3 4 5 6 7 8 1 Water filter Purifies water. NOTE ••The filter should be replaced every 6 months. See the Replacing the Water Filter section in this manual for details. 2 Control Panel Sets the freezer temperature and the water filter condition. 3 LED interior lighting Lights up the inside of the freezer. 4 Adjustable Freezer Shelf The freezer shelves are adjustable to meet individual storage needs.
OPERATION OPERATION Before Use Clean the freezer. Clean the freezer thoroughly and wipe off all dust that accumulated during shipping. CAUTION •• Do not scratch the freezer with a sharp object or use a detergent that contains alcohol, a flammable liquid or an abrasive when removing any tape or adhesive from the freezer. Remove adhesive residue by wiping it off with your thumb or dish detergent.
OPERATION 11 Control Panel Depending on the model, some of the following functions may not be available. ENGLISH Control Panel Features 1 5 2 6 3 7 4 NOTE ••When the freezer is in the Power Saving Mode, the display remains off until the door is opened or a button is pressed. Once on, the display remains on for 20 seconds. 1 2 Ice Plus This function increases both ice making and freezing capabilities. • Press the Ice Plus button to illuminate the icon and activate the function for 24 hours.
OPERATION 4 and 7 SABBATH Sabbath mode is used on the Jewish Sabbath and holidays. • To turn Sabbath mode on, touch the display to activate it, then press and hold the Freezer and Power buttons for 3 seconds until Sb appears in the display. • Sabbath mode automatically turns off after 96 hours. • To turn Sabbath mode off manually, press and hold the Freezer and Power buttons for 3 seconds. • Once turned on, Sabbath mode is maintained even after a power outage.
OPERATION 13 Ice Compartment ••Keep hands and tools out of the ice compartment. Failure to do so may result in damage or personal injury. ••Throw away the first few batches of ice after installation. This is also necessary if the freezer has not been used for a long time. Set the Ice On/Off button to OFF and shut off the water supply to the freezer. NOTE • The ice bin should be emptied any time the Ice On/ Off button is turned to the OFF mode.
OPERATION Food Storage Tips Storing Frozen Food Wrap or store food in the freezer in airtight and moisture-proof material unless otherwise noted. This prevents food odor and taste transfer throughout the freezer. For dated products, check date code to ensure freshness. Check a freezer guide or a reliable cookbook for further information about preparing food for freezing or food storage times. Food How to Butter or Margarine Keep opened butter in covered dish or closed compartment in refrigerator.
OPERATION 15 Ice Storage Drawer & Freezer Drawers 1 Pull out the drawer support until it stops. Angle the drawer into the space and set it on the support. Use the lower compartments for larger frozen foods and items stored for longer periods. • The sliding drawers allow easy access and convenience of use. Removing the Drawers 1 Pull the drawer out until it stops. Empty all contents out of the drawer before removing it. 2 Slide the drawer back until it lowers into place on the support.
OPERATION Removing the Drawer Support Adjusting the Door Bins 1 Press the levers on either side of the drawer To adjust the location of the bin, tilt the front of the bin up and slide the bin up or down to the desired location. support. 2 Keeping both levers pressed, lift the drawer support slightly and remove it from the rail system. Assembling the Drawer Support 1 Pull both drawer rails out until they stop.
OPERATION 17 Adjusting the Shelves Adjusting the shelves to fit items of different heights will make finding the exact item you want easier. CAUTION ••Make sure that shelves are level from one side to the other. Failure to do so may result in the shelf falling or spilled food. ••Do not clean glass shelves with warm water while they are cold. Shelves may break if exposed to sudden temperature changes or impact. Detaching the Shelf 1 Tilt up the front of the shelf and then lift the shelf straight up.
SMART FUNCTIONS SMART FUNCTIONS SIGNATURE KITCHEN SUITE Application The SIGNATURE KITCHEN SUITE application allows you to communicate with the appliance using a smartphone. Before Using the Application 1 Check the strength of the wireless signal near the appliance. • If the distance between the appliance and the wireless router is too far, the signal strength becomes weak. It may take a long time to register or installation may fail. 2 Turn off the Mobile data or Cellular Data on your smartphone.
SMART FUNCTIONS 19 Installing SIGNATURE KITCHEN SUITE Application NOTE • If you choose the simple login to access the SIGNATURE KITCHEN SUITE application, you must go through the appliance registration process each time you change your smartphone or reinstall the application. SIGNATURE KITCHEN SUITE Application Features Manage Food This feature helps track items in the refrigerator and freezer, sends alerts when items are near their use by dates, generates grocery lists, and links to related recipes.
SMART FUNCTIONS Smart Grid Function When the freezer operates in Smart Grid mode, the Smart Freezer function can control energy usage or delay the operation of some functions to save energy during peak usage periods. • You can override the Smart Grid function any time (using the Smart Grid button or application). • To use the Smart Grid function, you need to register your appliance with your electric utility company.
SMART FUNCTIONS 21 Smart Diagnosis™ Function 5 After you hear three beeps, release the Freezer Should you experience any problems with the appliance, it has the capability of transmitting data via your telephone to the SIGNATURE KITCHEN SUITE Information Center. NFC or Wi-Fi equipped models can also transmit data to a smartphone using the SIGNATURE KITCHEN SUITE application. 6 Keep the phone in place until the tone This method allows you to speak directly to our trained specialists.
SMART FUNCTIONS FCC Notice The following notice covers the transmitter module contained in this product. This equipment has been tested and found to comply with the limits for a Class B digital device, pursuant to Part 15 of the FCC Rules and also Part 18 of the FCC Rules. These limits are designed to provide reasonable protection against harmful interference in a residential installation.
SMART FUNCTIONS 23 Wireless Power Transfer Specifications Rated voltage 330 kHz ~ 370 kHz DC 12V Delivered power Less than and equal to 3W per shelf Transmission mode Electromagnetic induction Transmitter Receiver NOTE • Foreign objects and dirt between the right side of shelf and the inner cabinet wall could prevent the shelf light from turning on. • The shelf light turns on when the door is opened. • The shelf light turns off after seven minutes or when the door is closed.
MAINTENANCE MAINTENANCE Cleaning WARNING ••Use non-flammable cleaner. Failure to do so can result in fire, explosion, or death. CAUTION ••Do not use an abrasive cloth or sponge when cleaning the interior and exterior of the freezer. ••Do not place your hand on the bottom surface of the freezer when opening and closing the doors. General Cleaning Tips • The freezer defrosts automatically; however, clean it once a month to prevent odors. • Wipe up spills immediately.
MAINTENANCE 25 Replacing the Water Filter Replace the Water Filter • When the Replace Filter icon turns on. • When the icemaker output decreases. it counterclockwise to remove the water filter from the filter head. Cap 3 Replace with a new water filter. Take the new water filter out of its packing and remove the protective cover from the o-rings. Put the cap on the new water filter, then push it into the manifold hole until it stops. 1 Remove the old water filter.
MAINTENANCE 5 After changing the filter, press and hold the Water Filter Reset button for three seconds to reset the indicator light. NOTE To purchase a replacement water filter: •• Visit your local dealer or distributor •• Web : Find Parts & Accessories from Support section of signaturekitchensuite.
MAINTENANCE 27 Performance Data Sheet Model: LT1000P-S NSF System Trade Name Code : MDJ64844601 System tested and certified by NSF International against NSF/ANSI Standard 42, Standard 53 and Standard 401 for the reduction of substances listed below. substance Reduction Average Influent Challenge NSF specified Challenge Concentration Avg % Reduction Max Average Permissible Product Water Product Water Concentration Concentration NSF Reduction Requirements Chlorine Taste and Odor 2.0 μg/L 2.
MAINTENANCE substance Reduction Average Influent Challenge NSF specified Challenge Concentration Avg % Reduction Max Average Permissible Product Water Product Water Concentration Concentration NSF Reduction Requirements Mercury @ pH 8.5 5.6 μg/L 6.0 μg/L ± 10% 92.5% 0.420 μg/L 2.0 μg/L NA Cyst* 100,000 cysts/L Minimum 50,000 cysts/L >99.99% 10 cysts/L N/A ≥ 99.95% Atenolol 240 ng/L 200 ± 40% ng/L > 95.50% 10.80 ng/L 30 ng/L NA Carbamazepine 1600 ng/L 1400 ± 40% ng/L 98.
MAINTENANCE 29 Application Guidelines/Water Supply Parameters 0.5 gpm (1.89 lpm) Water Supply Community or Private Well Potable Water Water Pressure 20 – 120 psi (138 – 827 kPa) Water Temperature 33 °F – 100 °F (0.6 °C – 37.8 °C) Capacity 200 gallons (757 liters) It is essential that the manufacturer’s recommended installation, maintenance and filter replacement requirements be carried out for the product to perform as advertised.
TROUBLESHOOTING TROUBLESHOOTING FAQs: Frequently Asked Questions Q: What are the best temperature settings for my freezer? A: The default setting for the freezer is 0° Fahrenheit (-18° Celsius). Adjust these settings as necessary to keep food at desired temperatures. Ice cream should be firm and ice cubes should not melt in the freezer.
TROUBLESHOOTING 31 Before Calling for Service Review this section before calling for service; doing so will save you both time and money. Problem Refrigerator and Freezer section are not cooling. Cooling system runs too much. Possible Cause Solutions The control is set to OFF (some models). Turn the control ON. Refer to the Setting the Controls section for proper temperature settings. Appliance is set to Demo Mode.
TROUBLESHOOTING Cooling Problem Interior moisture buildup. Freezer is too warm. Possible Cause Solutions Doors are opened often or for long periods of time. When the doors are opened often or for long periods of time, warm, humid air enters the compartment. This raises the temperature and moisture level within the compartment. To lessen the effect, reduce the frequency and duration of door openings. Doors are not closed correctly. See the "Doors will not close correctly or pop open" section.
TROUBLESHOOTING 33 Cooling/Ice & Water Problem Freezer is too cold. Frost or ice crystals form on frozen food (inside of sealed package). Frost or ice crystals form on frozen food (outside of package). Solutions Doors are opened often or for long periods of time. When the doors are opened often or for long periods of time, warm, humid air enters the compartment. This raises the temperature and moisture level within the compartment.
TROUBLESHOOTING Ice & Water Problem Possible Cause Solutions Demand exceeds ice storage capacity. The icemaker will produce approximately 70-184 cubes in a 24 hour period. House water supply is not connected, valve is not turned on fully, or valve is clogged. Connect the freezer to a cold water supply with adequate pressure and turn the water shutoff valve fully open. If the problem persists, it may be necessary to contact a plumber.
TROUBLESHOOTING 35 Ice & Water Problem Ice has bad taste or odor. Icemaker is making too much ice. Solutions The ice detecting sensor is obstructed. Foreign substances or frost on the ice-detecting sensor can interrupt ice production. Make sure that the sensor area is clean at all times for proper operation. The freezer is not connected to a water supply or the supply shutoff valve is not turned on. Connect the freezer to the water supply and turn the water shutoff valve fully open.
TROUBLESHOOTING Parts & Features Problem Possible Cause Solutions Food packages are blocking the door open. Rearrange food containers to clear the door and door shelves. Ice bin, crisper cover, pans, shelves, door bins, or baskets are out of position. Push bins all the way in and put crisper cover, pans, shelves and baskets into their correct positions. See the Operation section for more information. The doors were removed during product installation and not properly replaced.
TROUBLESHOOTING 37 Noises Problem Possible Cause Solutions Normal Operation Rattling noises may come from the flow of refrigerant, the water line on the back of the unit, or items stored on top of or around the freezer. Normal Operation Freezer is not resting solidly on the floor. Floor is weak or uneven or leveling legs need to be adjusted. See the Leveling and Door Alignment section. Freezer with linear compressor was jarred while running.
TROUBLESHOOTING Wi-Fi Network Problem Possible Cause Solutions The password for the Wi-Fi that you are trying to connect to is incorrect. ••Find the Wi-Fi network connected to your smartphone and remove it, then register your appliance on SIGNATURE KITCHEN SUITE application Mobile data for your smartphone is turned on. ••Turn off the Mobile data of your smartphone and register the appliance using the Wi-Fi network. The wireless network name (SSID) is set incorrectly.
LIMITED WARRANTY 39 LIMITED WARRANTY Should your SIGNATURE KITCHEN SUITE (“Product”) fail due to a defect in materials or workmanship under normal and proper use, during the warranty period set forth below, SIGNATURE KITCHEN SUITE will, at its option, repair or replace the Product. This limited warranty is valid only to the original retail purchaser of the Product and applies only when purchased and used within the United States including U.S. Territories.
LIMITED WARRANTY •• Damage or failure to the Product caused by accidents, pests and vermin, lightning, wind, fire, floods, acts of God, or any other causes beyond the control of SIGNATURE KITCHEN SUITE. •• Damage or failure caused by unauthorized modification or alteration, or if used for other than the intended purpose. •• Damage or failure resulting from misuse, abuse, improper installation, repair, or maintenance. Improper repair includes use of parts not authorized by SIGNATURE KITCHEN SUITE.
1-855-790-6655