V-C7050NT V-C7050HT V-C7500HT
Table of contents Information for your How to use the How to ........................................................................................... head and the dust chamber Operation Adjusting cleaner cleaning Emptying Accessory the power level plug in and use ................................................................................... ...................................................................................... .....................................................
Information for your safety Please read all the following information, which contains important instructions for the safety, the use and the maintenance of the appliance. This appliance complies with the following EC Directives: -73/23/EEC, 93/68/EEC-Low Voltage Directive-89/336EEC -EMC Directive. Never allow children to use the appliance unsupervised. Do not use the appliance If the mains lead is damaged or faulty.
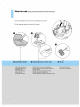
How to Fit the use Assembling Cleaner large cleaning head onto the end of the tube. 2 1 Nozzle outlet 1 The 2 position head (depending on model) Push telescopic nozzle outlet. 4 tube into 2 Telescopic tube (depending on model) Push telescopic tube into hose handle until catch clicks.
Attachment Point 3 Button Head Flexible Hose 3 Connecting the flexible hose Push the end of the head into the attachment To remove pull on the flexible hose the vacuum the flexible hose from the cleaner, press then point on on the button situated cleaner. vacuum on the head, forward.
How to Open use Using the accessory Fit the cleaning cover head and the cleaning pull out accessory you want. and Accessory Nozzles head onto the end of the tube. 2 1 3 1 Nozzle Upholstery Dusting brush & Crevice Tool frames, furniture outlines, books and other mattresses, etc. uneven The thread collectors Crevice Tool is for to pick up the threads and fluff.
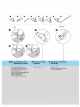
1 2 4 3 4-1 4-2 5 6 Spring Head 4 latch 6 5 Pedal Head Head 4-2 4-1 Pedal 4 4-1 4-2 ? Pedal Large cleaning head (Depending on model) position heads equipped with a pedal which allows you to its position according to the type 5 Sani punch (Optional) Refer to The 2 Page nozzle 12~14. 6 Adjusting the telescopic tube length Telescopic tube alter ? Pull out tube to required length. of ? Release latch. spring floor to be cleaned.
How to use Emptying the dust chamber Button Dust chamber The dust chamber needs full by emptying MAX which is marked on when the dust is the dust chamber. ? Turn off the appliance and unplug it. appliance is equipped with both the ? Your dust chamber and the motor filter. Press the button of the ? cover and the dust chamber forward. Remove the dust chamber cap and empty the dust chamber.
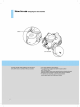
Operation Switch button Hose handle (V-C7050NT Only) 2 1 3 Regulator Cord reel button FLOOR MAX CARPET SOFA CURTAIN OFF MIN 1 Adjusting the power level (depending on model) ? The flexible hose handle has a manual air flow regulator ? ? power with the power control switch in the handle. Push power lever to start the To plug in and 3 use Pull out the mains lead to the desired length and plug ? into Press switch button to start the vacuum ? To cleaner.
How to use Cleaning the The motor filter is situated under the tank cap and you motor filter/Air cleaner can use it WARNING! permanently. Each time the light is on, clean the motor filter with water and brush and then replace it in the vacuum cleaner. Press the button of cover and pull the dust chamber forward. Open the tank cap. Separate the motor filter by rotaing it counter-clockwise. Clean the motor filter with the brush under a running tap. ?Dryitinshadeforaday.
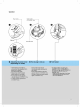
Cleaning Cleaning the dust chamber the exhaust filters Plate Dust chamber 2 1 Filter cover Wheel 3 Tank cap 1 Open the tank cap. 2 Remove two plates from ? the dust chamber. ? The exhaust filter is washable HEPA filter. so you can use To change the filter cover on the filter cover parts with soft material. Gently rinse both parts under a cold running tap. the filter, remove body by rotating counter-clockwise. ? Pull out the exhaust filter. ? Clean it with water.
User's guide for sani punch How to Features This nozzle vacuum picks up even dust inside through beating. nozzle use Follow the directions below for proper use. The bottom part can be separated to be cleaned. Since the bottom does not stick to the surface, vacuuming is easy. Assembly Connect the nozzle to the telescopic tube. Use Set the suction power control switch to MAX POWER before vacuuming.
This Sani Punch nozzle is for effective Effective cleaning of beds and blankets to remove mites and dust. cleaning Bed & blanket Bulky When using on Lay out the blanket and vacuum it on the bed the bed & heavy When blanket Light using on It is easier to clean by pushing blanket & sheet the floor light blanket or sheet the nozzle to the direction of the arrow. To increase lay on cleaning efficiency for light blankets, top of a bulky blanket and then clean.
User's For simple cleaning guide of the for sani vacuum and attach the crevice tool to punch vacuum nozzle Cleaning Vacuum Nozzle for Bedding nozzle, detach the Sani Punch nozzle from the telescopic tube vacuum dust. Bottom Top Since the vibrator inside is composed of precision parts, never disassemble the body. Be careful not to let foreign objects clog the air sunction part on top of the vacuum nozzle.
Follow the instruction below for (Do not soak the entire body through washing. of the vacuum nozzle in water, it may cause the vibrator to malfunction) Bottom 2 1 plate 3 Punch bar Bottom 4 plate 6 5 Punch bar 1 Press the button rear side of the nozzle to bottom on 2 the all the soiled Wipe of the vacuum separate the body vacuum with a parts 3 nozzle Wash the removed bottom plate with water and dry it. cloth. plate.
What to do if your Check that the appliance is appliance correctly plugged in and that the electrical socket is What to do when the suction the appliance and working. performance reduces? it. ? Stop ? Check that the ? Check that the dust chamber is not full. ? Check that the ? Check that the exhaust filter is not blocked. unplug does not work tubes, flexible hose and cleaning tool. light is not on if necessary. because of motor filter's blockage. Empty Clean the filter.
V-C7050NT V-C7050HT V-C7500HT P/No.
3 4 4 6 8 9 9 9 9 ............................................................................... ...................................................................................... ...................................................................................... ......................................................... ..................................................................................... ..................................................................................
3
2 1 2 1 4
3 3 5
2 1 3 3 2 1 6
6 5 4-2 6 4-1 4 3 4-2 7 1 4 5 6 2 5 4-1 4 4-1 4-2
8
2 3 1 FLOOR MAX CARPET SOFA CURTAIN OFF MIN 3 9 2 1
10
2 1 3 1 2 3 11
12
13
14
2 3 6 4 5 3 6 15 1 2 5 1 4
16