
Owner's Manual


Recording
Your VCR allows you to make recordings connect-
ing to a TV equipped with audio out and video out
sockets.
Your VCR start recording immediately for a set
period of time (ITR : Instant Timer Recording) or
until the video cassette runs out.
Your VCR incorporates Long Play (LP) which
enables you to record up to twice the amount of
time on a video cassette. For example an E-180
will record up to 180 minutes using Standard Play
(SP); using LP you will be able to record up to 360
minutes. Please note there will be a slight loss in
picture and sound quality when using LP.
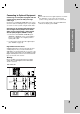
1. Connect the AUDIO(L/R)/VIDEO (VCR IN AV1) on
the rear panel of this unit or AUDIO IN
(L(MONO)/R)/ VIDEO IN on the front of this unit to
the audio out and video out sockets on the TV
using the audio and video cables.
2. Insert a video cassette with protection tab into
your VCR.
The video cassette should have the window side
facing up and the arrow facing away from you.
Your unit will switch on automatically. You can
also switch it on with the POWER button.
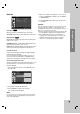
3. Select the channel you wish to record with the
TV’s channel selector.
4. Press AV until the socket you wish to record from
is displayed.
AV 1 for recording from AUDIO (L/R)/VIDEO
(VCR IN AV1) terminals on the rear of your unit.
AV 2 for recording from AUDIO IN (L(MONO)/R)/
VIDEO IN terminals on the front of your unit.
5. Press LP if you wish to record in Long Play or
Standard Play.
SP will produce improved picture and sound quali-
ty, however LP will provide twice as much record-
ing time as SP.
SP or LP will be displayed in your VCR display to
let you know which you have selected.
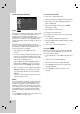
6. Press REC/ITR to start recording.
RECORD will appear on the TV screen.
Press REC/ITR several times. Each successive
press will increase the record time by 30 minutes
until you reach a maximum of 9 hours.
7. Press PAUSE/STEP to avoid recording unwanted
scenes.
Press PAUSE/STEP to continue recording.
If you press PAUSE/STEP during ITR, this unit
will enter the record pause mode and the record-
ing mode will be back to normal recording mode.
Tapes can be paused for up to 5 minutes; RECP
will be displayed when a tape is paused. After 5
minutes your VCR will stop recording to prevent
damaging the tape or your VCR.
7. Press STOP to end recording.
Press EJECT.
EJECT will appear on the TV screen for a few
seconds.
If the end of the tape is reached, your VCR will
stop recording automatically, rewind, stop, eject
the tape.
Notes:
If you do not wish to record on a tape (this can
happen quite easily by accident!) remove the
protection tab on the back edge of the video
cassette.
It is possible to record on a video cassette with the
record protection tab removed by covering the hole
with self adhesive tape.
20