OWNER'S MANUAL WASHING MACHINE Read this owner's manual thoroughly before operating the appliance and keep it handy for reference at all times. ENGLISH WD300C* MFL71887217 Rev.00_062322 www.lg.com Copyright © 2022 LG Electronics Inc. All Rights Reserved.
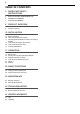
TABLE OF CONTENTS 3 IMPORTANT SAFETY INSTRUCTIONS 3 3 7 READ ALL INSTRUCTIONS BEFORE USE WARNING STATEMENTS CAUTION STATEMENTS 8 PRODUCT OVERVIEW 8 Product Features 10 INSTALLATION 10 10 11 12 14 15 Before Installing Choosing the Proper Location Stacking Pedestal Washer and Front-Loading Washer Connecting the Water Inlet Hoses Connecting the Drain Hose Leveling the Washer 17 OPERATION 17 18 19 21 24 24 Before Use Sorting Laundry & Loading the Washer Adding Cleaning Products Control Panel and W
IMPORTANT SAFETY INSTRUCTIONS 3 IMPORTANT SAFETY INSTRUCTIONS Safety Messages Your safety and the safety of others are very important. We have provided many important safety messages in this manual and on your appliance. Always read and follow all safety messages. This is the safety alert symbol. This symbol alerts you to potential hazards that can kill or injure you and others. All safety messages will follow the safety alert symbol and either the word WARNING or CAUTION.
IMPORTANT SAFETY INSTRUCTIONS • Destroy the carton, plastic bag, and other packing materials after the appliance is unpacked. Children might use them for play. Cartons covered with rugs, bedspreads, or plastic sheets can become airtight chambers. • The appliance must be installed and electrically grounded by qualified service personnel in accordance with local codes. • When installing or moving the appliance, be careful not to pinch, crush, or damage the power cord.
IMPORTANT SAFETY INSTRUCTIONS 5 • Do not modify or extend the power cord. • If the electrical supply cord is damaged, it must only be replaced by the manufacturer or its service agent or a similar qualified person in order to avoid a hazard. • Keep the area underneath and around your appliances free of combustible materials (lint, paper, rags, etc.), gasoline, chemicals and other flammable vapors and liquids.
IMPORTANT SAFETY INSTRUCTIONS • The appliance must be grounded. In the event of a malfunction or breakdown, grounding will reduce the risk of electric shock by providing a path of least resistance for electric current. The appliance is equipped with a cord having an equipment-grounding conductor and a grounding plug. The plug must be plugged into an appropriate outlet that is installed and grounded in accordance with all local codes and ordinances.
IMPORTANT SAFETY INSTRUCTIONS 7 CAUTION STATEMENTS • To reduce the risk of minor or moderate injury to persons, malfunction, or damage to the product or property when using this product, follow basic precautions, including the following: Installation • Install the product on a firm and level floor. Operation • Do not place objects on top of the appliance. • Turn off the water faucets and unplug the appliance if the appliance is to be left for an extended period of time, such as during vacations.
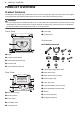
PRODUCT OVERVIEW PRODUCT OVERVIEW Product Features The images in this guide may be different from the actual components and accessories, which are subject to change by the manufacturer without prior notice for product improvement purposes. WARNING • For your safety and for extended product life, use only authorized components.
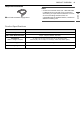
PRODUCT OVERVIEW Required Accessories NOTE • Contact LG Customer Service at 1-800-243-0000 (1-888-542-2623 in Canada) if any accessories are missing or to purchase accessories. For a list of LG front-loading washers which are compatible with the pedestal washer, visit the LG website at www.lg.com Product Specifications Model WD300C* Electrical Requirements 120 V~, 60 Hz Min. / Max.
INSTALLATION INSTALLATION Before Installing Tools Needed • Properly ground the washer to conform with all governing codes and ordinances. Failure to follow this warning can cause serious injury, fire, electric shock, or death. • To ensure proper airflow, do not block the large opening on the bottom of the washer with carpeting or other materials.
INSTALLATION 11 • If the floor has too much flex, reinforce it to make it more rigid. If the floor is not solid, it may cause severe vibration and noise. to allow for wall, door, or floor moldings that may increase the required clearances. Power Outlet • The power outlet must be within 60 inches (1.5 m) of either side of the washer. C • Position the washer so that the outlet and plug are easily accessible. • Do not overload the outlet with more than one appliance.
INSTALLATION 2 Remove and save the foam block for future use. • If the pedestal washer must be moved in the future, the foam block will help prevent damage to the pedestal washer during transportation. • To prevent damage, do not remove the foam block until the pedestal washer is at the final location. 3 NOTE Turn the top cover about 180 degrees, cover the opening in the top with the top cover and install 4 short sheet metal screws.
INSTALLATION 13 Contact an LG Customer Information Center for assistance in buying hoses. Front-Loading Washer and Pedestal Washer with Turbo Steam Dryer ENGLISH NOTE • Periodically check the hoses for cracks, leaks, and wear, and replace the hoses every five years. • Do not stretch the water hoses intentionally, and make sure that they are not pinched, crushed or kinked by other objects. • Water supply pressure must be between 20 psi and 120 psi (138 - 827 kPa).
INSTALLATION 3 Flush out the inlet hoses. • After the hoses are connected, turn on the water faucets and flush out any foreign substances such as dirt, sand, or sawdust. • Let the water drain into a bucket, and check the water temperature to make sure you’ve connected the hoses to the correct faucets. • The end of the drain hose should be located a minimum of 24 inches (61 cm) and a maximum of 96 inches (244 cm) above the bottom of the washer.
INSTALLATION 15 With the hose leading up from the elbow, firmly insert the elbow onto the drain outlet on the back of the pedestal washer. 3 Adjust the band clamp with pliers to keep the hose securely in place and prevent leaking. Connecting the Drain Connector 1 Insert the included band clamps on to the ends of the two drain hoses. 2 Connect the drain hose of the front-loading washer and the pedestal washer to the drain connector.
INSTALLATION 1 Clean the floor to attach the non-skid pads. • Use a dry rag to remove and clean foreign objects or moisture. If moisture remains, the non-skid pads may slip. 2 Adjust the level after placing the washer in the installation area. 3 Place the adhesive side c of the non-skid pad on the floor. • It is most effective to install the non-skid pads under the front leveling feet. If it is hard to place the pads under the front leveling feet, place them under the back leveling feet.
OPERATION 17 OPERATION WARNING • To reduce the risk of fire, electric shock, or injury to persons, read the SAFETY INSTRUCTIONS before operating this appliance. Operation Overview 1 • The optional remote control can also be used to select the desired cycle. Sort laundry and load the washer. • Sort laundry by fabric type, soil level, color and load size as needed. Open the lid and load items into the washer. 5 • Options for the selected cycle can be selected, if desired, using the option buttons.
OPERATION Sorting Laundry & Loading the Washer Grouping Similar Items For the best washing results, and to reduce the possibility of damage to clothing, sort clothing into loads made up of similar items. Mixing different fabric types and/or soil levels can result in poor wash performance, color transfer, discoloration, fabric damage or linting. Fabrics should be sorted into groups as described below. Colors Sort articles by color. Wash dark clothes separately from light colors or whites.
OPERATION 19 Bulky Items • Check and empty pockets. Paper clips, coins, matches, etc. can damage clothing and the washer. • Large, bulky items, such as a blanket, comforter, or bedspread, should be washed individually in the full-size washer. • Close zippers and hooks, and tie drawstrings to prevent snagging or tangling of clothes. Small Items • Pretreat heavily stained areas for best results. • Brush off heavy soil, dust, and hair from items before washing.
OPERATION detergent buildup in clothing, and residue buildup that can contribute to odors in the washer. NOTE • Use extra care when measuring 2X and 3X concentrated detergents because even a small amount of extra detergent can lead to problems. NOTE • Less detergent is required for lightly soiled items. Please use the appropriate amount of detergent in the Mini Washer. If you use too much detergent, excessive bubbles will remain after rinsing.
OPERATION 21 Control Panel and Wash Cycles Control Panel Features ENGLISH a Power On/Off Button • Press this button to turn the washer on or off. • Pressing this button during a cycle will cancel that cycle and any load settings will be lost. • The drawer will unlock after a brief pause. NOTE • When this button is pressed, the Normal cycle is selected by default. b Cycle Selector Buttons • Press a button to select the desired cycle.
OPERATION Time and Status Display a Estimated Time Remaining • When a cycle is selected, the default time for that cycle is displayed. This time will change as options are selected. • If the display shows ---, then the time will be displayed after the load sensing has detected the load size. • The time shown is only an estimate. This time is based on normal operating conditions. Several external factors (load size, room temperature, incoming water temperature, etc.) can affect the actual time.
OPERATION 23 • Control Lock can be selected for every cycle in this table. Description Estimated Time Wash Temp. Warm Cold Use this cycle to wash lightly soiled normal items, except delicate fabrics such as wool or silk. Normal NOTE 39 ~ 109 #† # Intimates Use this cycle to wash delicate items such as lingerie or sheer and lacy clothes which could easily be damaged in a normal cycle. This cycle is not for silk items.
OPERATION Options Your washer includes additional cycle options to customize cycles to meet your individual needs. NOTE NOTE • The function does not lock the door. • Once this function is set, all buttons are locked except the Power button. • To protect your garments, not every option is available with every cycle. • When the controls are locked, CL and the remaining time are alternately shown on the display during the wash cycle.
OPERATION 25 • To turn the sounds off completely, repeatedly press and hold the button until OFF appears in the status display.
SMART FUNCTIONS SMART FUNCTIONS Using LG ThinQ Application LG ThinQ Application Features For products that contain a Wireless LAN module • Remote Start - Control the appliance remotely from the LG ThinQ application. Installing LG ThinQ App and Connecting an LG Appliance Models with QR Code Scan the QR code attached to the product using the camera or a QR code reader app on your smartphone. • Downloaded - Download new and specialized cycles that are not included in the standard cycles on the appliance.
SMART FUNCTIONS 27 2 Press the Power button. • The appliance supports 2.4 GHz Wi-Fi networks only. To check your network frequency, contact your Internet service provider or refer to your wireless router manual. 3 Press and hold the Rinse button for 3 seconds to enable the remote control function. 4 Start a cycle from the LG ThinQ application on your smartphone. • LG ThinQ is not responsible for any network connection problems or any faults, malfunctions, or errors caused by network connection.
SMART FUNCTIONS equipment off and on, the user is encouraged to try to correct the interference by one or more of the following measures: • Reorient or relocate the receiving antenna. • Increase the separation between the equipment and the receiver. • Connect the equipment to an outlet on a circuit different from that to which the receiver is connected. • Consult the dealer or an experienced radio/TV technician for help. This device complies with part 15 of the FCC Rules.
SMART FUNCTIONS 29 1 Press the Power button to turn on the appliance. • Do not press any other buttons. Place the mouthpiece of your smartphone close to the Power button. x. Ma mm 10 3 Press and hold the Rinse+Spin button for 3 seconds or longer while holding the smartphone mouthpiece to the Power button until the data transfer is complete. • Keep the smartphone in place until the data transfer has finished. Time remaining for data transfer is displayed.
MAINTENANCE MAINTENANCE WARNING • To reduce the risk of fire, electric shock, or injury to persons, read this entire owner’s manual, including the SAFETY INSTRUCTIONS, before operating this appliance. • Unplug the appliance before cleaning to avoid the risk of electric shock. Failure to follow this warning can cause serious injury, fire, electric shock, or death. • Do not use volatile substances (benzene, paint thinner, alcohol, acetone, etc.
MAINTENANCE 31 Clean cycle monthly to remove residue and prevent odor. • Make sure to run the Tub Clean cycle only when the drum is empty. Never load laundry while using this cycle. The laundry may be damaged or contaminated with cleaning products. • Run the cycle more often under heavy use conditions or if odor is already present. • If mildew or musty smell already exists, run this cycle once a week for three consecutive weeks. 1 Remove any clothing from the drum. 2 Add cleaning agents.
MAINTENANCE Cleaning the Water Inlet Filters 7 • Before reattaching the water inlet hoses, flush them by running several gallons of water through them into a bucket or drain, preferably with the faucets wide open for maximum flow. If the washer does not fill properly, an error message will appear on the display. The inlet valve filter screens could be clogged by hard water scale, sediment in the water supply, or other debris.
MAINTENANCE 33 Turn on the washer and select the Spin Only option. 7 Press the Start/Pause button to start the drain pump for 1 minute. • This will expel some of the antifreeze, leaving enough to protect the washer from damage. 8 Turn off the washer and unplug the power cord. 9 Dry the drum interior with a soft cloth, and close the lid. 10 Store the washer in an upright position. 11 Drain any water in dispenser compartments and let them dry.
TROUBLESHOOTING TROUBLESHOOTING Before Calling for Service The washer is equipped with an automatic error-monitoring system to detect and diagnose problems at an early stage. If the washer does not function properly or does not function at all, check the following before you call for service. FAQs Q: Can the pedestal washer and the front-loading washer be run at the same time? A: Yes.
TROUBLESHOOTING 35 Error Messages Problem Possible Cause & Solution The drawer or the lid is not secured. DRAWER/LID OPEN ERROR • Close and secure the drawer or the lid. If the message keeps appearing, unplug the power cord and call for service. dE4 The drawer is not secured. DRAWER UNLOCK ERROR • Check for objects around the door and door seal. If the message keeps appearing, unplug the power cord and call for service. IE Water supply faucets are not fully open.
TROUBLESHOOTING Problem Possible Cause & Solution LE A motor error has occurred. MOTOR LOCKED ERROR • Allow the washer to stand for 30 minutes and then restart the cycle. PF Power failure or inadequate electrical service may have occurred during operation. POWER FAILURE • Press the Start/Pause button to restart the cycle. FF Inlet hose, drain hose or drain pump is frozen. FROZEN ERROR • See Care in Cold Climates in the front-loading washer manual.
TROUBLESHOOTING 37 Problem Possible Cause & Solution Foreign objects, such as keys, coins, or safety pins may be in the drum. Thumping sound Heavy clothes may produce a thumping sound. This is usually normal. • Stop the appliance and check the drum for foreign objects. If the noise continues after the appliance is restarted, call for service. • If the sound continues, the appliance is probably out of balance. Stop and redistribute the clothes. The clothes may be out of balance.
TROUBLESHOOTING Problem Excessive sudsing Possible Cause & Solution Too much detergent or incorrect detergent • HE detergents are formulated specifically for HE (High-Efficiency) washers and contain suds reducing agents. Only use detergent with the HE (High-Efficiency) logo. • For detergent quantities refer to About Detergent Use in OPERATION. If sudsing or detergent residue continues to be an issue, add an extra rinse. Washer will not turn on. Power cord is not properly plugged in.
TROUBLESHOOTING 39 Problem Washer is not filling properly. Possible Cause & Solution Filter is clogged. Inlet hoses may be kinked. • Check that the inlet hoses are not kinked or clogged. Energy efficiency • This is a High-Efficiency (HE) washer. As a result, the water level settings for this washer may be different than for a conventional washer. Insufficient water supply • Make sure that both the hot and cold water faucets are turned on all the way. Lid and drawer is open.
TROUBLESHOOTING Problem Poor stain removal Possible Cause & Solution Previously set stains. • Articles that have previously been washed may have stains that have been set. These stains may be difficult to remove and may require hand washing or pre-treating to aid in stain removal. Musty or mildewy odor in the washer Incorrect or too much detergent has been used. • Use only HE (High-Efficiency) detergent in accordance with the manufacturer’s instructions. Inside of the drum was not cleaned properly.
LIMITED WARRANTY 41 LIMITED WARRANTY TERMS AND CONDITIONS ARBITRATION NOTICE: THIS LIMITED WARRANTY CONTAINS AN ARBITRATION PROVISION THAT REQUIRES YOU AND LG ELECTRONICS (“LG”) TO RESOLVE DISPUTES BY BINDING ARBITRATION INSTEAD OF IN COURT, UNLESS YOU CHOOSE TO OPT OUT. IN ARBITRATION, CLASS ACTIONS AND JURY TRIALS ARE NOT PERMITTED. PLEASE SEE THE SECTION TITLED “PROCEDURE FOR RESOLVING DISPUTES” BELOW.
LIMITED WARRANTY • Damage or failure of the Product caused by leaky or broken water pipes, frozen water pipes, restricted drain lines, inadequate or interrupted water supply, or inadequate supply of air. • Damage or failure of the Product resulting from operating the Product in a corrosive atmosphere, in an unsuitable environment, or otherwise contrary to the Product owner’s manual.
LIMITED WARRANTY 43 Agreement to Binding Arbitration and Class Action Waiver. Upon failure to resolve the dispute during the 30 day period after sending written notice to LG, you and LG agree to resolve any claims between us only by binding arbitration on an individual basis, unless you opt out as provided below. Any dispute between you and LG shall not be combined or consolidated with a dispute involving any other person’s or entity’s product or claim.
LIMITED WARRANTY 800-980-2973. You must include in the opt out e-mail or provide by telephone: (a) your name and address; (b) the date on which the product was purchased; (c) the product model name or model number; and (d) the serial number (the serial number can be found (i) on the product; or (ii) online by accessing https:// www.lg.com/us/support/repair-service/schedule-repair-continued and clicking on “Find My Model & Serial Number”).
LIMITED WARRANTY 45 CANADA TERMS AND CONDITIONS Should your LG Washer ("Product") fail due to a defect in materials or workmanship under normal and proper use, during the warranty period set forth below, LG Electronics Canada, Inc. (“LGECI”) will, at its option, repair or replace the Product upon receipt of proof of the original retail purchase.
LIMITED WARRANTY • Damage or failure of the Product to perform during power failures and interrupted or inadequate electrical service; • Damage or failure caused by leaky or broken water pipes, frozen water pipes, restricted drain lines, inadequate or interrupted water supply or inadequate supply of air; • Damage or failure resulting from operating the Product in a corrosive atmosphere or contrary to the instructions outlined in the Product’s owner’s manual; • Damage or failure to the Product caused by a
LIMITED WARRANTY 47 Notice of Dispute. In the event you intend to commence an arbitration proceeding, you must first notify LG in writing at least 30 days in advance of initiating the arbitration by sending a letter to LGECI Legal Team at 20 Norelco Drive, North York, Ontario, Canada M9L 2X6 (the “Notice of Dispute”). You and LG agree to engage in good faith discussions in an attempt to amicably resolve your claim.
LIMITED WARRANTY otherwise provided for, LG waives any rights it may have to seek attorneys’ fees and expenses from you if LG prevails in the arbitration. Hearings and Location. If your claim is for $25,000 or less, you may choose to have the arbitration conducted solely (1) on the basis of documents submitted to the arbitrator, (2) through a telephonic hearing, or (3) by an in-person hearing as established by the applicable arbitration rules.
Memo 49
Memo
Memo 51
LG Customer Information Center For inquiries or comments, visit www.lg.com or call: 1-800-243-0000 1-888-542-2623 U.S.A. CANADA Register your product Online! www.lg.