OWNER’S MANUAL WASHING MACHINE Please read this manual carefully before operating your washing machine and retain it for future reference. T8566TEDTJ *MFLXXXXXXXX* Rev. : 00 (04T15) www.lg.
P roduct Features Washer doesn’t operate while the lid is open. If the lid is open during the wash, rinse or spin cycles, the operation stops for safety. FUZZY logic control ••A built-in load sensor automatically detects the laundry load and a microprocessor optimizes washing conditions such as ideal Water level and washing time.
C 3 ontents READ THIS MANUAL Inside you will find many helpful hints on how to use and maintain your washer properly. Just a little preventive care on your part can save you a great deal of time and money over the life of your washer. You will find many answers to common problems in the Troubleshooting section. If you review our chart of Troubleshooting Tips first, you may not need to call for service at all.
S Introduction afety Information Read carefully and thoroughly through this booklet as it contains important safety information that will protect the user from unexpected dangers and prevent potential damages to the product. This booklet is divided into 2 parts : Warning and Caution. : This is a warning sign specifying user’s applications which might be dangerous. : This is a sign specifying ‘Strictly Forbidden’ applications.
S afety Information YOUR LAUNDRY AREA ••Keep the area underneath and around your appliances free of combustible materials such as lint, paper, rags, chemical, etc. Operating with such materials around the machine may trigger explosion or fire. ••Close supervision is necessary if this appliance is used by or near children. Do not allow children to play on, with, or inside this or any other appliance. There is potential danger that children might drown in the tub.
S afety Information WHEN USING THE WASHING WARNING Introduction Do not use a plug socket and wiring equipment for more than their rated capacity. Exceeding the limit may lead to electric shock, fire , break down, and/ or deformation of parts. Do not mix chlorine bleach with ammonia or acids such as vinegar and/or rust remover. Mixing different chemicals can produce toxic gases which may cause death.
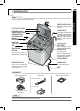
I dentification Part Body * Picture might be different by model. SOFT SAFETY DOOR TEMPERED GLASS POWDER AND LIQUID DETERGENT BOX SOFTENER INLET BLEACH DISPENSER FUNCTION SELECTOR TUB START/PAUSE BUTTON Use to start or stop the washing machine temporarily *Jet Spray Cap LINT FILTER Clean regularly to stop linting on the clothes load. *DRAIN HOSE for pump model Check if the drain hose is hung up before operating the washing machine.
F Introduction unction Information Our machine provides various washing methods which suits various conditions and types of laundry. Different types of laundry washing Normal Wash Use this Program for everyday washing e.g. sheets, towels, T-shirts. (refer to page 16) Duvet Wash Use for blanket or Duvet with (Hand Wash) sign. (refer to page 16) Extra Clean Use this Course to get better rising performance. (refer to page 16) Wool Wash Wool clothes (lingerie, wool, etc.
P reparation Before Washing WIRE Fire Hazard Load Size place items in the washer that The Water Level should just cover the clothes. Adjust the load size accordingly. Never dampened with gasoline or other Loosely load clothes no higher than the top row of holes in the washer tub. are flammable fluids. To add items after washer has started, press Start button and submerge No washer can completely remove oil. additional items. Close the lid and press Start button again to restart.
U Before Starting to Wash se of Water, Dispenser Drawer , Detergent , and Softener Using Water Amount of Water Level ••This machine detects quantity of laundry automatically, then sets the water level and proper amount of detergent. ••When you select a wash Course, the water level and amount of detergent (to be used) will be shown on the panel. ••The following table shows the amount of water.
Adding the Detergent Powder Detergent Box Open the detergent dispenser and deposit the appropriate amount of detergent where you deposit the detergent Powder Detergent dispenser. where you Some detergents MUST be fully dissolved before adding to your deposit the detergent machine to get the best wash results. Check the instructions on the detergent packet.
U Before Starting to Wash se of Water, Dispenser Drawer, Detergent, and Softener Use Fabric Softener Softener dispenser ( ) ••Dilute fabric softener with water. Undiluted fabric softener may result in spots that look like oil stain ••Measure and add the recommended amount of fabric softener into the compartment marked with this symbol( ). or Follow manufacturer's direction ))Fabric softener is automatically dispensed in the final rinse with indication beep.
S pecial Guide for Stain Removal ■■Do not use or mix liquid chlorine bleach with other household chemicals such as toilet cleaners, rust removers, acid or products containing ammonia. These mixtures can produce dangerous fumes which can cause serious injury or death. ■■To reduce the risk of fire or serious injury to persons or property, comply with the basic warnings listed below: ••Read and comply with all instructions on stain removal products.
F unction of each Button Before Starting to Wash Beeper Button(Only 1 Valve) Water Level Button ••If you want to use the washing machine without alarm signal sounds, press Beeper buttons allow you to select : High ▶ off Low ▶ High respectively. Default setting is High. (refer to page 25) ••Use to select the proper amount of water in relation to the weight and type of laundry. ••Automatically controlled, but can be selected manually by pressing the Water Level Button.
••Laundry progress is indicated here. ••Process to be done will have light on. Process in progress already done will have light off Display remaining time, reservation time, and alarm for trouble POWER Button ••During operation this indicates time to finish of laundry. Ex.) Indicates remaining time of laundry, rinse, spin dry during operation/pause. ••If there is a trouble, it blinks with buzzer sound and indicates the source of trouble. It will work normally after troubleshooting.
W ashing Course Add the laundry Washing Course Washing Course Used for normal loads, this mode automatically selects the most appropriate conditions and completes the sequence in one operation. The built-in sensor detects the size of the load and the ideal wash power and wash, rinse and spin times are set accordingly. Use this program for washing delicate fabrics such as lingerie and woolens.
t 17 Close the lid Finish gent undry. s use a ended antity cated ext to ollow turer’s ••If water is already in the tub, or putting wet laundry into the tub before starting will increase the Water Level. ••With lightweight bulky loads, Water Level can be set low. ••Changes to Water Temperature (Hot/ Cold) and wash level are possible during operation. (refer to page 14) ••When setting the Water Level manually, do not set to Medium to prevent damage to laundry.
W ashing Course Add the laundry Washing Course Washing Course Use this Course to wash School Uniform. Washing laundry with cycle that pre treats immediate stain without Hand - wash could be smelled badly without prompt laundry Add the detergent 1 ••Select the ••Add the appropriate quantity School Care of Detergent as indicated by Course on the the Water Level. Or follow the Control Panel.
t antity ed by w the urer’s Close the lid Finish Caution & Note Washing Course antity ed by w the urer’s 19
S Washing Course oak Wash 1 Use this mode to wash normal clothes or thick and heavy clothes which are excessively dirty. soak mode can be used with Normal , Duvet , School Care , Extra Clean Course Press the POWER button to turn power on. 2 Press the Course button to select the washing course ••Soak will not work in Wool and Quick wash, Pre Wash + Normal Tub Clean Course 3 Press the Wash button, to select Soak course.
T 21 ub Clean 1 Press the POWER button to turn power on. 2 Press the Program button to select the Tub Clean Course. Ex-Large Water is set automatically. 3 Press the START/PAUSE button. ••Left time is displayed. 4 After 10 minutes of water supplement. Add the oxygenated bleach (about 300 ml). ••Do not use the Detergent box. ••Do not place any laundry inside tub. 5 Close the lid. ••When the lid is open the machine will not operate, and chime sound will remind you to close the lid.
A Additional Function Course ir Dry Air Dry for your laundry. 1 Press the POWER button to turn power on. 2 Press the Air Dry button to select the desired timing. Press Spin for 3 seconds to select Air Dry ••Other function cannot be selected during Air Dry. ••Automatically set to 30 minutes upon selection. ••Press Spin button again to select duration (30 min. ▶ 60 min. ▶ 90 min. ▶ 120 min.) ••To deselect Air Dry press power button. 3 Press the START/PAUSE button. 4 Close the lid.
O 23 ption Washing Press the POWER button to turn power on. Only Wash 2 Only Rinse Only Spin Press the button, select the desired Press the button to select the Press the button to select the timing of wash. desired times of rinse. desired times of Spin.
D Additional Function Course elay Start (Reservation) Wash 1 Delay Start (Reservation) Wash is used to delay the finishing time of the operation. The hours to be delayed can be set by the user accordingly. The time on the display is the finishing time, not the start time. Press the POWER button to turn power on. 2 Press the Course button to select the washing course. ••Select the program for laundry on the Control panel. This program will not work in Wool and Tub Clean Program.
O ther Useful Functions 1 Press the POWER button ••Turn Power on. 2 Press the START/PAUSE button to start washing. ••After all washing conditions are set according to the manual. 3 Press both the Rinse button and the Spin button simultaneously. ••During the wash Course, all the buttons are locked until washing is completed or it is child-lock function is deactivated manually. How to Unlock If you want to unlock during wash, press both the Rinse and hold 3 Seconds again.
P lacing and Leveling 1 Please ensure that transit restraint has been removed before operating your machine. Place the machine on a flat and firm surface which allows proper clearance. Installation We suggest a minimum clearance of 2 cm to the right side and left sides of the machine for ease of installation. At the rear, a minimum clearance of 10 cm is suggested.
C onnecting Water Supply hose 1 Untighten the screw. Untighten the screw of the connector so that the tap can be placed in the middle. Rubber packing Screw Connector 2 Fixing the connector to the tap. Push the upper connector up till the rubber packing is in tight contact with the tap. Then tighten the 4 screws. 3 Attach the water supply hose securely to the connector. Push the water supply hose vertically upwards so that the rubber seal within the hose can adhere completely to the tap.
C onnecting Water Supply hose Normal Type 1 (Normal tap without thread & one touch type inlet hose.) Separate Middle connector from Water Supply Hose. Installation Separate Middle connector from the Water supply Hose by pulling the Pressing Rod and the Pressing Middle Handle that is attached to the Water supply Hose. Connector Fixed Sticker Pressing handle Pressing Rod Water Supply hose 2 Loosen the fixed nuts to connect the connector to the tap.
Screw Type 1 Attach the water supply hose to the tap. Rubber Packing Water Supply Hose 2 Connect the water supply hose to tap. Connect the water supply hose to the tap and then tighten it by screwing it to the right. 3 Check water leakage. After connecting the hose, open the tap to check for any water leakage. Connecting Water Supply Hose to the machine ••Connect the water supply hose to inlet valve of the washing machine, and then lock it by turning the hose connecting part.
C onnecting Drain Hose Before connecting drain hose, check your Drain Hose model and choose the correct instructions. Installation Pump Model 1 Fit the end of the drain hose to the outlet of the drain pump and tighten the clamp. 2 Put the other end of the drain hose over standpipe or wash tub. Hose Guide Within 50mm 0.9~1.2m Drain Hose NOTE ••To Prevent siphoning, the drain hose should not extend more than 50 mm from the end of the hose guide ••The discharge height should be approximately 0.
G rounding Method Outlet with ground terminal. Caution CAUTION concerning the Power Cord Most appliances recommend they be placed upon a dedicated circuit; that is, a single outlet circuit which powers only that appliance and has no additional outlets or branch circuits. Check the specification page of this owner’s manual to be certain. Do not overload wall outlets.
C Care and Maintenance leaning and Maintenance Cold water washing ••If you always use Cold water, we recommend that a Warm or Hot wash be used at regular intervals e.g. every 5th wash should be at least a Warm one. When you have finished ••Turn off taps to prevent the chance of flooding should a hose burst. ••Always unplug the power cord after use. When water supply into the tub is not clean or the filter is clogged with particles (such as sand), clean the filter in the inlet valve occasionally.
C 33 leaning and Maintenance Care and Maintenance When there is a possibility of freezing ambient temperatures. ••Close the water taps and remove the Water Supply Hose. ••Remove the water which remains in the water supply. ••Lower the drain hose flat against the ground and drain any remaining water left in the bowl the and drain hose. If frozen ••Remove the water supply hose, and immerse it in Hot water at approx.. 40°C. ••Pour approx.. 2 liters of Hot water at approx..
S oft safety Door Troubleshooting ••Using tempered glass, inside can be seen while washing and safety is guaranteed. ••To prevent sudden close of door, it uses smart hinge so the door closes softly. ••Door is heavy. Be careful not to be caught in hand or other material. It might cause injury or damage product. Smart Hinge Smart Hinge NOTE ••For customer safety, the door will be locked automatically during operation (Light turn on "door lock") sign.
C ommon washing problems Many washing problems involve poor soil & stain removal, residues of lint and scum, and fabric damage. For satisfactory washing results, follow these instructions. WASH PROBLEM Blue Stains ••Undiluted fabric softener dispensed directly onto fabric Solutions & Preventive Measures ••• Use correct amount of Detergent for load size, amount of soil and water Hardness. ••Use Warm or Hot water for normal soil. ••Different Water Temperature may be required according to soil type.
T Troubleshooting roubleshooting Before calling for service, check the problem against the list bellows.
S 37 martDiagnosis 1 TM Close the washer door, and press the POWER button. 2 Place the phone to SmartDiagnosisTM display. •• Make sure that the speaking side of the phone to face SmartDiagnosisTM display 3 Long press Water Level button to activate smart diagnosis. •• Place the phone near the SmartDiagnosisTM Display, and long press Water Label button until tak tak tak sound. Note : Before pressing the Water Level should turn the power button for reuse if you have made other operations.
B lanket Folding Method Troubleshooting The blanket and Large size cloth washing method The Clothes should not exceed 160x200 cm (Width x Length) Blanket folding method before washing 1 Fold the blanket in half along the length. 2 Fold the blanket into 3 parts, by a left-width around 30 cm. 30 cm. 3 Roll the blanket before put in the tub. 4 When input the clothes in the tub, the clothes should not over balance lower otherwise, it may cause damage to the blanket.
T 39 erms of Warranty What Is Not Covered : Terms of Warranty ••Service trips to your home to reach you how to use the product. ••If the product is connected to any voltage other than that shown on the rating plate. ••If the fault is caused by accident, neglect, misuse or Act of God. ••If the fault is caused by factors other than normal domestic use or use in accordance with the owner’s manual. ••Provide instruction on use of product or change the set-up of the product.
S Specification pecification H W Model Capacity Power Supply Rate output Water tap pressure Weight Size D T8566TEDTJ 11.0 kg 220 V∼ , 50 Hz 460 W 30 - 800 kPa (0.3 - 8.0 kgf / cm2) 40 kg 590 (W) x 606 (D) x 965 (H) *In our continuing effort to improve the quality of our appliances, it may be necessary to make changes to the appliance without revising this manual.
M emo
M emo
M emo