P/No.
Washing Machine OWNER'S MANUAL MODEL : WF-T1091~3TC(H/P) WF-T1191~3TC(H/P) WF-T1210TH Please read this manual carefully before operating your set. Retain it for future reference. Record model name and serial number of the set. Quote this information to your dealer when you require service.
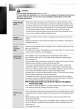
roduct Features PThe Trubo Drum washing machine does not operate with the lid open. If the lid is opened during wash, rinse and spin cycles, the machine will stop automatically. "For better wash of lots of of detergent is laundry, putting more heavily-soiled laundry first and using about 300g amount of detergent.
Contents Read this manual Inside you will find many helpful hints on how to use and maintain your washer properly. Just a little preventive care on your part can save you a great deal of time and money over the life of your washer. You will find many answers to common problems in the Troubleshooting section. If you review chart of our Troubleshooting Tips first, may not need to call for service at all.
4 S afety information WARNING! Read and follow this safety information carefully. safety, the information in this manual must be followed to minimize the risk of fire explosion, electric shock, or to prevent property damage, personal injury, or loss of life. For your Introducin or Save these instructions. ? WATER HEATER Under certain conditions hydrogen gas may be produced in a water heater that has not been used for two weeks or more. Hydrogen gas can be explosive under these circumstances.
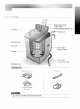
5 Identification of Parts Body supply hose (1EA 2EA) ?Power detergent softener Introducin ?Water or ?Lint filter ?Power cord* ¨fi˛ ‡... ¿" ¿... ...... ??fi œ ¿´‡?... ? ... ¿" "‡ "'†......"--... ‡†" ‰?£ -- "» »... ...¨˚ ......?" "Ł...¨˚ ¶†¿?'† ˙-- " -- ˙¥ ・ª¿ ?»...
6 F unction Information Our machine of laundry. Different Introducin provides various washing methods which suit various conditions and types types of laundry washing Fuzzy (Normal) Wash Use this The Program for normal clothes except for woolen clothes and lingerie. automatically detects the quantity of laundry and selects the appropriate washing time, rinsing time and spinning time.
7 Before Preparation Washing Care Labels * BeforStaingWsh care label on your clothes. This will tell you about the fabric content of your garment and how it should be washed. Look for a Sort clothes into loads that can be washed with the same wash cycle, water temperature and spin speed. Sorting To get the best results, different fabrics need to be washed in different ways.
8 U Using se of Water, Detergent, Bleach and Softener Water Amount of Water Level ? ? This machine detects the will be shown on the control ? The ? When the water level is ? amount of water. temperature The machine sets the ? You appropriate temperature automatically according to the wash program change by pressing the WATER TEMP button. The temperature of the water impacts the effectiveness of all laundry additives and therefore, the results.
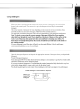
9 Using Detergent How much detergent When you select a wash program the water level and the amount of detergent (to be used) will be shown on the control panel. The amount of a cup in the diagram is about 40g for concentrated detergent. The correct amount of detergent will vary depending on the amount of soil in your clothes and work cloches may need more detergent, while bath towels usually need less.).
10 U BeforStaingWsh of Water, se Detergent, Bleach and Softener Fabric Softener Using Available Fabric Softener ? Do not ? For use concentrated fabric softener. This may cause some problems in automatic products instructions for use. dispensing. details refer to the softener more Depositing ? Type Fabric Softener Don't use softener with detergent. Use Powder softener in last rinse water ? When using ? When Detergent / Fabric Softener dispenser.
11 Special Guide for Stain Removal WARNING Do not use or mix liquid chlorine bleach with other household chemicals such as toilet cleaners, rust removers, acid or products containing ammonia. These mixtures can produce dangerous fumes which can cause serious injury or death. To reduce the risk of fire or serious injury to persons or property, comply with the basic warnings listed below: ? ? ? ? ? ? Read and comply with all instructions on stain removal products.
12 F unction of each Button How to select BeforStaingWsh Time Temp. (option) ? start (Reservation), Alarm indication During operation, the remaining time is indicated, and while paused, washing time, rinsing time, and spin time is indicated. For example, while washing, "1:09" indicates the time combined remaining for wash, rinse, and spin indicates a wash time of 15minutes, 2 Rinse cycles. When paused times, and 6 minute spin time.
13 Washing progress AUTO OFF button button Indicator ? The is to show the cycle washing progress. The light turns on for the process to be progressed, flickers during cycle operation, and it turns off automatically at the cycle's completion. ? ? name ? selecting wash program. This button allows you to select 6 different programs for different kinds laundry and dirtiness.
14 W ashing Programs ¡ WashingProm The figure within arrow is processing order manually. Add the Washing Programs laundry Fuzzy Washing (Normal Wash) Used for normal PROCESS PRO- 1 2 4 loads, this ¡GAdd the appropriate ¡GTh quantity of detergent as indicated by the ¡GTh water level next to mode automatically selects the most appropriate conditions and completes the sequence in one operation. The built-in sensor 8la WATER-DETERGENT.
15 Close the lid 3 Caution & Note Finish 6 5 already in the tub, or putting wet laundry into starting will increase the water level. ¡GWith light weight bulky, water level can be set low. ¡GChanges to water temperature (hot/cold) and wash level are possible during operation. (refer to page 12) ¡GIf water is the tub before rotates for ¡GThe pulsator 8 seconds to detect the load.
16 avourite Wash F WashingProm ? Pressing the favourite Program button allows you to store your favourite conditions in the normal cycle memory and then recall it for time. 1 Press the AUTO OFF 2 Select the FAVOURITE program. (Power) button to turn power use wash at a later on. FUZZY FAVOURITE DELICATE WOOL ECONOMY JEAN 3 Select your favourite wash conditions. ? Press the WATER TEMP. button to select wash water temperature. ? Press the WATER LEVEL button to select water level.
17 Economy Use this mode when washing lightly soilded clothes for The weight should be under 3.0kg. 1 Press the POWER button to turn power 2 Press the PROGRAM button to select a short time. WashingProm on. Economy. Select the SPEEDY program on the Control panel. PRO- 3 Add the detergent. The appropriate quantity of detergent marked next to the water level of WATER-DETERGENT. 4 Add the laundry and press the START/PAUSE button.
18 S WashingProm oak Wash washing excessively dirty laundry by soaking in water for some time to proteins and fats.¡fiSOAK¡fl mode can be used with all washing programs simultaneously except for WOOL and DELICATE program. Use this mode for remove 1 Press the AUTO OFF 2 Press the PROGRAM button to select the (Power) button to turn power on. washing program. The SOAK will not work in WOOL and DELICATE PRO- cleaning Program. 3 Press the WASH button, to select SOAK program.
19 (Reservation) Wash start Delay Delay start (Reservation) Wash is used to delay the finishing time of the hours to be delayed can be set by the user accordingly. The time on the display is the finishing time not the start time. The operation. , 1 Press the AUTO OFF 2 Press the PROGRAM button to select the (Power) button to turn power PROGRAM 3 Press the DELAY START washing program. Select the program for laundry on the Control This method will not work in Wool Program.
20 0 AditonalFucOps 1 ption Washing When you only need the Wash, Wash/Rinse or Rinse cycles, these can be set manually. Press the AUTO OFF 2 (Power) button to turn power Only Wash Only Wash,Rinse Press the WASH button to select the desired timing. on. Press the WASH button to select the desired timing. (refer to page 13) (refer to page 13) ASH Press the RINSE button to select the desired times of rinse.
21 1 Press the AUTO OFF 2 Only (Power) button to turn power on. Only Rinse,Spin Rinse Only Spin/Only drain Press the RINSE button to Press the RINSE button to Press the SPIN button to select the desired times of select the desired times of select the desired times of rinse. rinse. (refer to page 13) rinse. (refer to page 13) (refer to page 13) GRAM Press the SPIN button to select the desired times of rinse.
22 O ther Useful Functions Child Lock Function AditonFucOps If you want to lock all the use the child lock keys to prevent all the setting from being changed by a child, you can option. How to Lock 1 Press the AUTO OFF(Power) button. Turn Power 2 Press the START/PAUSE button to start 3 washing. After all AR on. washing conditions Press both the RINSE button and the SPIN button SOAK WASH SHOWER RINSE are according to set the manual. simultaneously.
23 Placing 1 and Place the machine Leveling on a flat and firm surface which allows proper clearance. We suggest a minimum clearance of 2cm to the right side and left sides of the machine for ease of more installation. At the rear, a than 10cm minimum clearance of 10cm is suggested. more than 2cm more than 2cm Caution If the washer is installed on a uneven,weak or tilted floor causing excessive vibration, spin failure or "SPIN Er." can happen to it.
24 C Instal ion onnecting Connecting Water Supply Hose to water Type the Untighten Fixing tap (Normal tap without thread & screw type inlet hose.) Rubber screw Untighten the screw of the connector so tap can be placed in the middle. 2 Supply Hose Before connecting the Water Supply Hose to the water tap, check the hose type and then choose the correct instruction here under. Note that the Water Supply Hose supplied may vary from country to country.
25 Normal 1 Type Separate (Normal tap without thread & Middle connector from Water Supply Separate Middle connector from the Water Supply Hose by pulling the Pressing Rod and the Pressing Handle that is attached to the Water Supply Hose while pressing them. one touch type inlet hose.
26 C Instal ion onnecting Screw 1 Water Supply Hose Type Attach the water hose to the tap. supply Push the water supply hose up so that the rubber packing within the hose can adhere completely to the tap. Water tap Rubber Water 2 Connect the water supply Packing Supply hose to the tap. Connect the water tighten it by 3 supply hose to the tap and then screwing it to the right. Check water leakage. After connecting the hose, open the tap to for any water leakage.
27 Drain Hose Connecting Before connecting Drain Hose, check your Drain Hose model and choose the correct instructions. Pump 1 Fit the machine end of the drain hose to the outlet 2 Put the other end of the drain hose of the drain pump and Fit the holder at the tighten the clamp. over the wash tub. standpipe plastic or of the machine.
28 G rounding Earth wire should be connected. If the earth wire is not connected, there is current CarendMitc Method Grounding possible danger of electric shock caused by leakage. Method with Ground insert space Terminal If the AC current outlet has ground terminal, then separate grounding required. Note that AC outlet power configurations may differ from country a is not to Ground Terminal country.
29 Cleaning When water supply into the tub is not clean or the filter is clogged with particles(such as sands...), clean the filter in the inlet valve occasionally.The figure of power cord and water tap may vary according to the country. CarendMitc To Clean the Filter in the Inlet Valve 1 Close the tap before 2 turning Turn off the power pulling out the off the power. Select both hot/cold and then press the button to cord. [START/PAUSE] remove the machine 3 before water from completely.
30 C CarendMitc leaning and Maintenance When there is a fear of ? freezing Close the water taps and remove the Water Supply Hose. supply. ? Remove the water which remains in the water ? Lower the drain hose and drain the water in the bowl and the drain hose by spinning. If frozen ? ? ? supply hose, and immerse it in hot water at approx.. 40˚C. Pour approx.. 2 liters of hot water at approx.. 40˚C, into the bowl and let it stand for 10 minutes.
31 Common washing problems Many washing problems involve poor soil & stain removal, residues of lint and damage. For satisfactory washing results, follow these scum, and fabric instructions. Troubleshting WASH PROBLEM Problems Poor soil removal Solutions & Preventive Measures Possible Causes ? Not ? Wash water enough detergent ? ? the washer ? Overloading ? Incorrect wash ? ? Do not Use amount of hot water for normal soil.
32 T roubleshooting Before Troubleshting calling for service check the Symptom Water Supply Failure Error problem against the list belows. Message INLET Er. Check up . . Is the water tap shut off? Is the water supply cut off ? . Is the tap . Is the water pressure low valve . or water supply hose frozen or ? is the filter of the inlet clogged with impurities? Is Hot/Cold selected to Hot when the hose connected is Cold? . Drainage Failure DRAIN Er.
33 of Terms Warranty What Is Not Covered: ? ? ? ? Service If the trips to your home to teach you how to use the product is connected to any voltage product. other than that shown the rating plate. Act of God. If the fault is caused by accident, neglect, misuse If the fault is caused by factors other than normal domestic or on use or use in accordance with the owner's manual.
34 S pecification Specifaton H D W Model WF-T1091~3TC(H/P),WF-T1191~3TC(H/P),WF-T1210TH Weight 47 Size 625(W)x625(D)x1030(H) Water tab pressure 30 -800 kPa In our kg (0.3 -8 kgf /cm2) continuing effort to improve the quality of our appliances, changes to the appliance without revising this manual.