GoldStar www.goldstarappliances.com OWNER’S MANUAL MANUAL DEL PROPIETARIO ROOM AIR CONDITIONER AIRE ACONDICIONADOR Models/Modelo WG5005R WG5005 IMPORTANT • Please read this owner's manual carefully and thoroughly before installing and operating your room air conditioner. • Please retain this owner's manual for future reference after reading it thoroughly. PRECAUTIONS > Antes de instalar y poner en marcha su ventilador de casa, haga el favor de leer cuidadosamente esta instrucción de Usuario.
Window-Type Air Conditioner Owner's Manuai TABLE OF CONTENTS Safety Precautions.....................3 2/ FORYOUR RECORDS Write the model and serial numbers here: Before Operation ...................... 7 Model # Serial # Introduction .............................. 8 Symbols Used in this Manual.... 8 Features .................................8 Electrical Safety.........................9 Temporary Use of an Adapter................................ 11 Temporary Use of an Extension Cord.....................
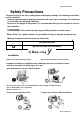
Safety Precautions Safety Precautions To prevent injury to the user or other people and property damage, the following instructions must be followed. ■ Incorrect operation due to Ignoring Instructions will cause harm or damage. The seriousnes Is classified by the following Indications. ■ Because of the weight of the product, it is recommended that you have a helper to assist in the installation. ^WARNING This symbol Indicates the possibility of death or serious Injury.
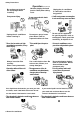
Safety Precautions Operation Plug in the power plug properly. Do not operate or stop the unit by inserting or pulling out the power plug. Do not damage or use an unspecified power cord. Otherwise, it will cause electric shock or fire. It will cause electric shock orIt will cause electric shock or fire. fire. Do not modify power cord length. Use the air conditioner on a Always plug into a single outlet circuit. (See page 7.) grounded outlet. Do not share the outlet with other appliances.
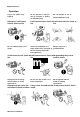
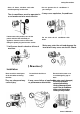
Safety Precautions Close all doors, windows and other outside openings to the room. Do not operate the air conditioner if you smell gas. The air conditioner must be operated in • It may cause explosion, fire,and burn. a enciosed area to be most effective. If water enters the product, turn off the power switch of the main body of appliance. Contact service center after taking the power plug out from the socket. Do not clean the air conditioner with water.
Safety Precautions ■ Operation ---------Be cautious not to touch the sharp edges when installing. It may cause injury. Hold the plug by the hand (not the cable) when taking it out. ' It may cause electric shock Unplug the air conditioner if it will not be used for a long period. > It will waste power consumption in vain and it may cause accident. Unplug the air conditioner before cleaning it. Do not put a pet or house plant where it will be exposed to direct air flow.
Before Operation L Before Operation Preparing for operation 1. 2. 3. 4. 5. Plug in the power plug properly. Use a dedicated circuit. Overloading the line could create a fire hazard. Do not use an extension cord. See page 11 for more details. Do not start/stop operation by plugging/unplugging the power cord. If the power cord is damaged and requires replacement, have an Authorized Servicer install an exact replacement part. Usage 1.
Introduction ^ Introduction Symbols Used in this Manual A This symbol alerts you to the risk of electric shock. This symbol alerts you to hazards that could cause harm to the air conditioner. A This symbol indicates special notes. Features A WARNING: This appliance should be installed in accordance with the National Electric Code.
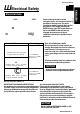
Electrical Safety Ш Electrical Safety Electrical Data 115V- 230V- Power cord may include a current interrupter device. A test and reset button is provided on the plug case. The device should be tested on a periodic basis by first pressing the TEST button and then the RESET button. If the TEST button does not trip or if the RESET button will not stay engaged, discontinue use of the air conditioner and contact a qualified service technician.
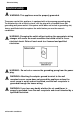
Electrical Safety Electrical safety A WARNING: This appliance must be properly grounded. The power cord of this appliance is equipped with a three-prong grounding plug. To minimize the risk of electric shock, use the plug with a standard three-slot grounding wall power outlet. If the power outlet does not Include a grounding slot, have a qualified electrician replace the outlet before you use the room air conditioner.
Electrical Safety Temporary Use of an Adapter We strongly discourage the use of an adapter due to potential safety hazards. For temporary connections, use oniy a UL-iisted adapter, avaiiabie from most iocal hardware stores. Ensure that the iarge slot in the adapter is aligned with the large slot in the receptacle for a proper polarity connection. To disconnect the power cord from the adapter, use one hand on each to avoid damaging the ground terminal.
Installation B Installation Have the following tools available for installation: * Screwdriver (Slotted and Phillips) Knife Pencil * Ruler Hammer Level Window Requirements Size This room air conditioner is designed for installation in standard double-hung windows with actual opening widths from 21" to 35". The upper and lower window sash must open sufficiently to allow a clear vertical opening of 12" from the bottom of the upper sash to the window stool.
Installation Location Install the air conditioner where the sunlight does not shine directly on the unit. Clearance Proper clearance enhances the cooling efficiency of the unit and prevents heat radiation of the condenser. * The bottom of the cabinet should be 30" to 60" above the ground. * The outside of the cabinet must extend outward for at least 1/2". * There should be no obstacles such as a fence or wall within 20" from the back of the cabinet.
Installation Preparation of Chassis 1. Insert the guide panels(Type G) into the guides of the air conditioner (Type H),Fasten the curtains to the unit with screws (Type A). I: Use a long screwdriver and installing the screws will be easier. 2. Cut the adhesive-backed seal strip (Type E) to the window width. Remove the backing from the seai strip and attach the seai strip to the underside of the bottom window. 3. Locating unit in window Open the window and mark center iine on the center of the inner sill.
Installation Unit Installation A Caution: During the foilowing step, hold unit firmly until window sash is lowered to top channel behind side panel frames. Personal Injury or property damage may result if unit falls from window. 1. Install the air conditioner in the window 1-1. Carefully lift the air conditioner and slide It into the open window. Make sure the bottom guide of the air conditioner drops into the notches of the L bracket.
Operating Instructions ^ Operating Instructions Location and Function^ CAUTION: If you turn off the air conditioner or switch from cooling to the fan, wait at least 3 minutes before setting to cooling again. > POWER -Turns air conditioner off. > FAN SPEED"LOW" Low speed fan operation with cooiing or not. > FAN SPEED "HI" Hi speed fan operation with cooiing or not. This automaticaiiy controls the temperature of indoor air. Turn the knob so that arrow points to the cooier marks for more moderate cooiing.
Operating Instructions Remote Control Operations The controls look like this: Controls —® 0 ® O Power To turn the Set ON, push the button. To turn the Set OFF, push the button again. This button takes priority over any other buttons. When you first turn it on, the Set is on the High cool mode and the temp, at 72°F Q Fan Speed Pressing the Fan Speed button toggles between Low and High speeds.
Operating Instructions Remote Controller CAUTION: The Remote Controller will not function properly if strong iight strikes the sensor window of the air conditioner or if there are obstacies between the Remote Controiier and the air conditioner. Power------------------------------------------------------------------------To turn the Set ON, push the button. To turn the Set OFF, push the button again. This button takes priority over any other buttons.
Operating Instructions Additional Features Air Direction Adjusting the air direction using the horizontai air deflector control. Using the control tabs, the air flow can be directed to the left, right, straight ahead, or any combination of these directions. Drain Pipe In humid weather, excess water may cause the Base Pan to overflow. To drain the water, remove the Drain Cap and secure the Drain Pipe to the rear hole of the Base Pan.
Maintenance and Service Maintenance and Service Air Filter Check the air filter at least twice a month to see if cleaning is necessary. Trapped particles in the filter can build up and block the airflow, reducing cooling capacity and causing an accumulation of frost on the evaporator. To clean the air filter: 1. Remove the air filter from the front grille by lifting the air filter up. 2. Wash the filter using lukewarm water below 40 °C (104 °F). 3.
Maintenance and Service Common Problems and Soluti É Before Calling for Service If you have problems with your air conditioner, read the following information and try to solve the problem. If you cannot find a solution, turn off the air conditioner and contact your dealer. Air conditioner does not operate 1. Ensure that the air conditioner is plugged into a proper outlet. 2. Check the fuse or circuit breaker. 3. Check whether the voitage is unusually high or low.
Maintenance and Service Troubleshooting The air conditioner may be operating abnormaiiywhen: 1 Probiem 1 Air conditioner does not start Possibie Causes | The air conditioner is unplugged. Make sure the air conditioner plug is pushed completely into the outlet. The fuse is blown/circuit breaker is tripped. Check the house fuse/circuit breaker box and replace the fuse or reset the breaker. Power failure. If power failure occurs, turn the mode control to Off.
Manual del usuario del acondicionador de aire tipo Ventana TABLA DE CONTENIDOS Precauciones de Seguridad..... 24 Antes de poner en marcha....... 28 Introducción............................ 29 Símbolos Utilizados en Este Manual.......................... 29 Características ..................... 29 Seguridad Eléctrica..................30 Uso Transitorio de un Adaptador............................. 32 Uso Temporal de un Cable Alargador.................... 32 Instalación ..............................
Precauciones de Seguridad B Precauciones de Segurid^ Para prevenir tanto lesiones al usuario u otras personas como daños materiales, es preciso seguir estas instrucciones. ■ La incorrecta operación del aparato como consecuencia de ignorar las instrucciones provocará daños o lesiones. ■ A cause del peso pesado del producto, se recomienda que usted tenga a un ayudante a participa en la instalación. ^ADVERTENCIA Este símbolo indica la posibilidad de lesiones mortales o graves.
Precauciones de Seguridad I Funcionamiento Enchufe la corriente adecuadamente. No haga funcionar o detenga la unidad insertando o tirando del enchufe. No dañe ni use un cable no especificado. • De otro modo, causará > Causará descarga eléctrica' oCausará descarga eléctrica o descarga eléctrica o incendio.incendio. incendio. No modifique la longitud del cable de corriente eléctrica. Use el aparato de aire acondicionado en un solo circuito.
Precauciones de Seguridad Cierre todas las puertas,ventanas y otras aberturas de sala. Ventile antes de hacer funcionar el acondicionador de aire cuando sale el gas. • El aparato de aire acondicionado debe operarse en un área cerrada para ser más efectivo. Si entra agua a la unidad,gire el interruptor principal del artefacto. Tome contacto con el centro de servicio después de desconectar el enchufe del tomacorriente. 'Causará descarga eléctrica o incendio.
Precauciones de Seguridad ■ Funcionamiento Al momento de su instalación, evite que se contacte con los bordes afilados. • Hay riesgo de lesiones personaies. Desenchufe el aparato de aire acondicionado antes de limpiarlo. Sostenga el enchufe por el cuerpo (no del cable) cuando lo saque. • Puede causar descarga eléctrica y daño. No coloque una mascota o una planta donde quede expuesto al flujo directo de aire. No se siente donde haya corrientes de aire.
Previo al Funcionamiento B Antes de poner en marcha Preparar para el funcionamiento 1 ■ Coloque el enchufe correctamente. 2. Use un único circuito para este aparato.Recargar el circuito podría provocar un riesgo de incendios. 3. No utilice un alargador.Consulte la página 32 para mas detalles. 4. No arranque/detenga el funcionaiento enchufando/desenchufando el cable de corriente eléctrica. 5. Si el alargador está dañado y ha de ser recambiado,solicite a un técnico autorizado que instale un recambio exacto.
Introducción B Introducción Símbolos Utilizados en Este Manual A Este símbolo lo advierte de un peligro de accidente por corriente eléctrica. Este símbolo lo adiverte de un peligro que pueda causar un daño del ventilador. Este símbolo significa condicciones especiales. Características A ADVERTENCIA : Este aparato debería instalarse de acuerdo con las normas del Código Eléctrico Nacional.
Seguraida Eléctrica Bseguraidad Eléctrica Datos Eléctricos 115V- 230V- i W tJ Utilice el enchufe de la pared standard 125V, enchufe de 3 Lineas de 15A, 125V AC O Consumo de Energía USO DE CORDONES DE E)aENSION Debido al potencial de peligro a su seguridad bajo ciertas circunstancias recomendamos encaredidamente no utiliar cordones de extensión. Sin embargo, si usted decide usar un cordón de extensión, utilice un fusible de es absolutamente necesario que este sea 15AMP.
Introducción Seguridad Eléctrica A Este equipo debe estar puesto a tierra debidamente. El cable de alimentación está equipado de una toma de tierra con tres pins. Para minimizar el peligro de una lesión por corriente eléctrica, utilice una toma con enchufe de tierra estándar con tres contactos. Si el enchufe de pared no contiene un borne de tierra, antes de usar el ventilador haga cambiar el enchufe por un electricista.
Seguridad Eléctrica Uso Transitorio de un Adaptador Debido a eventuales peligros de seguridad no recomendamos en absoluto el uso de un adaptador. Sólo para una conexión transitoria se puede usar el adaptador clasificado como UL que está a disposición en la mayoría de las tiendas de productos eléctricos. Atienda que e orificio grande en el adaptador corresponda al orificio grande en el enchufe para lograr la conexión con la polaridad correcta.
Instalación ■Instalación Para la instalación debería tener a disposición los instrumentos siguientes: * Destornillador (Estrella y Phillips) * Regla * Cucjillo * Martillo * Lápiz Nivel Requerimientos de Ventana Tamaño Este ventilador de casa está construido para ventanas estándar de dos alas con la extensión real de apertura de 21" a 35". El ala superior y el inferior de la ventana deben abrirse lo suficiente para producir un orificio vertical de 12" desde el ala superior hasta el antepecho.
Instalación Ubicaci ón Instale el aire acondicionado donde no reciba iuz solar directa Espacio iibre Si proporciona espacio libre mejorará la eficacia de ia unidad y evitará radiación de caior procedente dei condensador. *La parte inferior de ia carcasa deberá estar a 30 o 60 puigadas por encima del suelo. *La parte exterior de la carcasa deberá sobresalir hacia fuera al menos 1/2 pulgadas. *No deberá haber obstáculos como una valla o muro a 20 pulgadas de la parte posterior de la carcasa.
Instalación Preparación de la Carcasa 1. Introduzca los paneles (Tipo G). en los guías del 45 aire acondicionado (Tipo H).Las cortinas atorníilelas con ios tornilios (Tipo A). CONSEJO Use un atornillador largo. Así le será más fácil instala los tornillos. 2. Corte la banda adhesiva (Tipo E) y colóquela del ancho de la ventana. Remueva el plástico de la banda adhesiva y colóquela en la parte superior de el marco inferior de la ventana. 3.
Instalación Instalación de la Unidad Precautión: En las siguientes instrucciones, sostenga la unidad firmemente hasta que ia parte corrediza de la ventana descanse sobre la parte superior del canal y por detrás del marco de los paneles corredizos. Puede haber lesiones o daños si la unidad se cae de la ventana. 1. Instale el Aire Acondicionado a la Ventana 1-1. Cuidadosamente levante el aire acondicionado y colóquelo en el hoyo de la ventana.
Instrucciones de funcionamiento IInstrucciones de Funcionamiento Localización y Función de ios Controles A Si Vd. desconecta ei ventilador o lo conmuta del enfriamiento a la ventilación, antes del nuevo ajuste del enfriamiento espere por lo menos 3 minutos.
Instrucciones de funcionamiento Instrucciones de Control Remoto: Los controles tienen este aspecto. © O Enecndido/Apagado • Para ENCENDER el sistema presione ei botón, y para APAGARLO presione ei botón otra vez. • Este botón tiene prioridad sobre todos ios otros botones. • Cuando se enciende ei aparato por primera vez,usará ios ajustes dei modo High Cool a 72’F @ Velocidad del Ventilador • Pulsar el botón de velocidad del ventilador hace cambiar las velocideades entre Low y High.
Instrucciones de funcionamiento Control Remoto PRECAUTIÓN: El mando a distancia no funcionará correctamente si una luz fuerte hace contacto con el sensor del aire acondicionado o si hay obsáculos entre el mando a distancia y el aire acondicionado. Enecndido/Apagado------------------------------------------------------------------• Para ENCENDER el sistema presione el botón, y para APAGARLO presione el botón otra vez. • Este botón tiene prioridad sobre todos los otros botones. • Cuando Ud.
Instrucciones de funcionamiento Adicionales e Características La dirección dei aire Para ajustar la dirección dei aire usando controi de ia dirección dei aire. Las dos lengüetas horizontales para el control de las rejillas le permiten descargar el aire hacia la izquierda, o algo de aire a la izquierda y otro a la derecha, o todo el aire hacia el frente, o cualquier combinación de las posiciones mencionadas. Tubo de Desagüe En climas húmedos, es posible que la Bandeja Evaporadora se llenne de agua.
Mantenimiento y servicio B Mantenimiento y servicio Filtro de Aire Revise por lo menos dos veces al mes si no es necesario limpiar el filtro de aire. Las partículas detenidad se pueden acumular en el filtro impidiendo el flujo del aire, limitando el rendimiento de enfriamiento y causando la acumulación de hielo en el evaporador. Proceder de la limpieza del filtro de aire: 1 ■ Extraiga el filtro del aire de la rejilla frontal tirando del mismo 2.
Mantenimiento y servicio Problemas y Soluciones habituales Antes de Llamar el Servicio de Asistencia Técnica Si tiene problemas con su ventilador, lea las informaciones siguientes y trate de resolver el problema. Si no puede encontrar la solución, desconecte el ventilador y diríjase a su suministrador. El ventilador no funciona 1. Compruebe que el ventilador esté conectado en un enchufe correcto. 2. Revise el fusible. 3. Compruebe que la tensión no sea demasiado alta o baja.
Mantenimiento y servicio Resolución de problemas El acondicionador de aire puede estar funcionando anormalmente cuando: Problema Causas posibles Qué hacer El aire acondicionado está * Asegúrese que ei aire acondicionado Hcor-nnaMoH« 6stá conectado completamente a la desconectado. energia. EÍ fusible está quemado/el • Cheque los fusibles/interruptor de la interruptor de energía se ha casa y reemplace los fusibles o . Nr.niioaHr> reestablezca el interruptor de energía, acondiciona ..
GOLDSTAR AIR CONDITIONER LIMITED WARRANTY - USA LG Electronics Inc. repair or at Its option replace, without charge, your product If It proves to be defective In material or workmanship under normal use during the warranty period set forth below, effective from the dote of original consumer purchase of the product. This limited warranty Is good only to the original purchaser of the product and effective only when used in the United States, including Alaska, Hawaii, and U.S. Territories.