
Use and Care Guide
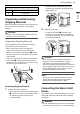
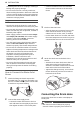
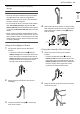
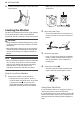
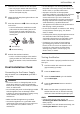

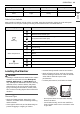
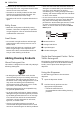
Table Of Contents
- WM1455H_A Owner's Manual - clean EN
- IMPORTANT SAFETY INSTRUCTIONS
- PRODUCT OVERVIEW
- INSTALLATION
- OPERATION
- SMART FUNCTIONS
- Using LG ThinQ Application
- Smart DiagnosisTM Function
- MAINTENANCE
- TROUBLESHOOTING
- LIMITED WARRANTY
- WM1455H_A Owner's Manual - clean French
- CONSIGNES DE SÉCURITÉ IMPORTANTES
- APERÇU DU PRODUIT
- INSTALLATION
- FONCTIONNEMENT
- FONCTIONS INTELLIGENTES
- Utilisation de l’application LG ThinQ
- Caractéristiques de l’application LG ThinQ
- Avant d’utiliser l’application LG ThinQ
- Installation de l’application LG ThinQ
- Utilisation de l’appareil à distance
- Caractéristiques du module LAN sans fil
- Avis d’Industrie Canada
- Énoncé d'IC concerant I'exposition à la radiation
- Renseignements sur l'avis de logiciel libre
- Fonctionnalité Smart DiagnosisMC
- Utilisation de l’application LG ThinQ
- ENTRETIEN
- DÉPANNAGE
- GARANTIE LIMITÉE
- WM1455H_A Owner's Manual - clean Spanish
- INSTRUCCIONES IMPORTANTES DE SEGURIDAD
- DESCRIPCIÓN GENERAL DEL PRODUCTO
- INSTALACIÓN
- FUNCIONAMIENTO
- FUNCIONES INTELIGENTES
- Uso de la aplicación LG ThinQ
- Función Smart DiagnosisTM (Diagnóstico Inteligente)
- MANTENIMIENTO
- SOLUCIÓN DE PROBLEMAS
- GARANTÍA LIMITADA

14 INSTALLATION
3 Use the provided tie strap to secure the drain
hose in place.
Leveling the Washer
The drum of the washer spins at very high speeds.
To minimize vibration, noise, and unwanted
movement, the floor must be a solid, level surface.
CAUTION
• Using the washer without leveling it may cause
excess vibration and noise, leading to a washer
malfunction.
• Adjust the leveling feet only as far as necessary
to level the washer. Extending the leveling feet
more than necessary can cause the washer to
vibrate.
NOTE
• Before installing the washer, make sure that the
floor is clean, dry and free of dust, dirt, water
and oil so the washer feet cannot slide easily.
Feet that move or slide on the floor can
contribute to excessive vibration and noise.
How to Level the Washer
1 Position the washer in its final location.
• Take special care not to pinch, strain, or
crush the water and drain hoses. If you have
a carpenter’s level
a, you can use it to
check that the washer is level. The slope
beneath the washer should not exceed 1
inch, and all 4 leveling feet must rest firmly
on the floor.
2 Adjust the leveling feet.
• Turn all 4 leveling feet in one direction to
raise the washer or the other direction to
lower it.
3 Check the level again.
• Push or rock the top edges of the washer
gently to make sure the washer does not
rock. If the washer rocks, readjust the
leveling feet.
4 Tighten the locknuts b
• Turn the locknuts counterclockwise and
tighten them when the washer is level.
Using Non-Skid Pads
If you install the washer on a slippery surface, it
may move because of excessive vibration.
Incorrect leveling may cause malfunction through
noise and vibration. If this occurs, install the non-
skid pads under the leveling feet and adjust the
level.