ENGLISH ESPAÑOL OWNER’S MANUAL WASHING MACHINE Before beginning installation, read these instructions carefully. This will simplify installation and ensure that the washer is installed correctly and safely. Leave these instructions near the washer after installation for future reference. WM4070H*A MFL67360447 www.lg.
TABLE OF CONTENTS TABLE OF CONTENTS 3 IMPORTANT SAFETY INSTRUCTIONS 3 4 5 BASIC SAFETY PRECAUTIONS GROUNDING INSTRUCTIONS SAFETY INSTRUCTIONS FOR INSTALLATION SAFETY INSTRUCTIONS FOR USE, CARE, CLEANING, AND DISPOSAL 6 7 PRODUCT FEATURES 8 INTRODUCING YOUR WASHING MACHINE 8 9 Parts and Accessories Control panel features 11 INSTALLATION INSTRUCTIONS 11 12 13 14 15 16 17 17 Preview installation order Checking and choosing the proper location Unpacking and removing shipping bolts Connecting t
IMPORTANT SAFETY INSTRUCTIONS 3 READ ALL INSTRUCTIONS BEFORE USE WARNING For your safety, the information in this manual must be followed to minimize the risk of fire, explosion, or electric shock, or to prevent property damage, injury to persons, or death. Your safety and the safety of others are very important. e have provided many important safety messages in this manual and on your appliance. Always read W and obey all safety messages. This is the safety alert symbol.
IMPORTANT SAFETY INSTRUCTIONS IMPORTANT SAFETY INSTRUCTIONS READ ALL INSTRUCTIONS BEFORE USE WARNING For your safety, the information in this manual must be followed to minimize the risk of fire, explosion, or electric shock, or to prevent property damage, injury to persons, or death. GROUNDING INSTRUCTIONS This appliance must be grounded. In the event of malfunction or breakdown, grounding will reduce the risk of electric shock by providing a path of least resistance for electric current.
IMPORTANT SAFETY INSTRUCTIONS 5 READ ALL INSTRUCTIONS BEFORE USE WARNING For your safety, the information in this manual must be followed to minimize the risk of fire, explosion, or electric shock, or to prevent property damage, injury to persons, or death. SAFETY INSTRUCTIONS FOR INSTALLATION WARNING To reduce the risk of fire, electric shock, or injury to persons when using this appliance, follow basic precautions, including the following.
IMPORTANT SAFETY INSTRUCTIONS IMPORTANT SAFETY INSTRUCTIONS READ ALL INSTRUCTIONS BEFORE USE WARNING For your safety, the information in this manual must be followed to minimize the risk of fire, explosion, or electric shock, or to prevent property damage, injury to persons, or death. SAFETY INSTRUCTIONS FOR USE, CARE, CLEANING, AND DISPOSAL WARNING To reduce the risk of fire, electric shock, or injury to persons when using this appliance, follow basic precautions, including the following.
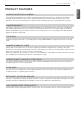
PRODUCT FEATURES 7 INVERTER DIRECT-DRIVE MOTOR The inverter direct drive motor, which is directly attached to the drum, is capable of producing multiple distinct different motions for optimal washing performance with very little noise and vibration. The motor assembly also contains fewer moving parts, thus resulting in fewer repairs.
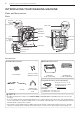
INTRODUCING YOUR WASHING MACHINE INTRODUCING YOUR WASHING MACHINE Parts and Accessories Parts Detergent dispenser drawer (See page 20) Water inlets Control panel (See page 9) TurboWash™ Upper Nozzle Door Shipping bolts Door seal Magnet Door Plunger (See page 7) Power cord Drain hose Tub Leveling feet Drain pump filter cover Drain pump filter Drain hose Accessories Included Accessories Non-skid pads Optional Accessories Caps for covering shipping bolt holes Pedestal (sold separately) Stacki
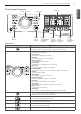
INTRODUCING YOUR WASHING MACHINE Cycle selector Power Button Operation Button Display Operation Start/ Pause Button Water Temperature Selection Button Spin Speed Selection Button Soil Level Selection Button ENGLISH Control panel features 9 Signal Sound Selection Button Description yy Turns the washing machine on and off. yy (During the wash cycle) stops operation, and cancels the settings.
INTRODUCING YOUR WASHING MACHINE Operation (continued) Button Description yy (Press before wash cycle) Pre-wash heavily soiled laundry (See page. 26). yy (Press and hold during wash cycle) Lock/Unlock the button (See page. 27). yy Use this option to save time (See page.27). yy (Press before wash cycle) Add extra rinse cycle to the selected one (See page. 26).
INSTALLATION INSTRUCTIONS 11 ENGLISH INSTALLATION INSTRUCTIONS Preview installation order Checking and choosing the proper location Unpacking and removing shipping bolts Connecting the water line Connecting the drain line Leveling the washing machine Plugging in the power cord and grounding Test run WARNING yy Washer is heavy! Two or more people are required when moving and unpacking the washer. Failure to do so can result in back or other injury.
INSTALLATION INSTRUCTIONS NOTE Checking and choosing the proper location Install the washing machine on a solid floor that is strong and rigid enough to support the weight of the washing machine, even when fully loaded, without flexing or bouncing. If the floor has too much flex, you may need to reinforce it to make it more rigid. If the floor is not solid, it may cause severe vibration and noise. 1 Clean the floor before installation. - Make sure to select solid and smooth ground.
INSTALLATION INSTRUCTIONS When removing the washer from the carton base, be sure to remove the foam drum support in the middle of the carton base. If you must lay the washer down to remove the base packaging materials, always lay it carefully on its side. Do NOT lay the washer on its front or back. 1 Remove the bottom two shipping bolts with the wrench (included) to fully loosen all four shipping bolts by turning them counterclockwise and then pulling them out.
INSTALLATION INSTRUCTIONS Connecting the water lines 1 Check the rubber seals on both sides of the hose. - Insert a rubber seal into the threaded fittings on each hose to prevent leaking. 4 Connect the hoses to the water inlets tightly by hand and then tighten another 2/3 turn with pliers. - Connect the blue hose to the cold water inlet and the red hose to the hot water inlet.
INSTALLATION INSTRUCTIONS 15 Using a laundry tub Secure the drain hose in place to prevent moving and leaking. 1 Clip the end of the hose into the elbow bracket. NOTE yy The drain hose should be properly secured. Failure to properly secure the drain hose can result in flooding and malfunction. yy Total height of the house end should not exceed 96 inches (244.8 cm) from the bottom of the washer. yy The drain must be installed in accordance with any applicable local codes and regulations.
INSTALLATION INSTRUCTIONS Leveling the washing machine 4 Check the washing machine’s level again. The washer tub of your new washing machine spins at very high speeds. To minimize vibration, noise, and unwanted movement, the floor must be perfectly level and solid. 1 Check the washing machine’s level. - Check the precise level by rocking the top edges of the washing machine or placing a level on the washing machine.
INSTALLATION INSTRUCTIONS Make sure to ground the washing machine to prevent a short circuit or an electric shock when plugging in. Using a 3-prong outlet Plug in the electrical outlet without additional grounding. Test run Check if the washing machine is properly installed and run a test cycle. 1 Load the washing machine with 6 pounds of laundry. 2 Press A and turn 3 Press B on the right to RINSE + SPIN. 4 Press C. - The wash cycle starts.
PREPARATION PREPARATION Sorting wash loads Precautions for fabric care before wash cycle Read and observe the following to prevent shrinkage or damage to clothes. uuCheck all pockets to make sure that they are empty. - Items such as clips, matches, pens, coins, and keys can damage both your washer and your clothes. uuBrush heavy soil, dust, or hair off fabrics before washing.
PREPARATION Most articles of clothing feature fabric care labels that include instructions for proper care. Category Label Directions Hand Wash Machine Wash, Normal Cycle se Permanent Press/Wrinkle U Resistant washing machine setting (which has a cool down or cold spray before the reduced spin) Use Gentle/Delicate washing machine setting (slow agitation and/ or reduced wash time).
PREPARATION Using detergent/fabric softener Loading the dispenser Recommended detergent The detergent dispenser drawer of the washing machine has a dispenser compartment for each detergent type. Add the appropriate detergents into its respective compartments. Make sure to use HE (High-Efficiency) detergent for front-loading washing machines. HE detergents dissolve more efficiently and produce fewer suds to ensure efficient washing and rinsing.
PREPARATION 21 Liquid Bleach Compartment This compartment holds liquid chlorine bleach, which will be dispensed automatically at the proper time during the wash cycle. NOTE yy If liquid detergent is to be used for the main wash when using the pre-wash option, the liquid detergent cup accessory must be used in main wash dispenser to prevent the main wash liquid detergent from being dispensed immediately.
USING YOUR WASHING MACHINE USING YOUR WASHING MACHINE Basic operation 1 Load the laundry into the washing machine and close the door. 2 Press A. - The lights around the cycle selector knob will illuminate and a chime will sound. B Turn to the desired cycle. - The proper default option is automatically set according to the wash cycle. See page 23, Cycle guide, for more detailed default options for each cycle. - See page 24, Main cycle, for details on the wash cycles.
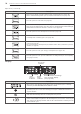
USING YOUR WASHING MACHINE 23 The cycle guide below shows the options and recommended fabric types for each cycle. ● = Available option BASIC OPTION (=DEFAULT) ADDITIONAL OPTIONS DISPLAY CYCLE FABRIC TYPE WASH SPIN SOIL PRE- EXTRA COLD TURBO FRESH TIME(MIN) STEAM TEMP.
USING YOUR WASHING MACHINE Main cycle You can wash laundry items more thoroughly by selecting the wash cycle that best suits the type of items to be washed. Turn the B to the desired cycle. When you select a wash cycle, the light for the corresponding wash cycle will turn on. See page 22, Basic operation, for more details on operating methods. Reduce laundry allergen, ALLERGIENE™ This cycle is a powerful, high temperature cycle designed specifically to reduce certain allergens.
USING YOUR WASHING MACHINE Setting spin speed, SPIN SPEED Each cycle has preset settings that are selected automatically. You may also customize the settings using the cycle setting buttons. Press the button for that option to view and select other settings. The washer automatically adjusts the water level for the type and size of wash load for best results and maximum efficiency. It may seem there is no water inside the drum in some cycles, but this is normal. You can set the desired spin speed.
USING YOUR WASHING MACHINE Adjusts the melody and button tones, SIGNAL The washing machine plays a melody when the wash cycle is finished. The buttons make a sound each time a button is pressed. The melody and button tones can be changed and off as desired. 1 Press A. 2 Turn B to the desired cycle. 3 Press . Adjust the melody and button tones as desired. Adding extra rinse cycle, EXTRA RINSE You can add an extra rinse cycle to the default rinse cycle.
USING YOUR WASHING MACHINE Saving energy, COLD WASH™ Adding the COLD WASH™ option reduces energy usage and provides the same washing performance as a warm water wash. By using 6 different washing motion (Tumbling, Rolling, Stepping, Scrubbing, Swing, Filtration), fabrics get the cleaning benefits, without the energy usage. 1 Press A and turn 2 Press B to the desired cycle. . The washer will automatically adjust the cycle settings. 3 Set any other desired options. 4 Press C.
USING YOUR WASHING MACHINE Selecting your customized cycle, CUSTOM PGM You can recall the customized wash cycle you had previously saved. To recall cycle 1 Press A after then press . 2 Press C. Tumbles clothes to prevent wrinkles, FRESH CARE Use this function when you are not able to take out your clothes as soon as the wash cycle ends. 1 Press A and turn 2 Press and hold B to the desired cycle. the wash cycle. - The light will turn on. for 3 seconds during 3 Select any desired options.
MAINTENANCE 29 Care for 1 minute. Not all of the RV antifreeze will be expelled. Care after wash After the cycle is finished, wipe the door and the inside of the door seal to remove any moisture. Leave the door open to dry the washer tub interior. Wipe the body of the washing machine with a dry cloth to remove any moisture. 8 Press A to turn off the washing machine and pull out the power plug. 9 Dry the tub interior of the washer tub with a soft cloth, and close the door.
MAINTENANCE When the Drain Line is Frozen 1 Pour hot water in the washer tub and close the door. - Leave it for 10 minutes. 2 Press A after 10 minutes. 3 Press 4 Press C. for draining and spinning. - Check if the water drains. Cleaning Periodically clean the washing machine to help maintain its performance and to minimize the chance of malfunction.
MAINTENANCE Automatic alert for cleaning washing machine Removing mineral buildup If you live in an area with hard water, mineral scale can form on the internal components of the washing machine. Take extra care to periodically clean the mineral buildup on the internal components to extend the lifespan of the washing machine.
MAINTENANCE Cleaning the water inlet filters Clean the water inlet filters periodically to prevent clogging. Take extra care to clean the water inlet filters for areas using hard water. Water may not be supplied if there are foreign objects, such as rust, sand, or stones in the water inlet filters. 1 Press A to turn off the washing machine and pull out the plug. 2 Turn off the faucets connected with the water inlets. 3 Remove the water inlets.
MAINTENANCE The washing machine fails to drain if the drain pump filter is clogged. Periodically clean the drain filter to prevent clogging with foreign objects. 6 Recap the plug onto the drain hose and reattach the drain hose. 1 Press A to turn off the washing machine and pull out the plug. 2 Open the drain pump filter cover. 7 Insert the drain pump filter. 3 Unclip the drain hose and remove the plug from the drain hose to drain the remaining water.
MAINTENANCE Cleaning the door seal Clean the door seal once a month to prevent build-up of dirt in the door seal. 1 Wear rubber gloves and protective goggles. 2 Dilute 3/4 cup (177 ml) of liquid chlorine bleach in 1 gallon (3.8 L) of water. 3 Soak a sponge or a soft cloth in this diluted solution and wipe down all around the door seal. 4 Wipe any moisture with a dry towel or cloth after cleaning. 5 Leave the door open to allow the door seal to dry completely.
TROUBLESHOOTING 35 Checking error messages If the following message appears on the display, check the following and take the appropriate corrective action. Message Possible Causes Item of clothing has gathered on one side of the tub. yy There are not enough items in the machine.
TROUBLESHOOTING Before calling for service Check the following before calling for service. Problem Clicking sound Possible Causes Solutions yy Do you hear a sound when you close or yy This sound is normal and occurs when the door is closed, locked or unlocked. lock and unlock the door? Spraying or hissing sound yy Is water spraying in the tub? yy This sound is normal as water is spraying or circulating during the cycle.
SPECIFICATIONS Possible Causes yy Did you remove the load immediately after it finished? yy Did you overload the tub? yy Did you reverse the hot and cold water inlets? Solutions yy Remove the load immediately after it finishes. yy Do not overload the tub. yy Hot water rinse can cause garments to wrinkle. Check the inlet hose connections. Power is not turned on yy Is the power cord plugged in properly? yy Make sure that the plug is secured in a grounded 3-prong, 120 V (60 Hz) outlet.
USING SMARTDIAGNOSIS™ USING SMARTDIAGNOSIS™ Should you experience any problems with your Washer, it has the capability of transmitting data to your Smart Phone using the LG Smart Laundry Application or via your telephone to the LG call center. SMARTDIAGNOSIS™ cannot be activated unless your Washer is turned on by pressing the POWER button. If your Washer is unable to turn on, then troubleshooting must be done without using SMARTDIAGNOSIS™.
WARRANTY 39 WARRANTY: LG Electronics U.S.A., Inc. (“LG”) warrants your LG Washing Machine (“product”) against defect in materials or workmanship under normal household use, during the warranty period set forth below, LG will, at its option, repair or replace the product.
WARRANTY LG WASHING MACHINE LIMITED WARRANTY (CANADA) WARRANTY: Should your LG Washer (“Product”) fail due to a defect in material or workmanship under normal home use during the warranty period set forth below, LG Canada will at its option repair or the Product upon receipt of proof of original retail purchase. This warranty is valid only to the original retail purchaser of the product and applies only to a Product distributed in Canada by LG Canada or an authorized Canadian distributor thereof.
ESPAÑOL MANUAL DE PROPIETARIO LAVADORA Antes de comenzar la instalación, lea atentamente estas instrucciones. Esto simplifi cará la instalación y asegurará que la lavadora está instalada en forma correcta y segura. Conserve estas instrucciones cerca de la lavadora luego de la instalación para futuras consultas. WM4070H*A MFL67360447 www.lg.
2 ÍNDICE ÍNDICE 3 INSTRUCCIONES IMPORTANTES DE SEGURIDAD 3 4 PRECAUCIONES BÁSICAS DE SEGURIDAD INSTRUCCIONES PARA LA CONEXIÓN A TIERRA INSTRUCCIONES DE SEGURIDAD PARA LA INSTALACIÓN INSTRUCCIONES DE SEGURIDAD PARA LA UTILIZACIÓN, CUIDADO Y LIMPIEZA, Y LA ELIMINACIÓN 5 6 7 CARACTERÍSTICAS DEL PRODUCTO 8 INTRODUCCIÓN A LA LAVADORA 8 9 Partes y Accesorios Características del panel de control 11 INSTRUCCIONES DE INSTALACIÓN 11 12 Vista previa del orden de instalación Comprobación y elección de l
INSTRUCCIONES IMPORTANTES DE SEGURIDAD 3 INSTRUCCIONES IMPORTANTES DE SEGURIDAD LEA TODAS LAS INSTRUCCIONES ANTES DE USAR ADVERTENCIA Su seguridad y la de otros es muy importante. H emos incluido muchos mensajes importantes de seguridad en este manual y en su electrodoméstico. Lea y cumpla siempre con todos los mensajes de seguridad. Éste es el símbolo de alerta de seguridad. El mismo alerta sobre potenciales riesgos de muerte o heridas tanto para usted como para otras personas.
4 INSTRUCCIONES IMPORTANTES DE SEGURIDAD INSTRUCCIONES IMPORTANTES DE SEGURIDAD LEA TODAS LAS INSTRUCCIONES ANTES DE USAR ADVERTENCIA Por su seguridad, se debe seguir la informacion indicada en este manual para minimizar el riesgo de incendio o explosion, descarga electrica, o para prevenir danos a la propiedad, lesiones personales, o muerte. INSTRUCCIONES PARA LA CONEXIÓN A TIERRA Este aparato debe ser conectado a tierra.
INSTRUCCIONES IMPORTANTES DE SEGURIDAD 5 INSTRUCCIONES IMPORTANTES DE SEGURIDAD LEA TODAS LAS INSTRUCCIONES ANTES DE USAR INSTRUCCIONES DE SEGURIDAD PARA LA INSTALACIÓN ADVERTENCIA Para minimizar el riesgo de incendio o explosion, descarga electrica, o para prevenir lesiones personales cuando use electrodomesticos, se deben seguir precauciones basicas de seguridad, incluyendo las siguientes: • Consulte las INSTRUCCIONES DE INSTALACION para un • La lavadora deberá estar siempre conectada a un enchufe
6 INSTRUCCIONES IMPORTANTES DE SEGURIDAD INSTRUCCIONES IMPORTANTES DE SEGURIDAD LEA TODAS LAS INSTRUCCIONES ANTES DE USAR ADVERTENCIA Por su seguridad, se debe seguir la informacion indicada en este manual para minimizar el riesgo de incendio o explosion, descarga electrica, o para prevenir danos a la propiedad, lesiones personales o muerte.
CARACTERÍSTICAS DEL PRODUCTO 7 CARACTERÍSTICAS DEL PRODUCTO MOTOR DIRECT-DRIVE INVERTER SMARTDIAGNOSIS™ Si experimenta alguna dificultad técnica con su lavadora, éste tiene la capacidad de transmitir información por teléfono al Centro de Atención al Cliente. El agente de servicio al cliente guarda la información transmitida de su máquina y la utiliza para analizar el problema, facilitándole un diagnóstico rápido y efectivo.
8 INTRODUCCIÓN A LA LAVADORA INTRODUCCIÓN A LA LAVADORA Partes y Accesorios Partes Cajón dispensador de detergente (véase página 20) Entradas de agua Panel de control (Véase página 9).
INTRODUCCIÓN A LA LAVADORA 9 Características del panel de control Selector de Ciclos Funcionamiento Pantalla ESPAÑOL Botón de Encendido Funcionamiento Botón Botón de Inicio/ Pausa Botón de Selección de Temperatura de Agua Botón de Selección Botón de Selección Sonido de la señal de Velocidad de de Nivel de de selección del Centrifugado Suciedad botón Descripción yy Enciende y apaga la lavadora. yy (Durante el ciclo de lavado) Detiene el funcionamiento, y cancela los ajustes.
10 INTRODUCCIÓN A LA LAVADORA Funcionamiento (continuación) Botón Descripción yy (Seleccione antes del ciclo de lavado) Prelavar prendas bien sucias (Véase página 26). yy (Durante el ciclo de lavado, mantenga pulsado) Bloquear / Desbloquear el botón (Véase página 27). yy Utilice esta opción para ahorrar tiempo (Véase página 27). yy (Seleccione antes de iniciar el ciclo de lavado) Utilice esta opción para agregar vapor para mayor potencia en el lavado (Véase página 26).
INSTRUCCIONES DE INSTALACIÓN 11 INSTRUCCIONES DE INSTALACIÓN Vista previa del orden de instalación ESPAÑOL Comprobación y elección de la ubicación adecuada Conexión del tubo de desagüe Desembalaje y retiro de los tornillos de transporte Nivelación de la lavadora Conexión de los tubos de agua Conexión del enchufe y la toma de tierra Prueba de funcionamiento ADVERTENCIA yy La lavadora es pesada. Se necesitan dos o más personas para instalar y trasladar el electrodoméstico.
12 INSTRUCCIONES DE INSTALACIÓN NOTA Comprobación y elección de la ubicación adecuada Instale la lavadora sobre un suelo con la resistencia y rigidez suficiente para soportar el peso de la máquina, incluso con la carga completa, sin que se flexione o rebote. Si el suelo tiene una flexibilidad excesiva, quizás deba reforzarse para hacerla más rígida. Si el suelo no es resistente, puede causar vibraciones y ruidos intensos. 1 Limpie el suelo antes de la instalación.
INSTRUCCIONES DE INSTALACIÓN Desempaque y retiro de los tornillos de transporte Al retirar la lavadora de la base de cartón, asegúrese de quitar el soporte del tambor de foam colocado en la mitad de la base de cartón. 1 Quite los dos pernos de transporte de la parte inferior con la llave inglesa (incluida) para soltar por completo los cuatro pernos de transporte, girándolos en el sentido opuesto al de las agujas del reloj y después tirando de ellos.
14 INSTRUCCIONES DE INSTALACIÓN Conexión de las tuberías de agua 1 Revise las juntas herméticas de goma de ambos extremos de la manguera. - Inserte una junta de goma en los acoples roscados de cada manguera para evitar fugas. Junta hermética de goma Junta hermética de goma Manguera de agua (Al grifo) Manguera de agua (A entrada de agua de la lavadora) 2 Conecte las tuberias de agua a las llaves de paso de agua caliente y fria y apriete las conexiones con la mano.
INSTRUCCIONES DE INSTALACIÓN Conexión del tubo de desagüe Fije el tubo de desagüe para evitar que se mueva y que se produzcan fugas. NOTA Utilización de una tina de lavado 1 Fije el extremo de la manguera en el soporte de codo. - Conecte el codo a una distancia no superior a 4 pulgadas (10 cm) del extremo de la manguera de desagüe.
16 INSTRUCCIONES DE INSTALACIÓN Nivelación de la lavadora PRECAUCIÓN El tambor de su nueva lavadora gira a alta velocidad . Para reducir las vibraciones, el ruido y los movimientos no deseados, el suelo debe estar nivelado y debe ser una superficie sólida. 1 Compruebe que la lavadora esté nivelada. - Compruebe la nivelación meciendo los extremos superiores de la lavadora o colocando un nivel sobre la máquina.
INSTRUCCIONES DE INSTALACIÓN Conexión del enchufe y la toma de tierra Conecte a tierra la lavadora para evitar un cortocircuito o descargas eléctricas durante la conexión. Conecte el enchufe en la toma sin conexión a tierra adicional. Prueba de funcionamiento Compruebe si la lavadora ha sido instalado correctamente y realice una prueba de funcionamiento. 1 Cargue la lavadora con 6 libras (3 kg) de ropa. 2 Pulse A. 3 Pulse para RINSE + SPIN. 4 Pulse C. - Se inicia el ciclo de lavado.
18 PREPARACIÓN PREPARACIÓN Clasificación de las cargas de lavado Precauciones para el cuidado de los tejidos antes del ciclo de lavado Lea y cumpla con las siguientes instrucciones para evitar que la ropa se encoja o se dañe. uuRevise todos los bolsillos para asegurarse de que esten vacios. - Articulos como clips, cerillos, plumas, monedas y llaves pueden danar su lavadora o sus prendas. uuCierre las cremalleras, ganchos y cordones para prevenir que estos articulos se enganchen o enreden en otras prendas.
PREPARACIÓN 19 Etiquetas de cuidado de las telas La mayoria de las prendas de vestir tienen etiquetas de cuidado de las telas para lograr un cuidado adecuado. Categoría Etiqueta Instrucciones Lavado a máquina, ciclo normal Utilice el ajuste de planchado permanente/ resistente a las arrugas (la cual tiene un enfriado o rociado con agua fría antes del centrifugado reducido) Utilice el ajuste de prendas delicadas (agitación lenta y/ o tiempo de lavado reducido).
20 PREPARACIÓN Utilización de detergente/ suavizante Detergente recomendado Asegúrese de utilizar detergentes de alta eficiencia (HE) para máquinas de carga frontal. Los detergentes de alta eficiencia se disuelven mejor y producen menos espuma para lograr un lavado y enjuague más eficiente. Utilice la cantidad correcta de detergente, siguiendo las instrucciones en la etiqueta del empaque del detergente.
PREPARACIÓN 21 Compartimiento de detergente para prelavado Compartimiento de blanqueador líquido Agregue el detergente liquido o en polvo a este compartimiento cuando se usa la opcion de Prewash (prelavado). Use siempre detergente tipo HE (Alta eficiencia ) con su lavadora. Este compartimiento alberga blanqueador liquido, que se dispensará automáticamente en el momento adecuado del ciclo de lavado.
22 UTILIZACIÓN DE LA LAVADORA UTILIZACIÓN DE LA LAVADORA Funcionamiento básico 1 Cargue la ropa en la lavadora y cierre la puerta. 2 Pulse A. - Las luces alrededor del dial selector de ciclos se iluminarán y sonará una señal acústica. B Gire al ciclo deseado. - Se selecciona automáticamente la opción por defecto según el ciclo de lavado. Consulte la página 23, Guía de ciclos, para más información sobre las opciones por defecto de cada ciclo de lavado.
UTILIZACIÓN DE LA LAVADORA 23 Guía de ciclos La guía de ciclos indicada más abajo muestra las opciones y tipos de telas recomendadas para cada ciclo. ● = Opcion disponible CICLO TIPO DE TEJIDO El ciclo TUB CLEAN (LIMPIEZA DE CONDUCTO) está específicamente diseñado para eliminar moho en la lavadora ALLERGIENE™ Algodon, ropa interior, fundas de almohadas, sabanas, ropa de bebe 89 99 ~ 132 98 ~ 107 EXTRA CALIENTE SANITARY (SANITARIO) Ropa interior muy sucia, ropa de trabajo,panales, etc.
24 UTILIZACIÓN DE LA LAVADORA Ciclo principal Para toallas TOWELS Puede lavar la ropa de forma más intensiva seleccionando el ciclo de lavado más adecuado para el tipo de prendas que se van a lavar. Gire el B al ciclo deseado. Cuando seleccione un ciclo de lavado, se iluminará la luz para el ciclo de lavado correspondiente. Consulte la página 22, Funcionamiento básico, para más información sobre los métodos de funcionamiento.
UTILIZACIÓN DE LA LAVADORA Botones de ajuste de ciclo NOTA yy Para proteger sus prendas de vestir, no todas las temperaturas de lavado/enjuague, velocidades de centrifugado, niveles de suciedad u opciones estan disponibles en cada ciclo. Vea la Guia de ciclos para obtener mas detalles. Opciones de ajuste antes del ciclo Usted puede seleccionar y agregar las opciones deseadas antes de iniciar la lavadora. Ajuste de la temperatura del agua, WASH TEMP.
26 UTILIZACIÓN DE LA LAVADORA Ajuste la melodía y los tonos de los botones, SIGNAL Añadiendo ciclo de enjuague extra, EXTRA RINSE La lavadora reproduce una melodía cuando ha terminado el ciclo de lavado. Los botones emiten un sonido cuando se pulsan.Puede cambiar y apagar la melodía y los tonos de los botones según lo desee. Puede añadir un ciclo de enjuague extra al ciclo de enjuague por defecto. 1 Pulse A. 2 Gire 3 Pulse . Ajuste la melodía y los tonos de los botones según lo desee.
UTILIZACIÓN DE LA LAVADORA ADVERTENCIA NOTA Ahorro de energía, COLD WASH™ Agregar la opcion COLD WASH™ a estos ciclos brinda una reduccion de energia y el mismo desempeno de lavado que un lavado con agua tibia. Mediante el uso de 6 movimientos de lavado diferentes (rotacion, balanceo, salto, refregado, oscilacion y filtracion), las telas obtienen los beneficios del lavado sin el gasto de energia. 1 Pulse A y gire B al ciclo deseado. La lavadora ajustará automáticamente las configuraciones del ciclo.
28 UTILIZACIÓN DE LA LAVADORA Como guardar ciclo personalizado, PGM SAVE Gira la ropa para evitar arrugas, FRESH CARE Puede guardar un ciclo con todos los ajustes y opciones que usted utilice con mayor frecuencia. Utilice esta función cuando no pueda retirar la ropa de la lavadora apenas se termina el ciclo de lavado. Para guardar un ciclo 1 Pulse A y gire 1 Para guardar el ciclo 2 Pulse A y gire B al ciclo deseado. 3 Haga los ajustes y agregue las opciones deseadas.
MANTENIMIENTO 29 MANTENIMIENTO Cuidados 7 Pulse C. Cuidados tras el lavado 8 Pulse A para apagar la lavadora y desconecte el enchufe. 9 Seque el interior del tambor con un trapo suave y cierre la puerta. ADVERTENCIA yy Desenchufe la lavadora antes de limpiar la misma para evitar el riesgo de descargas electricas. Si no se cumple con esta advertencia se podran producir heridas graves, incendios, descargas electricas o muerte.
30 MANTENIMIENTO Cuando se congela el tubo de desagüe 1 Vierta agua caliente en el tambor de la lavadora y cierre la puerta. - Deje el agua adentro durante 10 minutos. Limpieza Periódicamente limpie su lavadora para ayudar a mantener su rendimiento y para minimizar las posibilidades de funcionamiento defectuoso. 2 Pulse A después de 10 minutos. 3 Pulse 4 Pulse C. . - Verifique si se vacía el agua.
MANTENIMIENTO Alerta automática para la limpieza de la lavadora Limpieza del cajón dispensador de detergente Si deja detergente en el cajón dispensador durante un período prolongado de tiempo o utiliza la lavadora durante mucho tiempo, puede acumularse cal en el cajón. Retire y limpie el cajón una vez por semana. 1 Extraiga el cajón dispensador de detergente. Eliminación de la cal Si vive en un área con agua dura, puede acumularse la cal en los componentes internos de la lavadora.
32 MANTENIMIENTO Limpieza de los filtros de entrada de agua Limpie periódicamente los filtros de agua para evitar que se obstruyan. Ponga especial cuidado en la limpieza de los filtros si vive en áreas con agua dura. El agua podría no suministrarse correctamente si hay objetos extraños, como óxido, arena o piedras en los filtros de entrada de agua. 1 Pulse A para apagar la lavadora y desconecte el enchufe. 2 Cierre las llaves de paso conectadas a las mangueras de agua. 3 Retire las mangueras de agua.
MANTENIMIENTO Limpieza del filtro de la bomba de desagüe 33 6 Vuelva a colocar el tapón de la manguera e introdúzcala en el alojamiento. La lavadora no se vaciará correctamente si el filtro de la bomba de desagüe está obstruido. Limpie periódicamente el filtro para evitar obstrucciones por objetos extraños. el enchufe. 2 Abra la tapa del filtro de la bomba de desagüe. 3 Tire de la manguera de desagüe para extraerla y quite el tapón de la manguera para vaciar el agua restante.
34 MANTENIMIENTO Limpieza de la junta de la puerta Limpie la junta hermética de la puerta una vez al mes para evitar la acumulación de suciedad. 1 Utilice guantes de goma y gafas de protección. 2 Diluya 3/4 de taza (177 mL) de blanqueador líquido con lejía en 1 galón (3.8 litros) de agua. 3 Remoje una esponja o un trapo suave en esta solución diluida y limpie toda la zona alrededor de la junta de la puerta. 4 Seque la humedad con una toalla o trapo seco.
SOLUCIÓN DE PROBLEMAS 35 SOLUCIÓN DE PROBLEMAS Comprobación de los mensajes de error Si aparece el siguiente mensaje en la pantalla, compruebe lo siguiente y tome la acción correctiva apropiada. Causas posibles Solución yy Reorganice la ropa para equilibrar la carga. yy Los peluches o alfombrillas pueden desequilibrarse durante el centrifugado y la lavadora podría no vaciar el agua. Reorganice la ropa de punto para equilibrar la carga y vacíe el agua de nuevo. yy Lave sólo una manta.
36 SOLUCIÓN DE PROBLEMAS Antes de llamar al servicio técnico Haga las siguientes comprobaciones antes de llamar al servicio técnico. Problema Causas posibles Solución yy ¿Oye un sonido cuando cierra y bloquea o yy Este sonido es normal cuando se cierra, se bloquea o desbloquea la puerta. desbloquea la puerta? Sonido de silbido yy ¿Se está rociando agua en el tambor? yy Este sonido es normal cuando el agua se está rociando o circulando durante el ciclo.
ESPECIFICACIONES Problema Causas posibles 37 Solución yy ¿Ha retirado la carga inmediatamente yy Retire la ropa inmediatamente cuando haya después que se acabó el ciclo? acabado el ciclo. yy ¿Ha sobrecargado el tambor? yy No sobrecargue el tambor. yy ¿Ha invertido las entradas de agua caliente y yy El agua caliente hace que se arrugue la ropa. agua fría? Revise las conexiones de las mangueras de entrada de agua.
38 UTILIZACIÓN DEL SMARTDIAGONOSIS™ UTILIZACIÓN DEL SMARTDIAGNOSIS™ Si tuviera algún problema con su lavadora, la misma posee la capacidad de transmitir datos a un teléfono inteligente utilizando la aplicación Smart Laundry de LG o mediante el teléfono al Centro de atención telefónica de LG. SMARTDIAGNOSIS™ no puede ser activado a menos que su lavadora esté encendida pulsando el botón de ALIMENTACIÓN(POWER).
GARANTÍA 39 GARANTÍA LIMITADA PARA LAVADORA LG (EE.UU.) Nota: Los productos de sustitución o piezas de reparación pueden ser nuevos o remanufacturados en fábrica y tendrán garantía para el tiempo restante del período original de garantía o noventa (90) días, el que sea más largo. Guarde la factura o el justificante de compra como prueba de la fecha de compra para la garantía (se le podría pedir que envíe una copia a LG o un representante autorizado).
LG Customer Information Center This product qualifies for ENERGY STAR in the “factory default (Home Use)” setting. Changing the factory default settings or enabling other features may increase power consumption that could exceed the limits necessary to quality for ENERGY STAR. 1-800-243-0000 1-888-542-2623 USA CANADA Register your product Online! www.lg.