ENGLISH ESPAÑOL OWNER'S MANUAL WASHING MACHINE Read this owner's manual thoroughly before operating the appliance and keep it handy for reference at all times. WT7800C* MFL68267050 Rev.00_012719 MFL68267050_EN.indd 1 www.lg.com Copyright © 2018-2019 LG Electronics Inc. All Rights Reserved. 2019. 2. 13.
TABLE OF CONTENTS 3 SAFETY INSTRUCTIONS 33 SMART FUNCTIONS 3 IMPORTANT SAFETY INSTRUCTIONS 33 36 7 PRODUCT OVERVIEW 7 7 Parts Accessories 8 INSTALLATION 8 8 9 10 11 12 13 14 15 15 Tools Needed Installation Overview Product Specifications Choosing the Proper Location Unpacking and Removing Shipping Material Connecting the Water Lines Connecting the Drain Hose Leveling the Washer Connecting to the Power Supply Testing the Washer LG SmartThinQ Application Smart Diagnosis™ Function 37 MAINT
SAFETY INSTRUCTIONS 3 SAFETY INSTRUCTIONS Your safety and the safety of others are very important. We have provided many important safety messages in this manual and on your appliance. Always read and follow all safety messages. ENGLISH READ ALL INSTRUCTIONS BEFORE USE This is the safety alert symbol. This symbol alerts you to potential hazards that can kill or injure you and others. All safety messages will follow the safety alert symbol and either the word WARNING or CAUTION.
SAFETY INSTRUCTIONS ••Keep packing materials out of the reach of children. Packaging material can be dangerous for children. There is a risk of suffocation. ••Destroy the carton, plastic bag, and other packing materials after the appliance is unpacked. Children might use them for play. Cartons covered with rugs, bedspreads, or plastic sheets can become airtight chambers. ••The appliance must be installed and electrically grounded by qualified service personnel in accordance with local codes.
SAFETY INSTRUCTIONS 5 ••If the electrical supply cord is damaged, it must only be replaced by the manufacturer or its service agent or a similar qualified person in order to avoid a hazard. ••Do not put oily or greasy clothing, candles or flammable materials on top of the appliance. ••Do not store or use gasoline or other flammable vapors and liquids in the vicinity of this or any other appliance.
SAFETY INSTRUCTIONS CAUTION To reduce the risk of minor or moderate injury to persons, malfunction, or damage to the product or property when using this product, follow basic precautions, including the following: INSTALLATION ••Install the product on a firm and level floor. OPERATION ••Do not place objects on top of the appliance. ••Turn off the water faucets and unplug the appliance if the appliance is to be left for an extended period of time, such as during vacations.
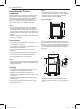
PRODUCT OVERVIEW 7 PRODUCT OVERVIEW ENGLISH Parts 9 1 Detergent Dispenser 2 Liquid Bleach Compartment 3 Tub 5 Control Panel 7 Water Inlets 4 Lid (Door) 6 Leveling Feet 8 Power Cord 9 Drain Hose Accessories Included Accessories Tie Strap Required Accessories Hot and Cold Water Hoses NOTE ••The images in this guide may be different from the actual components and accessories, which are subject to change by the manufacturer without prior notice for product improvement purposes.
INSTALLATION INSTALLATION Tools Needed Pliers Flat-blade Screwdriver Level Installation Overview Please read the following installation instructions first after purchasing this product or transporting it to another location. Choosing the proper location Connecting the drain hose Unpacking and removing shipping material Leveling the washer Connecting the water lines Connecting to the power supply TEST! Testing the washer MFL68267050_EN.indd 8 2019. 2. 13.
INSTALLATION 9 Product Specifications The appearance and specifications listed in this manual may vary due to constant product improvements. 120 VAC @ 60 Hz Min. / Max. water pressure 20 - 120 psi (138 - 827 kPa) Dimensions 27" (W) X 28 3/8" (D) X 44 1/2" (H), 57 1/4" (H with lid (door) open) 68.6 cm (W) X 72.1 cm (D) X 113 cm (H), 145.3 cm (H with lid (door) open) Net weight 127.9 lbs. (58.
INSTALLATION Choosing the Proper Location Install the washer on a solid floor that is strong and rigid enough to support the weight of the washer, even when fully loaded, without flexing or bouncing. If the floor has too much flex, you may need to reinforce it to make it more rigid. If the floor is not solid, it may cause severe vibration and noise. NOTE ••The washer must be installed on firm flooring to minimize vibration during the spin cycle.
INSTALLATION 11 Unpacking and Removing Shipping Material 2 CAUTION ENGLISH Unpack all shipping materials from the washer for proper operation and inspect it for shipping damage. To prevent damage, do not remove the foam block containing the owner’s manual, parts, and laundry product samples from the washer tub until the washer is in the final location. ••Failure to remove shipping materials can cause excessive noise and vibration. 1 Lift the washer off the foam base.
INSTALLATION Connecting the Water Lines To avoid the risk of costly water damage, purchase and install new inlet hoses when installing the washer. 1 Check the fittings and seals. Inspect the threaded fitting on each hose and make sure there is a rubber seal in place in both ends of each hose to prevent leaking. Rubber seal Water hose (to water inlet on washer) 2 Rubber seal Water hose (to tap) Connect the water supply hoses.
INSTALLATION 13 Connecting the Drain Hose Connect the drain hose to either a standpipe or laundry tub. 3 If the water valves and drain are built into the wall, fasten the drain hose to one of the water hoses with the tie strap provided (ribbed side on inside). ENGLISH NOTE ••The drain hose should always be properly secured. Failure to properly secure the drain hose can result in flooding and property damage. Tie strap ••Make sure that the drain hose is not stretched, pinched, crushed, or kinked.
INSTALLATION Leveling the Washer The tub of the washer spins at very high speeds. To minimize vibration, noise, and unwanted movement, the floor must be a level, solid surface. NOTE ••Adjust the leveling feet only as far as necessary to level the washer. Extending the leveling feet more than necessary can cause the washer to vibrate. NOTE ••To check if the washer is level from side to side, place a level on the back edge of the lid (door).
INSTALLATION 15 Connecting to the Power Supply WARNING ••Do not use a worn or damaged power cord or power plug. Replace or repair it immediately. Failure to do so may result in death, fire, electric shock, or malfunction. Check if the washer is properly installed and run a test cycle. 1 Make sure the tub is empty. Do not load anything in the tub for this test. 2 Press the Power button then immediately press and hold both the Spin and Soil buttons until an code appears in the display.
OPERATION OPERATION 4 Select a cycle. Turn the cycle selector knob or press the cycle buttons repeatedly until the desired cycle is selected. The preset wash temperature, spin speed, soil level and option settings for that cycle are shown. ••Pressing the Start/Pause button without selecting a cycle will cause the Normal cycle to begin immediately. 5 Adjust settings. Default settings for the selected cycle can now be changed, if desired, using the cycle modifier and option buttons.
OPERATION 17 Sorting Laundry ••The washer can be fully loaded, but the tub should not be tightly packed with items. The lid (door) of the washer should close easily. ••Use the Bedding cycle for buoyant or nonabsorbent items such as pillows or comforters. Failure to follow this caution can result in leakage. ••Clothing or articles that are waterproof or water resistant must be washed in the Waterproof cycle only. (e.g. water resistant clothing, mattress covers, outdoor clothes, plastic mats, etc.
OPERATION Loading the Washer ••Check and empty pockets. Paper clips, coins, matches, etc. can damage clothing and the washer. ••Close zippers and hooks, and tie drawstrings to prevent snagging or tangling of clothes. ••Use the Bedding cycle for large or bulky items such as poly-filled jackets, comforters, pillows, etc. These items may not be as absorbent as other laundry items and should be sorted into a separate wash load for optimal results. ••Combine large and small items in a load.
OPERATION 19 Adding Cleaning Products About the Dispensers ••Liquid fabric softener ••Liquid or powdered detergent for main wash Using the Detergent and Softener Dispensers To add detergent and fabric softener to the automatic dispenser: 1 Open the dispenser drawer. 2 Load the laundry products into the appropriate compartments. Liquid fabric softener compartment This compartment holds laundry detergent for the main wash cycle. Either powdered or liquid detergent may be used in this compartment.
OPERATION Using the Liquid Bleach Dispenser The bleach dispenser is a separate compartment at the left front of the tub opening. 1 Check clothing care labels for special instructions. 2 Measure liquid bleach carefully, following instructions on the bottle. ••High-efficiency washers use less water, so less bleach is needed. One half cup is enough for most loads. 3 Carefully pour the pre-measured amount of bleach directly into the bleach dispenser.
OPERATION 21 Detergent Use ENGLISH ••This washer is designed for use with only HE (HighEfficiency) detergents. HE detergents produce fewer suds, dissolve more efficiently to improve washing and rinsing performance, and help to keep the interior of the washer clean. Using detergent that is not HE may cause oversudsing and unsatisfactory performance which could result in error codes, cycle failure, and machine damage.
OPERATION Control Panel 1 2 3 6 4 5 Control Panel Features 1 Power On/Off Button Press to turn the washer on. Press again to turn the washer off. Pressing the Power button during a cycle will cancel that cycle and any load settings will be lost. The lid (door) will unlock after a brief pause. NOTE ••If there is any water remaining in the tub after the washer shuts off, it will drain following 4 minutes delay. The washer can be restarted any time before the drain begins.
OPERATION 23 Time and Status Display 2 ENGLISH 4 1 3 1 Door Lock Indicator The Door Lock indicator will light up once a cycle has started. The indicator light will stay on until the cycle is paused, stopped or has finished. 2 Wi-Fi Connect Indicator The indicator blinks during product registration and Wi-Fi setup and illuminates when the appliance is connected to a home Wi-Fi network. 3 Cycle Status Indicator These LEDs illuminate when a cycle is selected to indicate which stages are included.
OPERATION Wash Cycles Wash cycles are designed for the best wash performance for each type of load. Select the cycle that best matches the load contents for maximum wash performance and fabric care. See the Sorting Laundry section for best results, follow the fabric care labels on your garments. For a guide to fabric care symbols, see the Sorting Laundry section. Turn the knob or press the button to select the desired cycle.
OPERATION 25 Cycle Normal Delicates Use this cycle to prewash stains without needing to hand wash. Prompt treatment helps to prevent stains from setting or odors from developing. Note • When chime sounds, press the Start/Pause button to unlock lid, add main detergent to dispenser, and insert remainder of laundry. If the Start/Pause is not pressed within about 3 minutes, the cycle continues. (If Signal is turned off, the chime won’t sound.
OPERATION Cycle Guide Cycle Normal Wash Temp.
OPERATION 27 Cycle Spin Speed Soil Level Hot Extra High Heavy High Oxi Sanitize™ Medium Low No Spin Pre Wash+ Normal Normal Hot Extra high Warm High Semi Warm Medium Cold Low Tap Cold No spin Soak Stain Care Cold Wash Extra Rinse Water Plus Turbo WashTM ENGLISH Wash Temp. Light Normal Light Heavy Warm Delicates Semi Warm Normal Cold Low Tap Cold No spin Light Heavy Perm.
OPERATION Cycle Speed Wash Wash Temp. Spin Speed Soil Level Extra high Heavy Warm High Semi Warm Medium Cold Low Tap Cold No spin Soak Stain Care Cold Wash Extra Rinse Water Plus Turbo WashTM Normal Light Heavy Warm Waterproof Downloaded Default: Small Load Semi Warm Cold Low Tap Cold No spin Light Hot Extra high Heavy Warm High Semi Warm Medium Normal No spin Light Cold Tap Cold = available option, MFL68267050_EN.indd 28 Normal = default setting 2019. 2. 13.
OPERATION 29 Cycle Modifier Buttons Spin Higher spin speeds extract more water from clothes, reducing drying time and saving energy. NOTE ••To protect your garments, not every wash temperature, spin speed, soil level, or option is available with every cycle. A chime will sound and the LED will not light if a selection is not allowed. Adjusting the soil level setting will modify the cycle times and/or wash actions. ••Press the Spin button until the desired speed is selected.
OPERATION Special Care Features Press the Special Care button to select specialized cycles or add features to standard cycles. Press the button repeatedly to move through the available features. NOTE ••To protect your garments, not every feature is available with every cycle. ••If the Start/Pause button is not pressed within 60 minutes to start the cycle, the washer will shut off and all settings will be lost. Soak This option provides a 30-minute presoak prior to the start of the selected cycle.
OPERATION 31 Option Buttons After selecting the desired cycle and settings, press the cycle option button(s) for the option(s) you would like to add. The button will light when that option is selected. If the selected option is not allowed for the selected cycle, the chime will sound twice to alert you and the LED will not illuminate. NOTE ••To protect your garments, not every feature is available with every cycle.
OPERATION Turbo Wash™ Control Lock Adding the Turbo Wash™ option to a cycle reduces the length of the cycle while maintaining a similar wash performance. Use this option to disable the controls. This feature can prevent children from changing cycles or operating the machine. The feature does not lock the lid (door). Once the Control Lock is set, it must be deactivated before any controls, except the Power button, can be used.
SMART FUNCTIONS 33 SMART FUNCTIONS The LG SmartThinQ application allows you to communicate with the appliance using a smartphone. Before Using LG SmartThinQ ••For appliances with the 1 2 or logo Use a smartphone to check the strength of the wireless router (Wi-Fi network) near the appliance. ••If the distance between the appliance and the wireless router is too far, the signal strength becomes weak. It may take a long time to register or installation may fail.
SMART FUNCTIONS LG SmartThinQ Application Features Using Washer Cycle ••For appliances with the Remote Start or logo Washer Cycle (Remote Start, Downloaded) Set or download any preferred cycle and operate by remote control. Tub Clean Coach This function shows how many cycles remain before it is time to run the Tub Clean cycle. Smart Diagnosis™ This function provides useful information for diagnosing and solving issues with the appliance based on the pattern of use.
SMART FUNCTIONS 35 Wireless LAN Module Specifications LCW-004 Frequency Range 2412 - 2462 MHz IEEE 802.11 b : 22.44 dBm Output Power (Max) IEEE 802.11 g : 24.68 dBm IEEE 802.11 n : 24.11 dBm FCC Notice (For transmitter module contained in this product) This equipment has been tested and found to comply with the limits for a Class B digital device, pursuant to Part 15 of the FCC Rules. These limits are designed to provide reasonable protection against harmful interference in a residential installation.
SMART FUNCTIONS Smart Diagnosis™ Function Should you experience any problems with the appliance, it has the capability of transmitting data via your telephone to the LG Customer Information Center. NFC or Wi-Fi equipped models can also transmit data to a smartphone using the LG SmartThinQ application. NOTE ••Smart Diagnosis™ cannot be activated unless the appliance can be turned on using the Power button. If the appliance cannot be turned on, troubleshooting must be done without using Smart Diagnosis™.
MAINTENANCE 37 MAINTENANCE To reduce the risk of fire, electric shock, or injury to persons, read this entire owner's manual, including the Important Safety Instructions, before operating this washer. ••Unplug the washer before cleaning to avoid the risk of electric shock. Failure to follow this warning can cause serious injury, fire, electric shock, or death. ENGLISH WARNING ••Do not use volatile substances (benzene, paint thinner, alcohol, acetone, etc.
MAINTENANCE NOTE ••Never load laundry while using Tub Clean. The laundry may be damaged or contaminated with cleaning products. Make sure to run the Tub Clean cycle only when the tub is empty. ••Leave the lid (door) open after finishing the laundry, to keep the tub clean. Cleaning the Dispenser Drawer Detergent and fabric softener may build up in the dispenser drawer. Remove the drawer and inserts and check for buildup once or twice a month.
MAINTENANCE 39 Cleaning the Bleach Dispenser Type 1 Remove the cover from the bleach dispenser. Clean the cover and the opening with warm water. Cleaning the Water Inlet Filters If the washer does not fill properly, an error message will show on the display. The inlet valve filter screens could be plugged by hard water scale, sediment in the water supply, or other debris. ENGLISH Bleach may build up on the bleach dispenser cover. Check for buildup and clean the cover once or twice a month.
MAINTENANCE Care in Cold Climates When the Water Line is Frozen Storing the Washer 1 Turn off the faucets connected with the water lines. 2 Pour hot water on the frozen faucets to thaw the water lines and remove water lines. 3 Immerse the water lines in hot water to thaw them. 4 Connect the water lines with the water inlets of the washer and with the faucets. See Connecting the Water Lines for details. 5 Turn on the faucets. 6 Press the Power button.
TROUBLESHOOTING 41 TROUBLESHOOTING The washer is equipped with an automatic error-monitoring system to detect and diagnose problems at an early stage. If the washer does not function properly or does not function at all, check the following before you call for service. Noises You Might Hear Noise Possible Cause Solutions Clicking Lid (Door) lock relays when the lid (door) locks and unlocks. ••Normal Operation Spraying or Hissing Water spraying or circulating during the cycle.
TROUBLESHOOTING Operation Problem Possible Cause Hoses are not connected correctly. Solutions ••Check hoses and connectors for leaks, cracks and splits. ••Check and tighten hose connections. House drain pipes are clogged. ••The washer pumps out water very rapidly. Check for water backing up out of the drain pipe during drain. If water is seen coming out of the drain, check for proper drain hose installation and check for restrictions in the drain. Contact a plumber to repair drain pipe.
TROUBLESHOOTING 43 Problem Incomplete or no dispensing of detergent Washer will not operate. MFL68267050_EN.indd 43 Solutions The washer automatically adjusts the wash time for the amount of laundry, water pressure and other operating conditions. ••This is normal. The washer adjusts cycle time automatically to provide optimal results for the selected cycle. The time remaining shown in the display is only an estimate. Actual time may vary. Detergent compartments clogged from incorrect filling.
TROUBLESHOOTING Problem Washer is not filling properly. Water in the washer does not drain or drains slowly. Bleach does not dispense Premature dispensing of bleach MFL68267050_EN.indd 44 Possible Cause Solutions Filter clogged. ••Make sure the inlet filters on the fill valves are not clogged. Refer to the filter cleaning instructions. Inlet hoses may be kinked. ••Check that inlet hoses are not kinked or clogged. Energy efficiency ••This is a High-Efficiency (HE) washer.
TROUBLESHOOTING 45 Performance Problem Solutions Washer not unloaded promptly. ••Always remove items from the washer as soon as the cycle is complete. Washer overloaded. ••The washer can be fully loaded, but the tub should not be tightly packed with items. The lid (door) of the washer should close easily. Hot and cold water inlet hoses are reversed. ••Hot water rinse can set wrinkles in garments. Check the inlet hose connections. Bleach or softener dispensed too soon.
TROUBLESHOOTING Wi-Fi Problem Trouble connecting appliance and smartphone to Wi-Fi network MFL68267050_EN.indd 46 Possible Cause Solutions The password for the Wi-Fi network was entered incorrectly. ••Delete your home Wi-Fi network and begin the registration process again. Mobile data for your smartphone is turned on. ••Turn off the Mobile data on your smartphone before registering the appliance. The wireless network name (SSID) is set incorrectly.
TROUBLESHOOTING 47 Error Codes Problem Solutions If the balance is not successful, this error will be displayed. ••The automatic attempt to rebalance the load was not successful. The cycle has been paused to allow the load to be manually adjusted. The load is too small. ••Small loads may need additional items to be added to allow the washer to balance the load. Heavy articles are mixed with lighter items. ••The load may have heavy items loaded with lighter items.
TROUBLESHOOTING Problem Possible Cause Lid (Door) is not closed properly. Solutions ••Close the lid (door) and press Start/Pause button. After starting a cycle, it may take a few moments before the tub begins to turn or spin. The washer will not spin unless the lid (door) is locked. ••If the error persists once the lid (door) is closed and the Start/Pause button is pressed, call for service. ••Make sure that the lid (door) is closed properly and press the Start/Pause button.
LIMITED WARRANTY 49 LIMITED WARRANTY ARBITRATION NOTICE: THIS LIMITED WARRANTY CONTAINS AN ARBITRATION PROVISION THAT REQUIRES YOU AND LG TO RESOLVE DISPUTES BY BINDING ARBITRATION INSTEAD OF IN COURT, UNLESS YOU CHOOSE TO OPT OUT. IN ARBITRATION, CLASS ACTIONS AND JURY TRIALS ARE NOT PERMITTED. PLEASE SEE THE SECTION TITLED “PROCEDURE FOR RESOLVING DISPUTES” BELOW.
LIMITED WARRANTY ••Damage or failure caused by incorrect electrical current, voltage, or plumbing codes, commercial or industrial use, or use of accessories, components, or consumable cleaning products that are not approved by LG. ••Damage caused by transportation and handling, including scratches, dents, chips, and/or other damage to the finish of your product, unless such damage results from defects in materials or workmanship and is reported within one (1) week of delivery.
LIMITED WARRANTY 51 ENGLISH Arbitration Rules and Procedures. To begin arbitration of a claim, either you or LG must make a written demand for arbitration. The arbitration will be administered by the American Arbitration Association (“AAA”) and will be conducted before a single arbitrator under the AAA’s Consumer Arbitration Rules that are in effect at the time the arbitration is initiated (referred to as the “AAA Rules”) and under the procedures set forth in this section.
LIMITED WARRANTY Warranty Exceptions (U.S.) The packing materials are not removed. Remove the packing materials. Noise, vibration Tub support Carton base A coin or foreign object is stuck in the washer. Remove coins or foreign objects from the laundry before loading. E6 error, the tub won’t spin, noise The drain hose is installed too low. Reinstall the drain hose properly.
LG Customer Information Center For inquiries or comments, visit www.lg.com or call: 1-800-243-0000 1-888-542-2623 U.S.A. CANADA Register your product Online! www.lg.com MFL68267050_SP.indd 54 2019. 2. 13.