& INSTALLATION INSTALLATION Tools Needed Pliers Fla-blade Level Screwdriver Installation Overview Please read the following installation instructions first after purchasing this product or transporting it to another location.
INSTALLATION 8 Product Specifications The appearance and specifications listed in this manual may vary due to constant product improvements. Electrical requirements 120 VAC 80 He Bin. / Bax. water pressure 20 120 pai (138 827 kPa) Dimensions 27" (W) X 28%" (H), §7 %" (H with lid (door) open} 68.8 om (Wi X 72.1 em (D2) X 113 em {H), 145.3 em (H with lid {door} open} Het weight 127.9 Ibs. (58.
46 INSTALLATION Choosing the Proper Location Install the washer on a solid floor that is strong and rigid enough to support the weight of the washer, even when fully loaded, without flexing or bouncing. if the floor has too much flex, you may need bo reinforces it fo make it more rigid. If the floor is not solid, it may cause severe vibration and noise. NOTE » Bafflers installing the washer, make sirs tha floor ia clean, dry and free of dust, dirk, water and oll so the washer feet cannot slide easily.
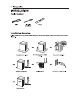
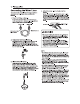
INSTALLATION 11 Unpacking and Removing 2 To prevent damage, do not remove the foam il i g block containing the owner's manual, parts, and $ h piping Material laundry product samples from the washer tub ung! Unpack all shipping materials from the washer for the washer is in the final location. proper operation and inspect it for shipping damage. AL CAUTION = Failure fo remove shipping materials can cause excessive noise and vibration. 4 Lift the washer off the foam base.
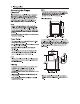
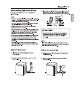
42 INSTALLATION Connecting the Water Lines To avoid the risk of costly water damage, purchase and install new inlet hoses when installing the washer. 4 Check the fittings and seals. Inspect the threaded fitting on each hose and make sure there is a nib bar seal in place in both ends of sate hose to prevent leaking. Rubber sea! Rubber seal “4 Water 108s {fo water inst on washer} 2 Connect the Walter supply hoses.
INSTALLATION 13 Connecting the Drain Hose Connect the drain hose to ether a standpipe or laundry ub. NOTE » The drain hose should always be properly secured. Failure fo progeny secure the drain hose can result in finding and proper damage. = The drain must be installed in accordance with any applicable local codes and regulations. = Make sure that hes drain hose is nof stretched, pinched, crushed, or kinked. = Do not install the drain hose with the end lower than 28.
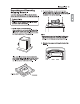
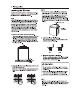
44 INSTALLATION Leveling the Washer The tub of the washer aping at very high speeds. To minimize vibration, noise, and unwanted movement, the floor must be a level, solid surface. NOTE = Adjust the leveling fest only as far as necessary to level the washer. Extending the leveling fest more than necessary can cause the washer fo vibrate. = Before installing the washer, make sure that the four is clean, dry and free of dust, dint, water and ofl a0 the washer feet cannot slide easy.
INSTALLATION 18 Connecting to the Power Supply The washer should be plugged into a 120-VAC, 60 Hz grounded 3-prong loutish. Plug in the washer. AL WARNING = Do not use a wom or damaged power cord or power plug. Replace or repair it immediately. Failure to do 50 may result in death, firs, semicircle shock, or malfunction. = Do not modify the power cord and plug provided with the appliance. Do net damage it when installing or moving the washer.