
Use and Care Manual


5755000H Copyright © Liberty Pumps, Inc. 2018
All rights reserved. – 11 –
Cutter Blade Replacement
CAUTION
Wear Protective Personal Equipment to protect hands as
exposed cutter blades have sharp edges.
The cutter blades are designed and rigorously tested to last
indefinitely without need for service or replacement in ordinary
applications. In the unlikely event that the cutter blades need
replacement, Liberty Pumps recommends replacement kit
# K001370 (440A Stainless Steel Cutter Blades hardened to
Rockwell 54c) available from http://www.libertypumps.com/
Services/Replacement-Parts or equivalent substitute.
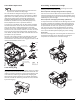
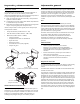
To replace the cutter blades, the 3/16” Allen wrench (supplied)
should be inserted into one of the holes located on the basket
floor. This will create a wedge preventing the cutter blade
assembly from turning. The locking fastener can be unscrewed
with the use of a 7/16” socket (1/4” drive). Once loose, the screw
and cap can be removed by pulling upward, exposing the two
cutter blades. Carefully insert the new cutter blade onto the two
pins. Replace the cap and screw.
The base of the cutting cartridge can be replaced as well. After
removing the cutter blades, a thin slotted screwdriver can be
inserted into the center hole and, once engaged, the base can be
rotated counterclockwise until it is free.
Toilet Sealing Ring
The seal between the toilet and the macerator consists of a rubber
ring connected to the macerator into which the toilet slides. The
rubber ring stretches and forms a seal around the discharge hub
of the toilet. This rubber ring is replaceable by unclipping the
plastic retainer and then pulling the ring outward. Installation is
reversed, first slide the rubber ring onto the macerator, followed
by the retaining ring.
Accessibility to Motorized Cartridge
The motorized cartridge can be accessed through the access
opening or removal of the main cover.
Removal of Power Cartridge Through the Access Opening:
Once the access cover has been removed and the basket is slid
toward the opening, the four fasteners securing the basket can be
unscrewed. The basket can then be removed through the opening
followed by the power cartridge.
Removal of Power Cartridge by Disassembly of Macerator:
If a full port ball valve was installed in the discharge line, it should
be closed to eliminate the possibility of waste discharging from
the discharge pipe. Next, the discharge and vent flanges should
be separated from the main cover by removing 4 screws from
each. The main cover can then be detached from the tank by
removing the fasteners on the periphery of the tank. The main
cover can then be lifted upward exposing the power cartridge.
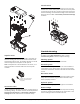
Power Cord:
The inner connecting power cord running from the switch box to
the motorized cartridge can be detached by unscrewing the
compression nut located at the motorized cartridge.
To remove cap,
unscrew fastener
Place Allen wrench
in hole to prevent
cutter from turning
Screw
Cap
Cutter
Blade
Base
Wear Protective Personal
Equipment to protect
hands as exposed cutter
blades have sharp edges.
CAUTION
Power Cord
Disconnect