
Installation Guide


Drawer Slides
©2005 LHMC
Ball-Bearing Side-Mount
Drawer Slides
Before You Begin
• Read the Do-It-Yourself Installation Instructions completely
before starting.
• Make sure all parts are included.
Parts List
• 2 Side-Mount Drawer Slides
• 12 #6 x 7/16 pan head wood screws
Recommended Tools
• Screwdriver
• Pencil or Scribe
• Ruler
• Level
Data
• 100 lb. Capacity per pair
• Length of 14”, 16”, 18”, 20”, 22”, 24”
Specifications
Drawer or Pull-Out-Shelf (For TV, VCR and Stereo Equipment)
• Drawer pull-out shelf must be 1/2” narrower than cabinet opening on
each side.
• Top and bottom of drawer or pull-out-shelf bottom should have 1/8”
minimum clearance from the cabinet opening.
1. Installing Cabinet Members to Cabinet
Press release lever to disconnect drawer members. Using a level place
and align cabinet member into position and place side flush with the
cabinet edge. Fasten each slide with three #6 pan head wood screws.
You will need to move the slide member back and forth to access the
screw holes. For supporting heavy objects use five #8-32 machine screws
and inserts to avoid tear out of slide.
2. Installing Drawer Members to Drawer or Pull-Out-Shelf
On drawer place and align drawer member into position. Place drawer
member end flush with the drawer overlay. Fasten each drawer member
with three #6 pan head wood screws.
3. Inserting Drawer
Insert drawer into cabinet and close. The drawer slide release lever will
lock as drawer is closed. Make sure drawer aligns properly and rides
smoothly on the side mount drawer slides.
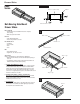
1
2
Cabinet
Drawer or pull-out shelf
Side mount drawer slide
Slide member
Cabinet member
Release lever
Drawer member
Cabinet member
Slide member
Align to edge
Align to edge
Drawer
D806
Series
SPECIFICATIONS