User Guide Module: LS9-AC11DBT Rev: 3.3.
LS9 User Guide Libre Wireless Technologies Private Limited librewireless.com Copyright © 2016 Libre Wireless Technologies. All rights reserved. Circuit diagrams and other information relating to Libre Wireless Technologies products are included as a means of illustrating typical applications. Consequently, complete information sufficient for construction purposes is not necessarily given.
LS9 User Guide Table of Contents 1. Introduction ................................................................................................................................. 9 1.1. 2. User Guide Insight ............................................................................................................................. 9 Libre Wireless Technologies’ EVK ...................................................................................... 11 2.1. 3. LS9 EVK Setup .........................
LS9 User Guide 5.8. ACP........................................................................................................................................................ 36 5.9. Model Name ...................................................................................................................................... 36 5.10. Manufacturer Name ....................................................................................................................... 37 5.11. WAC SSID .........
LS9 User Guide Password for Airplay Playback ............................................................................................................. 47 6.6. Cast For Audio .................................................................................................................................. 50 6.7. Spotify Connect ................................................................................................................................ 52 6.8. AUX-In Support .....................
LS9 User Guide Table of Figures Figure 2-1: LS9 Module (v1.0) Interfaces.................................................................................... 11 Figure 2-2: LS9 Module (v1.1) Interfaces.................................................................................... 11 Figure 2.1-1: LS9 Module and LS9 Bridge-Board ..................................................................... 12 Figure 3.1-1: LS9 Firmware Folder Structure ............................................................
LS9 User Guide Figure 6.16.2-2: Now Playing Screen for TuneIn ..................................................................... 68 Figure 6.16.3-1: QQ Music APP ....................................................................................................... 69 Figure 6.16.3-2: Login Screen ......................................................................................................... 70 Figure 6.16.3-3: Device Selection Option ...........................................................
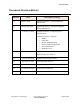
LS9 User Guide Document Revision History Revision Date Description of change 3.3 March 7, 2016 Updated Section 2.1 with Setup Button information. 3.2 February 10, 2016 Updated Section 3.1 “Firmware Upgrade Using USB Method”. 3.1 February 1, 2016 Updated section 5 “ Configuring NonVolatile-Item” Updated section 6 “ Features” • • • • • • 3.
LS9 User Guide 1. Introduction Libre Wireless provides evaluation kit (EVK) for users to gain familiarity with our products and expedite their own design and development. User can connect to LS9 module through USB, or wireless interface to configure the module, manage the on board device on the module, and perform functional test. 1.1.
LS9 User Guide • AUX Support • Bluetooth Support • TCP / IP Tunneling • Device Name Configuration Libre Wireless Technologies User Guide: LS9, Ver. 3.3.
LS9 User Guide 2. Libre Wireless Technologies’ EVK Figure 2-1 Marks different components of the LS9 Module Figure 2-1: LS9 Module (v1.0) Interfaces Figure 2-2: LS9 Module (v1.1) Interfaces Libre Wireless Technologies User Guide: LS9, Ver. 3.3.
LS9 User Guide 2.1. LS9 EVK Setup To setup the LS9 EVK and Get Started proceed as below. ACP is not provided along with Libre EVK. It is recommended to buy “ACP-V2.0C”. from Apple Inc. Connect the LS9 module to LS9 Bridge-Board. Figure 2.1-1: LS9 Module and LS9 Bridge-Board Insert LS9 Bridge-Board and LS9 module on LS9-EVK. Insert ACP on LS9 EVK. See section 7.1 for more details on ACP Setup. Connect USB-Type-A to USB-Type-A cable to, the Laptop USB port.
LS9 User Guide Driver Install Android Composite ADB Driver. See section 7.4 for procedure on installing Android Composite ADB Driver Insert the USB and the UART cable to Speaker and the Laptop / PC Open the device terminal such as, Teraterm(for windows) / Zoc6 / CoolTerm (for Mac) and set the Baud rate to 115200 like shown below Connect the Power adaptor to DC Jack on EVK Power On the EVK, using ON/ OFF Switch Open the ADB Shell on your laptop / PC Libre Wireless Technologies User Guide: LS9, Ver. 3.3.
LS9 User Guide 3. Firmware Upgrade 3.1. LS Firmware Upgrade • To upgrade LS9 modules loaded with firmware version 9006 or before, follow the procedure as described in section 0. • To upgrade LS9 modules loaded with firmware version 9006 or later, follow the procedure as described in section 3.1.2. Firmware Upgrade on LS9 module can be done in three ways.
LS9 User Guide Download and unzip the latest firmware image (83_IMAGE) from Libre Portal. https://librewireless.sharefile.com/d-s85ceb93437747d98 Copy the latest firmware image (83_IMAGE) into the Basic Release Package folder “usb_boot_bin_a0_m1_ACast_042715”. Figure 3.1-1: LS9 Firmware Folder Structure Connect the Laptop to LS9 EVK with the USB type A to Type A connector Download and install PuTTY Application http://www.putty.
LS9 User Guide LS9 boots to bootloader. Execute the command #l2nand –m on debug shell. Syntax #l2nand –m Example # l2nand-m 83_IMAGE LS flashes the image onto LS9. On Successful Completion Reboot the Module. End - - 3.1.2 Firmware Upgrade Using USB Method To update the LS9 Firmware using USB proceed as below. LS9 Firmware image is a Single-image binary file (File name: 83_IMAGE). The firmware image is upgraded by a trigger from Command-Shell or via Webpage.
LS9 User Guide The Firmware image should not contain any extensions. Insert the USB in LS9 EVK Execute command #netcfg in the device terminal to know the device IP. For Example, 10.0.1.13 Enter the IP address in the address bar of your browser. In Firmware Upgrade section, select Method as USB, and Click Upgrade. LS flashes the image onto LS9 module. Module will reboot on completion of firmware upgrade. End - - Libre Wireless Technologies User Guide: LS9, Ver. 3.3.
LS9 User Guide 3.1.3 Firmware Upgrade Using Network Method • At present firmware upgrade over Ethernet is supported. • It takes about 2 minutes to complete the upgrade progress. LS9 module does not support Ethernet port on the module. Hence it is recommended to use External USB Network adapter, to configure LS9 to Ethernet mode. LS9 Supports below listed network adapters.
LS9 User Guide • Windows 10: http://www.isunshare.com/windows10/turn-off-or-on-password-protected-sharing-inwindows-10.html • Windows 8: http://www.eightforums.com/tutorials/9907-passwordprotected-sharing-turn-off-windows-8-a.html • Windows 7: http://www.home-networkhelp.com/password-protected-file-sharing-in-windows7.html For the procedure to share the folder in Windows and Ubuntu see section 7.5. Execute command #netcfg in the device terminal to know the device IP For Example, 10.0.1.
LS9 User Guide Enter the file path (IP address of the PC/Folder Name) in the text box. For example, if the IP address of your PC is 192.168.1.109 and the folder name is XYZ, then the file path is “//192.168.1.109/XYZ”. Click Upgrade Libre Wireless Technologies User Guide: LS9, Ver. 3.3.
LS9 User Guide On successful upgrade, LS9-Module reboots, with the updated application. End -- 3.2. HOST-Firmware Update To update the HOST-MCU-Firmware binary file through LS9 module, over network proceed as below. • Make sure the LS9 EVK and your laptop / PC is connected to the same network. • At present firmware upgrade over Ethernet is supported. • The HOST-MCU firmware must be in an X-Modem receive mode to receive the HOST-MCU firmware.
LS9 User Guide Make sure your laptop / PC is not password protected and is not binded to the work domain. Execute command #netcfg in the device terminal to know the device IP For Example, 10.0.1.13 Enter the IP in the address bar of your browser. For Example, 10.0.1.13 In the Firmware upgrade section, Select Method as Network (HOST ONLY) Enter the file path (IP address of the PC/Folder Name) in the text box. For example, if the IP address of your PC is 192.168.1.
LS9 User Guide Enter the file name in the text box. Click Upgrade. End-- Libre Wireless Technologies User Guide: LS9, Ver. 3.3.
LS9 User Guide 4. Network Configuration You can configure the network to LS9 module in the following ways. • Wireless Network Setup Using WAC and SAC Method • Wireless Network Setup Using Webserver Method 4.1. Wireless Network Setup Using WAC and SAC WAC / SAC Trigger Commands To setup wireless network using WAC proceed as below 4.1.
LS9 User Guide Figure 4.1.-1: WAC Speaker Listed Select the speaker / EVK and Tap NEXT iOS device shares its Wi-Fi settings; that is SSID and Password with the WAC speaker and configures the device. On successful configuration the device is configured to the Wi-Fi network to which the iOS device is connected. End-- 4.1.
LS9 User Guide Figure 4.1.-2: Libre APP Tap Configure in the menu In Speakers To Be Setup section tap the Speaker name. Libre Wireless Technologies User Guide: LS9, Ver. 3.3.
LS9 User Guide In Speaker Setup Page type the SSID and Passphrase of the Home AP, and Click Save. Libre Wireless Technologies User Guide: LS9, Ver. 3.3.
LS9 User Guide Continue the configuration steps for all the speakers. End-- 4.2. Wireless Network Setup Using Webserver 4.2.1 LS-Connect Method To setup wireless network using LS-Connect proceed as below Long press the Setup-Button on Ls9 EVK to trigger LS-Connect Device enters “AP” mode and is available in the Wi-Fi network list as LSConfigure_xxxxxx From the network list Select LSConfigure_xxxxxx and connect the laptop to the network. Libre Wireless Technologies User Guide: LS9, Ver. 3.3.
LS9 User Guide Enter the following URL in the address bar of your browser 192.168.43.1 webpage shows Network status as shown in Figure 6-4. Select the Access Point (AP) to be connected to from Select Your Network drop-down list Select Security Type from Security drop-down list, Enter the valid login credentials and Click OK Device disconnects from laptop and connects to the network selected To know the newly acquired IP execute command #netcfg in the device terminal End-- 4.2.
LS9 User Guide In Select Your Network section, Select the Access Point (AP) to be connected, from Select your Network drop-down list and Click Save End -- 4.2.3 Manual Configuration Method To connect the device to the network manually proceed as below. In Select Your Network section, enable Configure Manually Enter the Access Point SSID and Click Save. Device reboots and connects to the network.
LS9 User Guide End – Libre Wireless Technologies User Guide: LS9, Ver. 3.3.
LS9 User Guide 5. Configuring Non-Volatile-Item Non-Volatile (NV) item in LibreSync is configured through command line. • To configure the NV-Item, type the below command in the command line and Reboot the LS-Module. Syntax of the Command to set NV-Item #setenv <> Syntax of the Command to Reboot #reboot • To know the value of the NV-Item set, type the below command in the command line.
LS9 User Guide There should be space between setenv and and between the and <>. After configuring NV-Item, to apply the NV-Item settings, Reboot the LS-Module. For example, To Configure NV-Item hostpresent #setenv hostpresent <<1>> To Know the value of the NV-item, hostpresent set #getenv hostpresent 5.1. Host Communication Over UART Host Present NV-item avoids Junk data/false triggers, in case of EVK's where UART1 communication is typically not required.
LS9 User Guide The syntax below provides the commands to enable and disable Telnet. Enable #setenv telnet <<1>> Disable #setenv telnet <<0>> 5.3. Network Interface Network Interface NV-item allows user to set the type of Network interface such as Ethernet, Wi-Fi or Auto. Ethernet The syntax below provides the commands to enable Ethernet. #setenv netif <> Wi-Fi The syntax below provides the commands to enable Wi-Fi.
LS9 User Guide 5.4. SSID of DDMS-Zone in SA-Mode The default SSID for the DDMS-Zone in SA-Mode is “Direct-LBLibreSync”. You can change the SSID of the DDMS-Zone by editing the NV-Item “ddms_SSID”. #setenv ddms_SSID <> Editing the NV-item changes the SA-Group SSID as “Direct-LBNewName”. 5.5. DDMS-Zone Password The default password for DDMS-Zone is hello123. The password for DDMS-Zone can be edited using the NV-item ddms_password.
LS9 User Guide 5.7. I2S M-Clock M-Clock is supported at frequency of 12MHz and 12.288MHz. M-Clock by default is set to 12MHz. NV-Item MCLK is used to edit the frequencies of the I2S M-Clock. The syntax below provides the commands to edit MCLK. To set the MCLK at 12MHz #setenv MCLK <<12000000>> To set the MCLK at 12.288MHz # setenv MCLK <<12288000>> 5.8. ACP NV-Item ACPpresent enables detection of the Apple Co-processor for ACP certificate validation. By default the NV-Item ACPpresent is set as 1.
LS9 User Guide #setenv Model <> Editing the NV-item changes the Model Name as “ModelNewName”. The NV-Item Model Name should not contain, Space or special characters except underscore “_”. 5.10. Manufacturer Name The NV-Item Manufacturer is used to set the Manufacturer name for the Speaker or the device. The Manufacturer name can be any name of the user choice. The Maximum length of the Manufacturer name is 63 characters. The default Manufacturer Name for LS-Enabled speakers is Libre.
LS9 User Guide 5.12. HOST BAUDRATE HOST_BAUDRATE NV-Item is used to define different UART BAUDRATE. UART BAUDRATE supported in LS9 is 9600, 19200, 38400, 57600 (default) and 115200 Use the below syntax to set the UART NAUDRATE. To Set UART BAUDRATE #setenv HOST_BAUDRATE <<57600>> 5.13. Serial Number NV-Item Serial_num indicates the serial number of the speaker device. Serial number can be of maximum length of 15 characters. Use the syntax below to define the serial number of the speaker device.
LS9 User Guide 5.15. Hardware Version NV-Item Hardware_version indicates the hardware used in the speaker device. Hardware version can be of maximum length of 15 characters. Use the syntax below to define the Hardware Version of the speaker device. To Define The Serial Number of The Speaker Device #setenv Hardware_version <> 5.16. Firmware Version NV-Item Firmware_version indicates the firmware used in the speaker device. Firmware version can be of maximum length of 15 characters.
LS9 User Guide 5.18. SPDIF SPDIF NV-Item allows the user to enable / disable SPDIF output. When SPDIF is disabled, output is from I2S. By default SPDIF output is disabled. To enable SPDIF output, use the syntax below in the command line. Enable SPDIF Output # setenv spdif 1 Disable SPDIF Output (Default) #setenv spdif 0 5.19.Current Volume The NV-item current_volume enables the user to set the volume levels for LS enabled speakers. The possible Values for the NV-Item Current Volume is between 0-100.
LS9 User Guide 5.21.Bluetooth BT_CONTROLLER NV-Item is used to select the type of board or disable BT functionality in LS-Modules. • Setting the value to 0 disables BT functionality • Setting the value to 1 enables BT functionality (Default) Use the below syntax to define the BT Controller Functionality. To Enable Bluetooth #setenv BT_CONTROLLER <<1>> (Default) To Disable Bluetooth #setenv BT_CONTROLLER <<0>> 5.22.
LS9 User Guide Setting DLNA_Conn_Closed NV-Item to ‘0’ will FAIL the DLNA Certification. Use the syntax below to enable / disable the time gap between play-pause trigger in DLNA. To Enable Time Gap Between Play-Pause Trigger (Default) #setenv DLNA_ConnClosed <<1>> To Disable Time Gap Between Play-Pause Trigger #setenv DLNA_ConnClosed <<0>> 5.24.Tidal User Name NV-Item TidalUserName is used to set the login credentials to access Tidal music service.
LS9 User Guide 5.26.Current Volume The NV-item current_volume enables the user to set the volume levels for LS enabled speakers. The possible Values for the NV-Item Current Volume is between 0-100. The default value is 50. The syntax below provides the commands to edit the NV-Item. #setenv current_volume <<50>> 5.27.DDMSOOHmode NV-Item DDMSOOHmode is used to set the LS-Enabled device to SA-Mode. Use the syntax below to set DDMSOOHmode to LibreSync Speaker.
LS9 User Guide To set as Cli #setenv p2p_state <> 5.29.PlayerState NV-item PlayerState is used to define if the LS-enabled speaker is in Free state, or is a Master, or is a Slave, . Use syntax below to define the Player State for the speaker. To set as Free #setenv PlayerState <<0>> To set as Master #setenv PlayerState <<1>> To set as Slave #setenv PlayerState <<2>> 5.30.Scene Name NV-Item Scene_Name is used to edit the default name of the scene created.
LS9 User Guide 6. Features 6.1. Libre APP for Android LUCI enables user to remotely, control the LibreSync LS9 enabled product using the Libre Application for android. The application can be used to browse DLNA-DMS in the network, SD Card connected to device and other online radio stations such as vTuner and TuneIn , and stream music using the DMP feature supported by LS9. For more information on using Libre APP refer LibreWireless-Usability_Guide_Dynamic_Direct_Multi-Node_Streaming 6.2.
LS9 User Guide 6.3. Source Switching LibreSync enables user to switch the playback sources without any hitches. User can choose to stream music either from Cast-For-Audio (C4A) Spotify connect and the music streams on the selected device from the source. For example, A LS Device streaming Cast-For-Audio (C4A) starts streaming music from Spotify connect when, the user selects music from Spotify APP to be played on the device. 6.4. Software Security LibreSync software is secured using Crypto IC.
LS9 User Guide Figure 6.5-1 AirPlay Stream End -- Password for Airplay Playback You can either enable or disable a password, to start Airplay playback on the LS enabled device through a webpage. Enable To enable a password for Airplay Playback proceed as below. Execute command #netcfg in the device terminal to know the device IP For Example, 10.0.1.13 Enter the IP in the address bar of your browser with port number For Example, 10.0.1.13 Libre Wireless Technologies User Guide: LS9, Ver. 3.3.
LS9 User Guide In Your Device Name section, Enter the Airplay Password in the white box below and Click Apply Device reboots automatically. Figure 6.5-2: Password for Airplay Open the Control Centre or Music App on iOS device Or Use iTunes installed on any machine Tap the AirPlay icon AirPlay enabled LibreSync device is listed Select the device and Select Play In the pop screen enter the password entered in the webpage AirPlay starts streaming. Libre Wireless Technologies User Guide: LS9, Ver. 3.3.
LS9 User Guide Figure 6.5-3: Enter Password for Streaming End-- Disable To disable a password for Airplay Playback proceed as below. Execute command #netcfg in the device terminal to know the device IP For Example, 10.0.1.13 Enter the IP in the address bar of your browser with port number For Example, 10.0.1.
LS9 User Guide Figure 6.6-1: Disable Airplay Password Device reboots automatically. End -- 6.6. Cast For Audio Once the speaker or device is configured to the network, it is discovered by Cast For Audio supported iOS / Android Application (i.e. Cast for Audio Application), and is available for Cast For Audio streaming. To stream Cast For Audio proceed as below Connect the iOS / Android device in same network as your LS-Device.
LS9 User Guide Figure 6.6-1: Cast for Audio Application Menu Cast For Audio enabled LS-Device is listed Figure 6.6-2: Device list Select the device and start Cast For Audio streaming Libre Wireless Technologies User Guide: LS9, Ver. 3.3.
LS9 User Guide Figure 6.6-3: Cast for Audio Enabled Device Selected End -- 6.7. Spotify Connect LibreSync enables you to stream music via Spotify connect. To use the Spotify connect APP proceed as below. Register for Spotify premium account and get the Username and Password for the account Download the Spotify app from the APP store/Play Store. To stream music from Spotify connect proceed as below. Reboot the LS enabled device and connect to the network.
LS9 User Guide Connect iOS device/Android phone to the same network. Open the Spotify APP Figure 6.7-1: Spotify APP Login to Spotify, using the Username and Password received, during registration. Libre Wireless Technologies User Guide: LS9, Ver. 3.3.
LS9 User Guide Figure 6.7-2: Spotify Login Screen Browse for songs in the Spotify Server In Now playing screen, select Speaker in right bottom Libre Wireless Technologies User Guide: LS9, Ver. 3.3.
LS9 User Guide Figure 6.7-3: Device Selection Select the LS enabled device Figure 6.7-4: Device List LS enabled device starts streaming music from Spotify Connect End -- 6.8. AUX-In Support Users can connect Audio Source to AUX-In jack of EVK and select the source from LibreAPP. 6.9. DLNA ® / DMR Libre Wireless Technologies User Guide: LS9, Ver. 3.3.
LS9 User Guide After the device is configured to the network, device is discoverable over UPnP®. Any Universal Plug and Play (UPnP) / Digital Living Network Alliance (DLNA) certified controller can be used to stream music to the device. To test Play To functionality proceed as below Open Media Player on Windows 7 In the play list, Click Play To and select the LS enabled speaker or device Or Right click on the song and Click Play To Music starts streaming.
LS9 User Guide Figure 6.9-2: Media Streaming Options Digital Media Renderer (DMR) functionality can be verified using any app on the Android / iOS devices as well. For example, the native audio player on Samsung Galaxy devices can be used. End-- 6.10. LUCI Over UART LibreSync enabled devices provides a set of Message-Boxes for Control and Status Indications to, remote control itself.
LS9 User Guide Switching to Wired Mode To switch to wired mode from Wi-Fi mode proceed as below Make Sure device is connected to an Wi-Fi Network Execute command #netcfg in the device terminal to know the device IP For Example, 10.0.1.13 Enter the IP in the address bar of your browser. For Example, 10.0.1.13 In Select Your Network drop-down list, select Switch to Wired mode Figure 6.11-1: Switch to Wired Mode Connect the device with an Ethernet cable Libre Wireless Technologies User Guide: LS9, Ver.
LS9 User Guide Click Save LS module reboots automatically End-- Switching to Wireless Mode To switch to wired mode from Wi-Fi mode proceed as below Execute command #netcfg in the device terminal to know the device IP For Example, 192.168.0.103 Enter the IP in the address bar of your browser with port number For Example, 192.168.0.103 In Select Your Network drop-down list, select Switch to Wi-Fi mode and Click Save Libre Wireless Technologies User Guide: LS9, Ver. 3.3.
LS9 User Guide Figure 6.11-2: Switch to Wi-Fi Mode LS module reboots automatically. End-- 6.12.TCP / IP Tunneling TCP/IP Tunnelling is a unique feature supported by LS modules. Tunneling enables a Host MCU to communicate with other network devices over UART. The Host MCU can build their own proprietary protocol using LUCI tunneling. For more information on TCP / IP tunneling refer LUCI document LibreWirelessTechNote - LS_Light_Weight_Universal_Control_Interface 6.13.
LS9 User Guide 6.14.Device Name Configuration You can define a friendly name to LS-Enabled device. To define the friendly name proceed as below. Execute command #netcfg in the device terminal to know the device IP For Example, 10.0.1.13 Enter the IP in the address bar of your browser with port number For Example, 10.0.1.13 In Your Device Name section, Enter the Device Name in the white box and Click Apply Device reboots automatically. Libre Wireless Technologies User Guide: LS9, Ver. 3.3.
LS9 User Guide Figure 6.14-1: Device Name Section The device name length can be up-to maximum of 50 • characters. • After the Firmware upgrade, if the device friendly name is not set, the device name is listed as below - iTunes server and DMR Speakers lists the device as LibreSync_xxxxxx End-- 6.15.
LS9 User Guide Figure 6.15-1: Switch to Wired Mode Connect the device with an Ethernet cable Click Save LS module reboots automatically End-- Switching to Wireless Mode To switch to wired mode from Wi-Fi mode proceed as below Execute command #netcfg in the device terminal to know the device IP For Example, 192.168.0.103 Enter the IP in the address bar of your browser with port number For Example, 192.168.0.
LS9 User Guide Figure 6.16-1: Switch to Wi-Fi Mode LS module reboots automatically. End-- 6.16.Music Services vTuner vTuner is an internet radio device that receives and plays streamed media, either from Internet radio or Home network. vTuner on Libre platform can be used to stream music using the Libre APP. To stream music from vTuner proceed as below. In the Now Playing screen of Libre APP, Tap Sources Tap vTuner from the source List Browse through the list and select the song of your choice.
LS9 User Guide Figure 6.16.1-1: vTuner Browse Screen LS enabled speaker starts streaming the song from vTuner. Libre Wireless Technologies User Guide: LS9, Ver. 3.3.
LS9 User Guide Figure 6.16.1-2: Now Playing Screen for vTuner End -- TuneIn TuneIn is an internet radio station that enables streaming of music. TuneIn on Libre platform can be used to stream music using the Libre APP. To stream music from TuneIn proceed as below. Step 1. In the Now Playing screen of Libre APP, Tap Sources Tap TuneIn from the source List Libre Wireless Technologies User Guide: LS9, Ver. 3.3.
LS9 User Guide Browse through the list and select the song of your choice. Figure 6.16.2-1: TuneIn Browse Screen LS enabled speaker starts streaming the song from TuneIn. Libre Wireless Technologies User Guide: LS9, Ver. 3.3.
LS9 User Guide Figure 6.16.2-2: Now Playing Screen for TuneIn End -- QQ Music LibreSync enable you to stream music via QQ music service. To use the QQ music service Step 1. Register for QQ Music account and get the Username and Password for the account Download the QQ Music app from the Play Store. To stream music from QQ Music proceed as below. Reboot the LS enabled device and connect to the network. Libre Wireless Technologies User Guide: LS9, Ver. 3.3.
LS9 User Guide Connect Smartphone to the same network. Open the QQ Music APP Figure 6.16.3-1: QQ Music APP Login to QQ Music, using the Username and Password received, during registration. Libre Wireless Technologies User Guide: LS9, Ver. 3.3.
LS9 User Guide Figure 6.16.3-2: Login Screen Browse for songs in the QQ Music Server In Now playing screen, select ‘Q’ symbol Libre Wireless Technologies User Guide: LS9, Ver. 3.3.
LS9 User Guide Figure 6.16.3-3: Device Selection Option Select the LS enabled device Libre Wireless Technologies User Guide: LS9, Ver. 3.3.
LS9 User Guide Figure 6.16.3-4: Device List Playback from QQ music on the LS enabled device starts. End - - Spotify LibreSync enables you to stream music via Spotify connect. Spotify on LS-Enabled speakers supports to Save / Play/ Delete presets, for more information on Spotify Preset Actions refer to Message-Box # 75 in LUCI Document (LibreWirelessTechNote-LS_Light_Weight_Universal_Control_Interface) available in LibreSync Document Portal. To use the Spotify connect APP proceed as below. Step 1.
LS9 User Guide • The device name is listed as, LibreSync_xxxxxx • In Spotify free account, LS Device will not be listed in the Spotify speaker list. To stream music from Spotify connect proceed as below. Reboot the LS enabled device and connect to the network. Connect iOS device/Android phone to the same network. Open the Spotify APP Figure 6.16.4-1: Spotify APP Login to Spotify, using the Username and Password received, during registration. Libre Wireless Technologies User Guide: LS9, Ver. 3.3.
LS9 User Guide Figure 6.16.4-2: Spotify Login Screen Browse for songs in the Spotify Server In Now playing screen, select Speaker symbol in right bottom Figure 6.16.4-3: Device Selection Libre Wireless Technologies User Guide: LS9, Ver. 3.3.
LS9 User Guide Select the LS enabled device Figure 6.16.4-4: Device List LS enabled device starts streaming music from Spotify Connect End -- Deezer Deezer on Libre platform can be used to stream music using the Libre APP. To stream music from Deezer proceed as below. Step 1. In the Now Playing screen of Libre APP, Tap Sources Tap Deezer from the source List Enter the User Name and Password to login to the music service. Libre Wireless Technologies User Guide: LS9, Ver. 3.3.
LS9 User Guide Browse through the list and select the song of your choice. Figure 6.16.5-1: Deezer Browse Screen LS enabled speaker starts streaming the song from Deezer. Libre Wireless Technologies User Guide: LS9, Ver. 3.3.
LS9 User Guide Figure 6.16.6-2: Now Playing Screen for Deezer End -- Tidal Tidal, also known as TIDALHiFi is a subscription-based music streaming service that offers lossless audio and high definition music. The service has over 30 million tracks and 75,000 music videos. Tidal on Libre platform is used to stream music using the Libre APP. To stream music from Tidal proceed as below. Step 1.
LS9 User Guide Browse through the list and select the song of your choice. Figure 6.16.6-1: Tidal Browse Screen LS enabled speaker starts streaming the song from Tidal. Libre Wireless Technologies User Guide: LS9, Ver. 3.3.
LS9 User Guide Figure 6.16.6-2: Now Playing Screen for Tidal End -- Libre Wireless Technologies User Guide: LS9, Ver. 3.3.
LS9 User Guide 7. Appendix 7.1. ACP Setup It is recommended to Use “ACP 2.0C”. To insert ACP on LS9 EVK proceed as below. To use the ACP board in LS6 EVK, remove the ACP board from the ACP slot as shown below. Insert the ACP board onto the ACP slot in the LS9 EVK as shown below. Libre Wireless Technologies User Guide: LS9, Ver. 3.3.
LS9 User Guide End-- 7.2. Rework on LS6 EVK to evaluate LS9 Module. If you are using LS6 EVK for LS9 module evolution then Remove electrolytic capacitor C15, C22, USB connector and Remount and soldier electrolytic capacitor on the back side of the LS6 EVK. Connect 5v from LS6 EVK to LS9 module USB_VBUS J1-pin 17 7.3. Install USB Composite Drive To Install USB Composite Drive proceed as below Download Marvell Windows USB Driver available in Libre Portal https://librewireless.sharefile.
LS9 User Guide Open Device Manager. After boot up, if there is only one “Android ADB Interface” device as shown in the above screenshot, then follow, section 2.1.1 to install USB Composite Drive. Otherwise skip section 2.1.1 and go to section 2.1.2 directly. Right click “Android ADB Interface”, and select “Update Driver Software”. Libre Wireless Technologies User Guide: LS9, Ver. 3.3.
LS9 User Guide Select “Browse my computer for driver software”. Select “let me pick from a list device drivers on my computer” Libre Wireless Technologies User Guide: LS9, Ver. 3.3.
LS9 User Guide Select “USB Composite Device”, then click “Next”. After installation, two unknown devices will be seen as shown in the below screenshot. Libre Wireless Technologies User Guide: LS9, Ver. 3.3.
LS9 User Guide End-- 7.4. Install Android Composite ADB Driver To install Android Composite ADB Driver (ADBD) proceed as below. Download ADB Composite Driver from http://developer.android.com/sdk/win-usb.html Power on LS EVK ADBD starts on LS-EVK Boot-Up. Two unknown devices will show up in Device Manager as seen in the below screenshot. Right click the 2nd device, and select “Update Driver Software.” Libre Wireless Technologies User Guide: LS9, Ver. 3.3.
LS9 User Guide Select “Browse my computer for driver software” Libre Wireless Technologies User Guide: LS9, Ver. 3.3.
LS9 User Guide Select “let me pick from a list device drivers on my computer” Libre Wireless Technologies User Guide: LS9, Ver. 3.3.
LS9 User Guide Select “Show all Device”, then click “Next” Select “Have Disk…” Libre Wireless Technologies User Guide: LS9, Ver. 3.3.
LS9 User Guide Go to Google USB driver file location and then select “OK” Select “Android Composite ADB Interface”, then click “Next”. Click “Yes” on Update Driver Warning message then Libre Wireless Technologies User Guide: LS9, Ver. 3.3.
LS9 User Guide Click “Install” on Windows Security message After installation is complete, “Android Composite ADB Interface” device is displayed as shown in the screenshot. End -- Libre Wireless Technologies User Guide: LS9, Ver. 3.3.
LS9 User Guide 7.5. Sharing Folder Windows 1 Right-Click on the folder where the firmware image (83_IMAGE) is placed and Click Properties. 2 Go to Sharing menu and Click Share. 3 From the drop-down select Everyone and Click Add. 4 Click Share. 1 Right-Click on the folder where the Firmware Image (83_IMAGE) is placed Ubuntu and Click Local Network Share. 2 Select all the sharing options and Click Share. 3 Add all the permission for the Alert. 4 Click Apply.
LS9 User Guide FCC Statement This equipment has been tested and found to comply with the limits for a Class B digital device, pursuant to part 15 of the FCC rules. These limits are designed to provide reasonable protection against harmful interference in a residential installation. This equipment generates, uses and can radiate radio frequency energy and, if not installed and used in accordance with the instructions, may cause harmful interference to radio communications.
LS9 User Guide Caution! Any changes or modifications not expressly approved by the party responsible for compliance could void the user's authority to operate the equipment. IMPORTANT NOTE: In the event that these conditions can not be met (for example certain laptop configurations or co-location with another transmitter), then the FCC authorization is no longer considered valid and the FCC ID can not be used on the final product.