
Operation Manual


Below the toolbar, specify for the selected hotspot:
• Address: the address pointed to by the hyperlink. You can also point to an anchor in a
document; to do this, write the address in this format:
file:///<path>/document_name#anchor_name
• Text: type the text that you want to be displayed when the mouse pointer is moved over the
hotspot.
• Frame: where the target of the hyperlink will open: pick among _blank (opens in a new
browser window), _self (opens in the active browser window), _top or _parent.
Tip
The value _self for the target frame will usually work just fine. It is therefore not
recommended to use the other choices unless absolutely necessary.
Using LibreOffice’s drawing tools
You can use LibreOffice’s drawing tools to create graphics such as simple diagrams using
rectangles, circles, lines, text, and other predefined shapes. You can also group several drawing
objects to make sure they maintain their relative position and proportion.
You can place the drawing objects directly on a page in your document, or you can insert them into
a frame.
You can also use the drawing tools to annotate photographs, screen captures, or other illustrations
produced by other programs, but this is not recommended because:
• You cannot include images in a group with drawing objects, so they may get out of
alignment in your document.
• If you convert a document to another format, such as HTML, the drawing objects and the
graphics will not remain associated; they are saved separately.
In general, if you need to create complex drawings, it is recommended to use LibreOffice Draw,
which includes many more features such as layers, styles, and so on.
Creating drawing objects
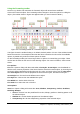
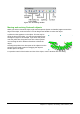
To begin using the drawing tools, display the Drawing toolbar (Figure 307) by clicking View >
Toolbars > Drawing.
If you are planning to use the drawing tools repeatedly, you can tear off this toolbar and move it to
a convenient place on the window.
1 Select 6 Text 11 Symbol Shapes 16 Points
2 Line 7 Curve 12 Block arrows 17 Glue Points
3 Line Ends with Arrow 8 Connector 13 Flowcharts 18 Fontwork Gallery
4 Rectangle 9 Lines and Arrows 14 Callouts 19 From File
5 Ellipse 10 Basic Shapes 15 Stars 20 Gallery
21 Extrusion On/Off
Figure 307. The Drawing toolbar
312 | Getting Started with LibreOffice 4.0