
Operation Manual


Introduction
In Calc, Draw, and Impress, formulas are inserted as OLE objects without any background (area
fill) or borders. See Chapter 1 Creating & Editing Formulas for more information on inserting
formulas into a LibreOffice module.
Each formula object is inserted into a spreadsheet, drawing, or slide as follows:
• In Calc, formulas are inserted into a selected cell in a spreadsheet with no style assigned to
the formula object.
• In Draw and Impress, formulas are inserted into a central position on your drawing or slide
and, by default, are assigned the drawing object style Object with no fill and no line. For
more information on how to modify or assign drawing object styles, see the Draw User
Guide or the Impress User Guide.
Anchoring formulas
Calc
A formula object can be anchored into your spreadsheet as To Page (default setting), or as To Cell.
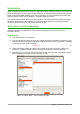
To change the anchoring type of formulas in a Calc spreadsheet:
1) Select the formula object in your spreadsheet.
2) Right-click on the formula and select Anchor > To Page or To Cell from the context menu
3) Alternatively, go to Format > Anchor on the main menu bar and select To Page or To Cell.
Draw and Impress
When a formula is inserted into a drawing or slide, it is inserted as a floating OLE object and is not
anchored to any particular position in a drawing or slide.
Formula object properties
Formula objects in Calc, Draw, and Impress can be modified just like any other object that has
been placed in your spreadsheet, drawing, or presentation, with the exception of formula object
size and changing the format of any text within a formula. For more information on how to change
object properties, see the Calc User Guide, Draw User Guide and Impress User Guide. For more
information on formula object size and formatting formula text, see Chapter 1 Creating & Editing
Formulas in this guide.
The following points will help you select which dialog to use if you want to change the properties of
formula objects.
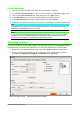
• For formula backgrounds, use the various options in the pages of the Area dialog.
• For formula borders, use the various options in the Line dialog. Note that formula borders
are separate from cell borders in a Calc spreadsheet.
• To accurately re-position a formula object, use the various options in pages of the Position
and Size dialog.
• In Draw and Impress, you can arrange, align, group, flip, convert, break, combine, and edit
points of formula objects.
• You cannot change the text attributes of a formula object. The text used in a formula is set
when you create the formula in the Formula Editor.
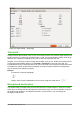
• Formula object size is set by the formula font size when the formula is created in the
Formula Editor. The formula object size is protected in the Position and Size dialog, but this
Chapter 3 Formulas in Calc, Draw & Impress | 49