
Home Security System User Manual

Installation
9
2.2 Surface-Mounting the AC4
After determining where to place the unit, check to ensure that you have all the hardware required to
install the panel on the surface of a wall. Obtain the needed tools and material.
Required tools
• Electric drill (if surface is too hard to drive screws without pilot holes)
• Screwdriver
• Marker to denote layout of holes
• Four screws, each #10
2.2.1 Mounting the Panel
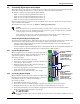
1. Mark the wall for mounting holes, using the back of the unit as a template (see Figure 5).
2. Drill holes, if required, to install the four #10 screws that will secure the AC4 to the wall. Clean
up the debris.
3. If the wall material is not strong enough to hold the screws securely, use wall anchors.
4. Install the top two screws—the screw heads must be small enough to slip through the larger,
bottom portion of the pear-shaped mounting slot in the AC4 (see inset in Figure 5). The screws
must also be large enough to extend over the edges of the top of the mounting slot.
5. Hang the AC4 on the screws, letting the panel slip down until the screws are in the smaller, upper
portion of the slot.
6. Tighten the screws until they are snug.
7. Insert the remaining two screws in the bottom holes on the back of the panel and tighten.
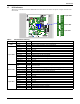
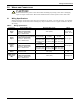
Figure 5 Mounting dimensions
NOTE
Removing the conduit knockouts before mounting the AC4 on the wall will ease installation
and prevent strain on the mounting hardware and wall. It is imperative to remove the
knockouts if the unit is to be flush-mounted.
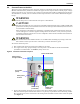
!
CAUTION
Check building plans and other relevant documents to determine whether mounting the AC4
at the selected location might cause cutting or otherwise damaging electrical or
communication wiring or pipes.
0.213"
(5.4mm)
Mounting Slot
0.375"
(9.6mm)
AC4
back plate
12.5"
(317.5mm)
0.213" (5.4mm)
Bottom hole diameter
10"
(254mm)