
Owners manual


Installation
Emerson
®
MPH2
™
10
2.1 Attaching Input Power Cords—Hard-Wired Models Only
MPH2’s with integral power cords need no assembly before installation. Units with hard-wired input
power require attachment of input power cords. See Table 1 for wire sizing.
Hard-wired models may be wired with or without conduit.
2.1.1 Attaching Input Power Cords Without Conduit
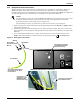
1. Remove the end cap. It is held in place with two T10 Torx screws.
2. Slide the terminal block cover off.
3. Loosen the strain-relief collar. It is held in place with two Phillips head PH1 screws.
4. Strip the insulation from the individual wires as required to fit into the terminal block.
Recommended stripping length for MPH2 units rated less than 32A is 9mm; for MPH2’s rated or
higher, 11mm.
5. Slip the power cord through the hole in the end cap and through the strain-relief collar.
6. Loosen the terminal block screws.
7. Insert the wires into the terminal block according to the labeling inside the MPH2; tighten each
terminal block screw after inserting a wire. Refer to Table 2 for tightening torque.
8. Tighten the strain-relief collar around the input power cord. The cord’s outer insulation covering
should extend through the bracket.
9. Replace the terminal block cover by either sliding it on or snapping it into place.
10. Reattach the end cap to the MPH2 with the two screws removed in Step 1.
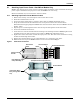
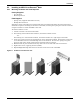
Figure 7 Hard-wired connections
L2
L1
PE
L3
Terminal Blocks
Labels
Strain-Relief
Collar
Terminal Blocks
Input Power Wiring
Entry Through End
Cap
Hard-Wired Connections
(Faceplate and End Cap Removed)
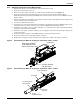
Faceplate
Terminal Block Screws
Phillips Head
Screws
Nuts Attaching Cable
Clamp Assembly: 4