
Owners manual

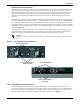


Installation
11 Emerson
®
MPH2
™
2.1.2 Attaching Input Power Cords With Conduit
1. Remove the end cap. It is held in place with two T10 Torx screws.
2. Slide the terminal block cover off.
3. Remove the cable clamp assembly. It is held in place with four nuts (see Figure 7).
4. Strip the insulation from the individual wires as required to fit into the terminal block.
Recommended stripping length for MPH2 units rated less than 32A is 9mm; for MPH2’s rated or
higher, 11mm.
5. Slip the stripped wires through the seal-tight conduit connector, through the metal end plate and
into the terminal block connection box.
6. Loosen the terminal block screws.
7. Insert the wires into the terminal block according to the labeling inside the MPH2; tighten each
terminal block screw after inserting a wire. Refer to Table 2 for tightening torque.
8. Install the cover plate spacer, by either sliding it on or snapping it into place and sliding it firmly
against the main body of the MPH2.
9. Install the cover plate, by either sliding it on or snapping it into place and pressing it against the
cover plate spacer.
10. Attach the metal end plate to the MPH2 with four screws provided in the kit.
11. Slide the conduit into the seal-tight conduit connector.
12. Tighten the seal-tight conduit connector until it grips the conduit and crimps it securely.
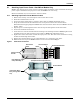
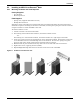
Figure 8 Disassembling the MPH2 for installing an input power cable in conduit
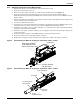
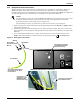
Figure 9 Disassembling the MPH2 for installing an input power cable in conduit
Cover Plate
End Cap; attaches
with two screws
Cable Clamp Assembly
(Individual parts shown;
may be removed as a unit)
Cover Plate Spacer
Cover Plate
Conduit
(Cable Not Shown)
End Cover
(4 screws)
Conduit Connector
(field-supplied)