
Quick Start Guide

MPH2
™
Rack-Mount PDU
Quick-Start Guide
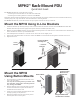
In-Line
Bracket
... insert the
fasteners.
Position the MPH2
assembly and ...
Springnuts in
Rack Frame
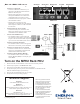
Mount the MPH2
Using Button Mounts
1. Attach the factory-supplied button mounts to the
rear of the rack PDU.
Use only the mounting button provided with
the rack PDU. Using other mounting buttons
may damage the MPH2.
2. Find the keyhole slots in the rack frame or install
the rack manufacturer’s keyhole slot brackets in
the desired location in the rack.
3. Insert each of the attached mounting buttons into
the large opening of a keyhole slot.
4. Slide the assembly down into the narrow portion
of the keyhole slot to lock in place.
Insert the Button
Mount into the
Keyhole Slot
Back of MPH2
Button
Mount
Weight of MPH2 Seats
the Rack PDU in the Slot
The MPH2 rack PDU may be mounted in a rack by:
• Attaching two in-line brackets to the ends of the rack PDU
• Attaching two mounting buttons to the back of the MPH2
Determine which mounting method best suits your rack and install the necessary hardware in the rack. The hardware may
include spring nuts, cage nuts and the rack manufacturer’s mounting bracket.
The MPH2 rack PDU may be mounted so that its input power cord exits at the top or bottom.
Mount the MPH2 Using In-Line Brackets
1. Install the brackets by inserting the legs of the in-line brackets into the slots on each end of the MPH2 rack PDU. The
brackets will lock in place when upright and square with the rack PDU (see below, left).
2. Hold the top of the MPH2 assembly over the desired mounting holes in the rack frame or rack manufacturer’s bracket and
insert the fasteners into the top rack PDU bracket.
3. Use a Phillips head screwdriver to turn the screws. Leave the screws slightly loose.
4. Position the rack PDU bracket on the lower end of the MPH2 over the desired mounting holes and insert the screws.
5. Tighten all screws.