Use and Care Manual For “NoFrost” Combined Refrigerator-Freezers with IceMaker HCB 2082 7084 843-00
C ongratulations on your purchase. Choosing this appliance means you want all the benefits of state-of-the-art refrigeration technology, guaranteeing you top quality, a long appliance life span and excellent reliability. The features on your appliance have been designed to ensure maximum convenience day in, day out. This appliance has been manufactured with recyclable materials using an environmentally friendly process, so together we’re making an active contribution to the preservation of our environment.
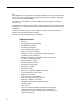
Table Contents Page Disposal of Old Appliance.............................................. 4 Disposal of this appliance.............................................. 4 Disposal of Carton.......................................................... 4 R600a Refrigerant.......................................................... 4 Setting up........................................................................ 4 Important Safety Information.......................................... 5 Electrical Safety.........
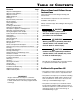
Safety Disposal of Old Appliance R600a Refrigerant WARNING! DANGER! Risk of child entrapment. Child entrapment and suffocation are not problems of the past. Junked or abandoned refrigerators are still dangerous – even if they will sit for “just a few days.” If you are getting rid of your old refrigerator, please follow these instructions to help prevent accidents. Before you discard old appliances: • Take off the doors. • Leave the shelves in place so that children may not easily climb inside.
Safety Important Safety Information • To prevent injury to you or damage to the unit, the appliance should be unpacked and set up by two people. • If the appliance is damaged on delivery, contact the supplier immediately before connecting to the power source. • To guarantee safe operation, ensure that the appliance is set up and connected as described in these operating instructions. • Do not operate the refrigerator in the presence of explosive fumes.
Safety Electrical Safety Safety Regulations Connect this appliance to a 15 amp or 20 amp, 110120 VAC, circuit which is grounded and protected by a circuit breaker or fuse. The appliance is designed to cool, freeze and store food and to make ice. It is designed as a household appliance. We recommend using a dedicated circuit for this appliance to prevent circuit overload and the chance of interruption to the appliance. The appliance is not intended for outdoor use.
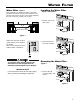
Water Filter Water Filter - Figure 1 Before turning on the appliance install the water filter provided in the interior rear wall of the refrigerator compartment. This ensures good ice cube quality and keeps the water circuit free of solids such as sand. Installing the Water Filter - Figure 2 and Figure 3 1. Remove cover of the filter socket. Water filter location Figure 2 Figure 1 Replace the filter when the drop symbol appears on the temperature display.
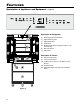
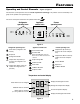
Features Description of Appliance and Equipment - Figure 5 Description of Refrigerator (1) Operating and Control Elements (2) Adjustable Door Racks (3) Adjustable Shelves (4) Gallon Rack (5) Model Plate (behind the BioFresh drawer on the left hand side) (6) BioFresh Drawers (7) Water Filter Description of Freezer (8) Upper Freezer Drawer (9) Lower Freezer Drawer (10) Ice Maker (in the interior of the Upper Freezer Drawer) (11) Ventilation Grille (12) Adjustable-Height Unit (behind the Ventilatio
Features Operating and Control Elements - Figure 6, Figure 7 The electronic control panel has the new “Touch capacitance technology”. Any function can be activated by a fingertip on the symbol of the operating icons.
Operation Turning the Appliance On and Off - Figure 8 Setting the Temperature Clean the appliance before turning it on for the first time. See Cleaning. Do not place frozen food in the freezer until the temperature shows at least 0°F / -18°C. The refrigerator and freezer compartments can be operated separately. 1. Turning on: Touch the Refrigerator On/Off icon - Figure 8 The appliance is pre-set for normal operation.
Operation Temperature Display - Figure 8 Audible Alarm Signal - Figure 8 In normal operation, the following settings will be displayed: • the average refrigerator temperature • the warmest frozen food temperature. The audible alarm signal helps to protect frozen food and to save energy. When starting up for the first time or when the appliance is warm, dashes will appear in the freezer temperature display, until the temperature in the freezer compartment is 32°F (0°C).
Operation Setup Mode = Sabbath mode In the setup mode you can activate the following functions: = Sabbath mode = Child lock The door can be opened and closed at any time. = Drop symbol reset = Ice maker function test (for service personnel only) = Water quantity for Ice cube tray = BioFresh temperature adjustment = Temperature display mode = Display brightness = Door gasket heating control = Reset Air filter LED • The lighting remains off.
Operation = Child lock = Drop symbol reset The child lock is designed to protect the appliance from being turned off accidentally. How to activate the child lock • Activate the setup mode by touching the Superfrost icon for 5 seconds After the Water filter has been changed the drop symbol on the display must be reset. How to reset the drop symbol • Activate the setup mode by touching the Superfrost icon for 5 seconds.
Operation Setup Mode - Figure 10 = Water quantity for ice cube tray If the produced ice cubes of the Ice Maker are too small, the inflowing water quantity can be adjusted. How to adjust the water quantity • Activate the setup mode by touching the Superfrost icon for 5 seconds. • Touch the freezer compartment Down icon until appears in the freezer temperature display. • Touch the Superfrost icon - the display shows • Touch freezer compartment Up icon once only so E 4 appears in the display.
Operation = Display brightness How to adjust the display brightness • Activate the setup mode by touching the Superfrost icon for 5 seconds. • Touch the freezer compartment Down icon until appears in the freezer temperature display. • Touch the Superfrost icon - the display shows • Touch freezer compartment Up/Down icons to select 0 = minimum to 5 = maximum brightness • Touch the Superfrost icon at the desired value. • Exit setup mode by touching the freezer compartment On/Off icon.
Refrigerator Compartment Arranging Food - Figure 11 Shelf Arrangement To avoid possible injury, only adjust an empty shelf or door rack. Do not attempt to adjust a shelf or door rack with food on it. You can rearrange the height of the shelves and door racks as required. Repositioning the door racks - Figure 12 Slide the door rack up, pull out toward you and replace in reverse order. Figure 12 To remove the BioFresh drawer Pull the drawer straight out, grip at the back and lift out - Figure 13.
Refrigerator Compartment Repositioning the shelves - Figure 14 Bottle tray 1. Hold the shelf underneath with your hand to avoid from tipping down backwards when removing. 2. Lift the shelf at the front. 3. Remove the shelf forward until the circular cutout of the shelf is in line with the interior light cover. 4. Lift the shelf up or down and replace in the desired position. The tray above the BioFresh compartment can be used for storing bottles horizontally.
BioFresh Compartment Interior Light BioFresh Compartment - Figure 19 The interior light is located at the left, right and top in the refrigerator compartment (Figure 18) and above each drawer in the freezer comartment. It turns on if one of the doors or one freezer drawer is opened. The BioFresh compartment maintains food freshness up to 3 times longer than in standard refrigerators. The light turns off automatically if one of the doors or one freezer drawer has been opened for approximately 15 minutes.
BioFresh Compartment Notes Humid setting • The humidity in the compartment depends on the moisture content of the food, and the frequency a drawer is opened. Vegetables, salad • The fresher the product and the higher its quality, the longer the storage life. • Unwrapped food should be stored separately. Wrap food if there is not enough space in the drawers. To avoid bacterial spoilage, different types of meat should not contact each other. Keep meat packed separately.
Freezer Compartment Freezer Compartment Description Removing the Freezer Compartment Containers The ice maker is located in the upper drawer on the left side. The containers of both freezer drawers can be removed. The ice cubes fall out of the ice maker into the drawer. The upper drawer is divided by a partition wall for storing ice cubes in the left part of the drawer (Figure 20). • Unlatch the container on the left and right corners by pulling upwards (1) - Figure 21.
Freezer Compartment Freezing Freezing and Storage Fresh food should be frozen completely and as rapidly as possible. This is provided by the Superfrost feature and ensures that the nutritional value, appearance and flavor of the food remains intact. • Pack frozen food in standard freezer bags or reusable plastic, metal or aluminum containers. Freezing with Superfrost - Figure 23 • Touch the Superfrost icon briefly so the LED turns on. • Wait 24 hours. • Then place the fresh food inside the freezer.
IceMaker Safety Instructions and Warnings for the Automatic Ice Maker • The ice maker is designed exclusively to make ice cubes in quantities needed by a household. • All repairs and work on the ice maker may only be done by customer service personnel or other appropriately trained personnel. Ice Maker Description After you start the ice maker for the first time, it may take up to 24 hours before the first ice cubes are ready.
Defrosting/Cleaning Defrosting Refrigerator compartment The refrigerator compartment defrosts automatically. The water that forms on the rear wall drains into a reservoir at the back of the appliance and evaporates automatically through the compressor heat. Freezer compartment The NoFrost system automatically defrosts the freezer compartment. Any moisture will collect on the evaporator and freeze. It will periodically defrost and evaporate. IMPORTANT Do not clean the equipment parts in a dishwasher.
Cleaning Cleaning the Air Filter • Open the bottom freezer drawer and remove the ventilation grille by pulling forwards - Figure 25. • Clean the filter in a dishwasher or by hand with lukewarm water and dishwasher detergent. • Install the air filter in the reverse order. • Install the ventilation grille. • Install all equipment parts and replace the food in the appliance. • Turn the appliance on. • Reset the air filter LED.
Vacation Vacation Tips (Figure 27) Short vacations Turning on the ice maker after vacation It is not necessary to turn off the refrigerator and freezer if you will be away for less than four weeks. • Open the water suppy to the ice maker. • Shut off the water supply to the ice maker. > When the IceMaker LED starts blinking, the remaining water in the supply line is in the ice maker. • Leave the ice maker on and working for one day so that the remaining ice cubes are ejected.
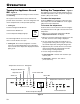
Troubleshooting Troubleshooting Your appliance is designed and manufactured for a long life and reliable operation. If a problem occurs during operation, check whether it is due to an operating error. Please note that even during the warranty period, some repair costs may be your responsibility.
Troubleshooting Ice Maker Troubleshooting You may be able to correct the following faults yourself: Problem Possible Cause and Remedy Ice maker cannot be turned on - Is the appliance connected to the electrical outlet? Ice maker is not making any ice - Is the ice maker turned on? Is the water supply line open? Are both freezer drawers closed properly? Customer Service Appliance Information If none of the above possible causes apply, and you can not rectify the fault yourself, contact your nearest c
Warranty LIEBHERR WARRANTY PLAN FULL TWO YEAR WARRANTY For two years from the date of original purchase, your Liebherr warranty covers all parts and labor to repair or replace any part of the product which proves to be defective in materials or workmanship. FULL FIVE YEAR WARRANTY For five years from the date of original purchase, your Liebherr warranty covers all parts and labor to repair or replace any components that prove to be defective in materials or workmanship in the sealed system.
For Service in the U.S. Liebherr Service Center Toll Free: 1-866-LIEBHER or 1-866-543-2437 Email: Service-appliances.us@liebherr.com PlusOne Solutions, Inc. 3501 Quadrangle Blvd, Suite 120 Orlando, FL 32817 For Service in Canada Liebherr Service Center Toll Free: 1-888-LIEBHER or 1-888-543-2437 www.euro-parts.ca EURO-PARTS CANADA 39822 Belgrave Road Belgrave, Ontario, N0G 1E0 Phone: (519) 357-3320 Fax: (519) 357-1326 *708484300* w w w. l i e b h e r r - a p p l i a n c e s .