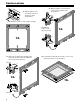
Installation Instructions Overlay kit 7084 273-00
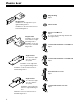
Parts List Hinge bushing 2 pcs. Hinge bracket Installation on the right at the top for right-hand hinged door. Installation on the left at the bottom for left-hand hinged door. Hinge bracket Installation on the right at the bottom for righthand hinged door. Installation on the left at the top for left-hand hinged door. Angle bracket To connect the appliance door and the door panel. Plastic washer Special screw M4 x 16 2 pcs.
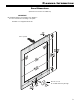
Planning Information Panel Dimensions (Dimensions in brackets are millimeter) IMPORTANT The standard stainless steel handle of the appliance door is not intended for mounting to the panel. A handle is not supplied with the kit. Face of panel Recess for lock. Do not drill all the way through.
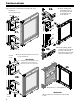
Installation NOTE The following description depicts appliance WU 3400. The same procedure applies to WU 4500 and RU 510 appliances. The description shows the installation process for a right hinged door. For installation on a left hinged door the support brackets must be mounted on the opposite side accordingly. See chapter “Parts list” for explanation of the respective mounting position of the brackets. 3. 3. Pull out hinge pin. 4. 1. Remove screw. 4. Remove upper hinge pin. 1. 5.
Installation 6. Remove and save covers. 9. Unscrew door handle. 9. 6. NOTE Handle is not designed to fit on the cabinet panel. 10. 7. 10. Unscrew door latch. 7. Unscrew upper hinge bracket and save the screws. The bracket is not needed anymore. NOTE Keep the screws to fasten the hinge brackets from the kit. 11. Compress the covers in the places shown and release. 8. Unscrew the lower hinge bracket and save the screws. The bracket is not needed anymore. 11. 8.
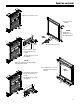
Installation 12. Drill through the outer steel sheet of the door through the holes shown below. 14. Drill through the outer steel sheet of the door through the holes shown below. Drill diameter 11/64” or 3/16” (approx. 4.5 mm) Drill diameter 11/64” or 3/16” (approx. 4.5 mm) 14. 12. 13. Clip on the top and bottom angle bracket and screw into place with screw M6 x 20. Use a 4 mm metric allen key. 15. Lay down the panel with the front face on the countertop. Place the door onto the panel. M6 x 20 13.
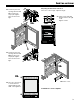
Installation 19. Click the covers into place again. 19. 16. 16. Align the side edge of the panel to the edge of the angle brackets. 17. Screw the panel and the door together using the predrilled holes with 6 screws 4 x 29. 20. Clip on the top and bottom angle bracket and screw into place with screw M6 x 20. Use a 4 mm metric allen key. M6 x 20 17. 20. 18. M6 x 20 18. Unscrew both angle brackets.
Installation 21. Screw in the countersunk screws M4 x 16 at top and bottom. Use a Torx™ 20 key. 23. M4 x 16 23. Attach bushing and top hinge bracket on the top hinge pin and secure with special screw M4 x 16. 21. 24. M4 x 16 Screws 4 x 17 22. Fasten the panel with screws 4 x 17 at top and bottom. 24. Attach bushing, plastic washer and bottom hinge bracket on the bottom hinge pin and secure with special screw M4 x 16.
Installation Adjusting the lateral tilt of the door If the door is at an angle, adjust the angle. 26. Screw into place the top hinge bracket with two screws (from step 7) through the holes shown on the right. 29. Undo screws and slide hinge bracket to the right or left. Tighten screws. 26. 27. Screw into place the top hinge bracket with three screws (from step 8) through the holes shown on the right. 29. 27. 30. 28. 28.
For Service in the U.S. Liebherr Service Center Toll Free: 1-866-LIEBHER or 1-866-543-2437 Email: Service-appliances.us@liebherr.com PlusOne Solutions, Inc. 3501 Quadrangle Blvd, Suite 120 Orlando, FL 32817 For Service in Canada Liebherr Service Center Toll Free: 1-888-LIEBHER or 1-888-543-2437 www.euro-parts.