
Installation Instructions


GB
8
Connection to the water supply
The water pressure must be between 0.15 and 0.6 MPa (1.5 -
6 bar).
Important:
If the water lter is inserted in the appliance, the water
pressure must lie between 0.3 and 0.6 MPa (3 - 6 bar). If
the water pressure with the inserted water lter is too low,
this may cause the ice maker to malfunction.
The water supply to the appliance must be through a cold water
pipe that can withstand the operating pressure and complies with
the hygiene regulations. For this, use the stainless steel hose sup-
plied (length 3 m).
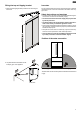
Anti-tipping bracket
Compressor mounting
plate
Wall
Appliance
3. Push the appliance to the wall until the compressor mounting
plate touches the anti-tipping bracket.
Caution!
To prevent the appliance from tipping forwards, the compressor
mounting plate must be touching the anti-tipping bracket!
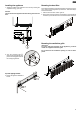
1. Insert the bent section of the hose through
the opening at the rear of the appliance.
2. Connect the hose to the solenoid valve
at the front side of the appliance.
4. Connect the hose to the shut-off tap.
Open the shut-off tap and check the system for leakage.
Caution!
Do not connect the appliance to the power supply until the
installation is completed.
Important!
After the IceMaker has been switched on, the water supply system
must be bled. See the section Bleeding the ice maker in the
operating instructions.