Use and Care Manual For NoFrost Combined Refrigerator-Freezers with IceMaker CBS 1360 7085 551-02
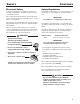
Table of Contents Contents Page Please Read and Follow these Instructions.................. 2 California Proposition 65................................................ 2 Disposal of Old Appliance.............................................. 3 Disposal of this Appliance.............................................. 3 R600a Refrigerant.......................................................... 3 Important Safety Information.......................................... 4 Electrical Safety....................
Safety Disposal of Old Appliance DANGER! Risk of child entrapment. Child entrapment and suffocation are not problems of the past. Junked or abandoned refrigerators are still dangerous – even if they will sit for “just a few days.” If you are getting rid of your old refrigerator, please follow these instructions to help prevent accidents. Before you discard old appliances: • Take off the doors. • Leave the shelves in place so that children may not easily climb inside.
Safety Important Safety Information • To prevent injury to you or damage to the unit, the appliance should be unpacked and set up by two people. • If the appliance is damaged on delivery, contact the supplier immediately before connecting to the power source. • To guarantee safe operation, ensure that the appliance is set up and connected as described in these operating instructions. • Disconnect the appliance from the power source if a fault occurs. Pull out the plug, turn off or remove the fuse.
Safety Features Electrical Safety Safety Regulations Connect this appliance to a 15 amp or 20 amp, 110120 VAC, circuit which is grounded and protected by a circuit breaker or fuse. The appliance is designed to cool, freeze and store food and to make ice. It is designed as a household appliance. We recommend using a dedicated circuit for this appliance to prevent circuit overload and the chance of interruption to the appliance.
Features Saving energy Clearance on the back must be 2 inch (51 mm).
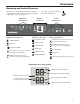
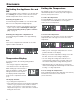
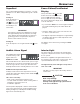
Features Operating and Control Elements The electronic control panel has the Touch capacitance technology. Any function can be activated by a fingertip on the symbol of the operating icons. Refrigerator operating icons Refrigerator operating icons The exact contact point is between the symbol and its label.
Features Switching the Appliance On and Off Clean the appliance before turning it on for the first time. See Cleaning. Do not place frozen food in the freezer until the temperature shows at least 0°F (-18°C). Switching the appliance on Touch the Refrigerator On/Off icon or the Freezer On/ Off icon so the temperature displays light up. Setting the Temperature The appliance is pre-set for normal operation. We recommend temperatures of 38°F (3°C) in the refrigerator and 0°F (-18°C) in the freezer.
Operation SuperCool It is recommended particularly if you wish to cool large quantities of food, drinks, freshly baked goods or meals rapidly. Turning on Touch the SuperCool icon briefly so the LED turns on. The refrigerator temperature will drop to its lowest value. If the power failure LED is lit, this means the freezer temperature has risen too high during the last few hours or days due to a power failure. The freezer temperature display flashes at the same time.
Operation Setup Mode In the setup mode, you can activate the following functions: = Sabbath mode This feature considers the religious requirements on the Sabbath or holidays. When the Sabbath mode is active, some functions of the electronic controls are switched off. • The lighting remains off. • The cooling fan remains in its actual state: If it is on, it remains on, if it is off, it remains off. • There is no door alarm. • There is no temperature alarm.
Operation = Bleeding the water pipe system and resetting the drop symbol on the display After the appliance has been switched on for the first time or the water filter (optional accessory) has been renewed, follow these steps to bleed the water pipe system. This is important for proper operation of the ice maker. = Ice maker function test Activation by service personnel only.
Operation Arranging Food = Temperature display mode You can choose the unit of temperature for the display in degrees Fahrenheit or degrees Celsius. The factory setting is degrees Fahrenheit. • Activate the setup mode by touching the SuperFrost icon for 5 seconds. • Touch the freezer compartment Down icon until appears in the freezer temperature display. • Touch the SuperFrost icon - the display shows • Touch the SuperFrost icon again - the temperature reading is now displayed in degree Celsius.
Refrigerator Compartment Equipment You can rearrange the height of the shelves and door racks as required. CAUTION! Risk of injury and damage. Only adjust an empty shelf or door rack. Do not attempt to adjust a shelf or door rack with food on it. Repositioning the shelves Hold the shelf underneath with your hand to avoid from tipping down backwards when removing. Lift the shelf at the front. 1. Remove the shelf forward until the circular cutout of the shelf is in line with the interior light cover. 2.
BioFresh Compartment BioFresh Compartment Storage Times The BioFresh compartment maintains food freshness up to 3 times longer than in standard refrigerators. for food in the BioFresh compartment The constant temperature just above 32°F (0°C) and the adjustable humidity provides the ideal storage conditions for different types of food. Slide control to left This setting is suitable for dry or wrapped food like dairy products, meat, fish, cold cuts.
Freezer Compartment Freezing Freezing and Storage Fresh food should be frozen completely and as rapidly as possible. This is provided by the SuperFrost feature and ensures that the nutritional value, appearance and flavor of the food remains intact. • Pack frozen food in standard freezer bags or reusable plastic, metal or aluminum containers. Freezing with SuperFrost • Always write the date and contents on the package and do not exceed the stated storage time for the food. This prevents spoiling.
IceMaker Safety Instructions and Warnings for the Automatic Ice Maker • The ice maker is designed exclusively to make ice cubes in quantities needed by a household. • All repairs and work on the ice maker may only be done by customer service personnel or other appropriately trained personnel. • Do not consume or use the first three batches of ice. This applies both to using the appliance for the first time and also using it after it has not been used for a long period of time.
Cleaning/Vacation Defrosting Refrigerator compartment The refrigerator compartment defrosts automatically. The water that forms on the rear wall drains into a reservoir at the back of the appliance and evaporates automatically through the compressor heat. Freezer compartment The NoFrost system automatically defrosts the freezer compartment. Any moisture will collect on the evaporator and freeze. It will periodically defrost and evaporate.
Troubleshooting Your appliance is designed and manufactured for a long life and reliable operation. If a problem occurs during operation, check whether it is due to an operating error. Please note that even during the warranty period, you may be responsible for certain repair costs.
For Service in the U.S. Liebherr Service Center Toll Free: 1-866-LIEBHER or 1-866-543-2437 Email: Service-appliances.us@liebherr.com PlusOne Solutions, Inc. 3501 Quadrangle Blvd, Suite 120 Orlando, FL 32817 For Service in Canada Liebherr Service Center Toll Free: 1-888-LIEBHER or 1-888-543-2437 www.euro-parts.ca EURO-PARTS CANADA 39822 Belgrave Road Belgrave, Ontario, N0G 1E0 Phone: (519) 357-3320 Fax: (519) 357-1326 *708555102* w w w. l i e b h e r r - a p p l i a n c e s .
Installation Instructions For NoFrost Combined Refrigerator-Freezers CS 1321 7085 545-00
Important Please Read and Follow these Instructions These instructions contain Danger, Warning and Caution notes. This information is important for safe and efficient installation and operation. Always read and comply with all Danger, Warning and Caution notes! DANGER! Danger indicates a hazard which will cause serious injury or death if precautions are not followed. Content Page Please Read and Follow these Instructions.................. 2 Note to the Installer............................................
Safety Disposal of Old Appliance DANGER! Risk of child entrapment. Child entrapment and suffocation are not problems of the past. Junked or abandoned refrigerators are still dangerous – even if they will sit for “just a few days.” If you are getting rid of your old refrigerator, please follow these instructions to help prevent accidents. Electrical Safety Connect this appliance to a 15 amp or 20 amp, 110120 VAC, circuit which is grounded and protected by a circuit breaker or fuse.
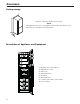
Planning Information Appliance Dimensions Overall height of the appliance can be increased by a maximum of 5/8” (see Leveling the appliance).
Planning Information Cabinet Opening Dimensions The appliance can be used freestanding or semi built-in. If semi built-in, please consider the cabinet opening dimensions. This is where the power cord extends from the back of the appliance. Free length of the power cord = 98 inch (2500 mm). IMPORTANT The power plug must be easily accessible so that the appliance can be disconnected from the mains quickly in an emergency. It must not be behind the back of the appliance.
Installation Unit Venting Leveling the Appliance Do not restrict the air flow. The ventilation opening can either be directly over the appliance , above the cabinet and below the ceiling or through a vent installed in a soffit . 1 2 3 IMPORTANT The clear ventilation cross-section must be at least 31 in² (200 cm²) from the lower ventilation opening right to the upper one. The section below the freezer door and the floor must not be covered.
Blocking For Safety Mounting the anti tipping device WARNING! Tip over hazard! The anti tipping bracket must be mounted to prevent the appliance from tipping when the fully stocked door is opened. IMPORTANT Be sure that there is no plumbing or electrical wiring located in this area which screws or drills could damage. 1. Mark the center of the appliance on the back wall. 2. Mount the anti tipping bracket. Center line of appliance.
Reversing Door Hinges Changing Over Door Hinges Door hinges should only be changed by a trained expert. 5. Changing over the door hinges requires two people. 1. Open top door, pry off door cover and pivot to the right. 4. 1. 4. Pull the right-hand side of the cover approx. 1/4" (6 mm) towards you. 5. Remove pin. 3. 6. 2. 2. Let door cover hang down. 3. Slide red safety bracket over the hinge. 6. Open top door wide and remove covers. 7.
Reversing Door Hinges IMPORTANT The door must now be held secure by another person. 9. 13. 8. 8. Disconnect the connector and pull the cable out of the guide. 13. Open bottom door, pry off door cover. 9. Remove cover from upper door mounting and unscrew door. 15. 16. 11. 10. 14. 14. Pivot door cover to the right. 10. Transfer fastener for soft stop mechanism to the opposite side. 11. Transfer cover plate to the opposite side. 15. Slide red safety bracket over the hinge. 16. Remove pin. 12. 17. 17.
Reversing Door Hinges IMPORTANT The door must now be held secure by another person. 25. 18. 19. 26. 18. Pull out middle hinge pin. 19. Remove bottom door. 24. 24. Tilt appliance slightly backwards and unscrew the adjustable foot. 25. Remove the hinge pin. 26. Unscrew hinge bracket. 20. 21. 180° 22. 20. Unscrew hinge bracket. 27. Transfer fastener for soft stop mechanism on hinge bracket to the opposite side. 27. 28. Transfer cover to the opposite side. 28. 21.
Reversing Door Hinges 36. 35. Both doors 31. 35. Remove screw. 31. Tilt appliance slightly backwards, insert pin and attach using the adjustable foot. 36. Pivot soft stop mechanism outwards on the left, pull to the left and remove. 32. 33. 32. Release pressure plates at the front 1 and pull them backwards to remove 2. 33. 37. Both doors 37. Turn soft stop mechanism through 180° and re-fit on the opposite side. 33. Transfer door handle and plugs to the opposite side. 34. 34.
Reversing Door Hinges 41. 46. 46. Click cover into place. 41. Insert middle hinge pin. 48. 47. 47. Disconnect the connector. 42. 42. Slide door cover over soft stop mechanism hinge. 48. Using a screwdriver, push out the hinge from underneath and remove it from the door complete with the cable. 49. 43. 44. 49. Using a screwdriver, push out the plug from underneath and transfer it to the opposite side. 45. 43. Move soft stop mechanism hinge to the fastener and insert pin. 50. 51. 44.
Reversing Door Hinges 58. 52. 59. 57. 57. Pull the left-hand side of the cover approx. 1/4" (6 mm) towards you. 52. Suspend top door on hinge pin. For this, the door must be open at least 90°. 58. Move soft stop mechanism hinge to the fastener and insert pin. 59. Remove red safety bracket. IMPORTANT The door must now be held secure by another person. 53. 60. 60. Pivot door cover to the right and click into place on the door. 54. 53. Secure door with screws and click cover into place. 61. 54.
For Service in the U.S. Liebherr Service Center Toll Free: 1-866-LIEBHER or 1-866-543-2437 Email: Service-appliances.us@liebherr.com PlusOne Solutions, Inc. 3501 Quadrangle Blvd, Suite 120 Orlando, FL 32817 For Service in Canada Liebherr Service Center Toll Free: 1-888-LIEBHER or 1-888-543-2437 www.euro-parts.ca EURO-PARTS CANADA 39822 Belgrave Road Belgrave, Ontario, N0G 1E0 Phone: (519) 357-3320 Fax: (519) 357-1326 *708554500* w w w. l i e b h e r r - a p p l i a n c e s .