Installation Instructions For NoFrost Combined Refrigerator-Freezers with IceMaker CS 1360 7085 561-00
Important Please Read and Follow these Instructions These instructions contain Danger, Warning and Caution notes. This information is important for safe and efficient installation and operation. Always read and comply with all Danger, Warning and Caution notes! DANGER! Danger indicates a hazard which will cause serious injury or death if precautions are not followed. WARNING! Warning indicates a potentially hazardous situation which, if not avoided, could result in death or serious injury.
Safety Disposal of Old Appliance DANGER! Risk of child entrapment. Child entrapment and suffocation are not problems of the past. Junked or abandoned refrigerators are still dangerous – even if they will sit for “just a few days.” If you are getting rid of your old refrigerator, please follow these instructions to help prevent accidents. Electrical Safety Connect this appliance to a 15 amp or 20 amp, 110120 VAC, circuit which is grounded and protected by a circuit breaker or fuse.
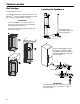
Planning Information Appliance Dimensions Overall height of the appliance can be increased by a maximum of 5/8” (see Leveling the appliance).
Planning Information Cabinet Opening Dimensions The appliance can be used freestanding or semi built-in. If semi built-in, please consider the cabinet opening dimensions. This is where the power cord extends from the back of the appliance. Free length of the power cord = 98 inch (2500 mm). IMPORTANT The power plug must be easily accessible so that the appliance can be disconnected from the mains quickly in an emergency. It must not be behind the back of the appliance.
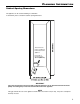
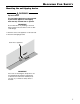
Installation Unit Venting Leveling the Appliance Do not restrict the air flow. The ventilation opening can either be directly over the appliance , above the cabinet and below the ceiling or through a vent installed in a soffit . 1 2 3 IMPORTANT The clear ventilation cross-section must be at least 31 in² (200 cm²) from the lower ventilation opening right to the upper one. The section below the freezer door and the floor must not be covered.
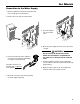
Blocking For Safety Mounting the anti tipping device WARNING! Tip over hazard! The anti tipping bracket must be mounted to prevent the appliance from tipping when the fully stocked door is opened. IMPORTANT Be sure that there is no plumbing or electrical wiring located in this area which screws or drills could damage. 1. Mark the center of the appliance on the back wall. 2. Mount the anti tipping bracket. Center line of appliance.
Ice Maker Safety Instructions and Warnings • Do not install the water connection while the combined refrigerator-freezer is connected to an electrical outlet. • The connection to the water supply may only be made by a trained and licensed plumber. • All equipment and devices used to supply the water to the appliance must comply with the current regulations for your geographical area. WARNING! Water Connection Adapter IMPORTANT Only use the supplied adapter for connection to the solenoid valve.
Ice Maker Connection to the Water Supply 1. Move the appliance towards the final position and leave enough space to work behind. 2. Remove the cover from the solenoid valve. 5. Screw the adapter onto the solenoid valve. 6. Move the power supply line to the area of the electrical outlet. WARNING! 3. Connect the water line to the adapter in the respective configuration, depending on the type of water line used. The figure shows the configuration with a copper line as an example.
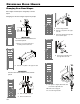
Reversing Door Hinges Changing Over Door Hinges Door hinges should only be changed by a trained expert. 5. Changing over the door hinges requires two people. 6. 1. 7. 5. Unscrew hinge bracket. 6. Transfer cover plate to the opposite side. 7. Turn hinge bracket through 180° and screw into place. IMPORTANT The door must now be held secure by another person. 1. Remove cover from upper door mounting and unscrew door. 8. 2. 8. 2. Remove hinge bushing, turn through 180° and re-fit. 10.
Reversing Door Hinges 17. 12. Transfer the hinge component on the hinge bracket to the opposite side. 18. 12. Both doors 18. 17 Release pressure plates at the front 1 and pull them backwards to remove 2. 18. Transfer door handle and plugs to the opposite side. 13. Transfer cover to the opposite side. 13. Both doors 19. Transfer spring clip to the opposite side. 14. 15. 20. 14. Transfer cover plate to the opposite side. 15. Screw hinge bracket into place. 20. Suspend bottom door on hinge pin.
Reversing Door Hinges IMPORTANT The door must now be held secure by another person. 22. 25. 22. Using a screwdriver, push out the hinge and remove it from the door . 25. Suspend top door on hinge pin. For this, the door must be open at least 90°. 23. 26. 23. Using a screwdriver, push out the plug and transfer it to the opposite side. 26. Secure door with screws and click cover into place. 24. 24. Insert hinge. 27. 27. Place the appliance in its final position at the place of installation.