
Installation Guide


Mounting the anti tipping device
WARNING!
The anti tipping brackets must be mounted
to prevent the appliance from tipping when
the fully stocked door is opened.
WARNING!
Be sure that there is no plumbing or
electrical wiring located in this area which
screws or drills could damage.
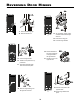
The anti tipping brackets provided can be mounted
within 11-3/4 inch to the left and right of the
appliance center (Figure 6).
Freestanding applications
1. Mark the center of the appliance on the back
wall.
2. Mount the anti tipping brackets within the given
area.
IMPORTANT
Locate at least one anti tipping bracket directly
in line with a wall stud (Figure 6).
To ensure a secure mounting of the brackets,
use any possible mounting option as shown in
Figures 8 - 11.
6
InstallatIon
IMPORTANT
After final installation, this screw must be
turned down until it has proper floor contact to
support the hinge bracket.
Figure 5
5 mm
socket
22 mm
wrench
Figure 6
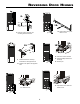
Leveling the Appliance - Figure 5
1. The height can be adjusted in front by twisting
the leveling feet
1
.
2. Twist the adjusting bolt
2
to set up the back of
the appliance.
CAUTION!
Do not use a power driver.
3. Align the appliance with sides of kitchen
cabinets by adjusting leveling feet
1
and the
supports
2
.