Operating instructions Combined fridge-freezer 120614 7085640 - 01 CUN(esf) ...
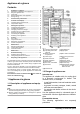
Appliance at a glance Contents 1 1.1 1.2 1.3 1.4 1.5 Appliance at a glance............................................ Description of appliance and equipment.................. Range of appliance use............................................ Conformity................................................................ External dimensions of the appliance....................... Saving energy.......................................................... 2 2 2 3 3 3 2 General safety information..................
General safety information - Storage and cooling of medicines, blood Model Height of appliance H (mm) plasma, laboratory compounds or similar 1623 materials and products subject to the Medical CUN 31.. CUN(esf) 35.. 1817 Devices Directive 2007/47/EC - Use in potentially explosive areas CUN(esf) 39.. 2011 Improper use of the appliance can lead to CUN 40.. 2011 damage to or spoilage of the stored goods.
Controls and displays service only or by other specialised personnel trained for the purpose. - Only assemble, connect and dispose of the appliance according to the instructions. - Please keep these instructions in a safe place and pass them on to any subsequent owners. - Special-purpose lamps (incandescent lamps, LEDs, fluorescent tubes) in the appliance serve to illuminate the appliance interior and are not suited for room illumination.
Putting into operation 4 Putting into operation q Always stand the appliance backed directly to the wall using 4.1 Transporting the appliance q The appliance may be moved only when it is empty. q Do not install the appliance without assistance. q The more R 600a refrigerant there is in the appliance, the CAUTION Risk of injury and danger of damage as a result of incorrect transport! u Transport the appliance in a packed condition. u Transport the appliance upright.
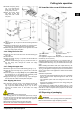
Putting into operation u Always see to good ventilation at the installation site. 4.3.3 Transferring the middle bearing elements 4.3 Changing over the door hinges You can change over the door hinges if necessary. Ensure that the following tools are to hand: q Torx® 25 q Torx® 15 q Screwdriver q Cordless screwdriver, if necessary q Second person for fitting work, if needed 4.3.1 Detaching the upper door Note u Remove any food from the door racks before removing the door, so that no food falls out. Fig.
Putting into operation u Transfer the spring clamp Fig. 7 (31): Depress the latch nose and pull the spring clamp off over it. u Slide the spring clamp into place on the new hinge side until it clicks into place. 4.4 Insertion into a row of kitchen units Fig. 7 Fig. 8 u Lift the stopper Fig. 8 (30) out of the door bearing bush and transfer it. u Detach door handle Fig. 8 (32), stopper Fig. 8 (33) and pressure plates Fig. 8 (34) and transfer to the opposite side.
Control The packaging is made of recyclable materials: - corrugated board/cardboard - expanded polystyrene parts - polythene bags and sheets - polypropylene straps - nailed wooden frame with polyethylene panel* u Take the packaging material to an official collecting point. 4.6 Connecting the appliance NOTICE Risk of damage to the electronic control system! u Do not use stand-alone inverters (conversion of d.c. to a.c./ three-phase) or energy saving plugs.
Control 5.3.3 Shelves Dismantling door racks Moving or removing shelves The shelves have stops preventing them from being unintentionally pulled out. u The door racks can be dismantled for cleaning. 5.3.6 Removing the bottle holder u Remove the bottle holder according to the illustration. Fig. 10 u Lift the shelf slightly and pull forward a little. u Adjust the height of the shelf. To do so, push the cut-outs along the supports.
Maintenance Wrap produce and spread it out as far as possible. Do not allow produce to be frozen to touch produce that is already frozen to prevent the latter thawing. You do not have to activate SuperFrost in the following cases: - when placing frozen food in the freezer - when freezing up to approx. 1 kg fresh food daily 5.4.7 Information system* Freezing with SuperFrost u Briefly press the SuperFrost button Fig. 3 (5). w The SuperFrost button shines.
Malfunction u Empty appliance. u Pull out the power plug. u Clean plastic outer and inner surfaces with lukewarm water and a little washing-up liquid. Do not apply stainless steel cleaning agent to glass or plastic surfaces to prevent them from being scratched. Darker areas at the beginning and quite an intensive colour of the stainless steel surface are normal.* NOTICE* The stainless steel doors are provided with a high-quality surface coating and must not be treated using the accompanying care product.
Decommissioning The SuperFrost button flashes together with the temperature display. → There is a fault. u Please contact the after-sales service (see Maintenance). All LEDs light up in the temperature display. → Demo mode is activated. u Please contact the after-sales service (see Maintenance). The outer surfaces of the appliance are warm*. → The heat of the refrigeration circuit is used to prevent condensate from forming. u This is normal. The temperature is not cold enough.
Disposing of the appliance * Depending on model and options 13
Liebherr Hausgeräte Ochsenhausen GmbH * Memminger Strasse 77-79 * D-88416 Ochsenhausen * * www.liebherr.