Operating instructions Refrigerator Read the operating instructions before switching on for the first time Page 10 GB 7083 181-00 FK_FKv
Range of appliance use Disposal notes The appliance contains reusable materials and should be disposed of properly - not simply with unsorted household refuse. Appliances which are no longer needed must be disposed of in a professional and appropriate way, in accordance with the current local regulations and laws. The appliance is suitable solely for cooling food in a domestic environment or similar.
Safety instructions and warnings • To prevent injury or damage to the unit, the appliance should be unpacked and set up by two people. • In the event that the appliance is damaged on delivery, contact the supplier immediately before connecting to the mains. • To guarantee safe operation, ensure that the appliance is set up and connected as described in these operating instructions. • Disconnect the appliance from the mains if any fault occurs. Pull out the plug, switch off or remove the fuse.
Setting up • Do not place the appliance in direct sunlight or near cookers, radiators and similar sources of heat. • The floor on which the appliance stands should be horizontal and level. Compensate for uneven floors with the adjustable feet. • Do not cover ventilation openings or grille. Switching the appliance on and off You are recommended to clean the interior of the appliance before switching it on for the first time (see Cleaning).
Cooling The grid shelves can be moved to accommodate different height bottles or packages. High-percentage alcohols should be tightly sealed and stored upright. The ventilation slots on the inside must not be covered! Interior light Safety lock GB The lock in the appliance door is equipped with a safety mechanism. Locking the appliance • Insert the key as shown by arrow 1. • Turn the key 90°. To unlock the appliance, the same procedure must be repeated in the same order.
Malfunctions If a malfunction occurs during operation, check whether it is due to an operating error. You may be able to rectify the following faults yourself: Changing over door hinges Door hinges should only be changed by a trained expert. Changing the door hinges must be done by two people.
GB 7. Insert the key. 15 Turn the key 90°. 14. Remove lock. 7 14 8 8. Remove cover. 9 9. Remove screw. 10. Turn the lock approx. 3° clockwise. 15. Reinsert hinge bushing. 16. Transfer covers to the opposite side. 17. Transfer plug and bushing. 11 16 17 10 11. Remove pin. 18 12. Remove bushing. 13. Turn back the lock 90° anticlockwise. 12 19 13 18. Remove bushing. 19. Insert the lock as shown in the illustration.
21 20. Turn the lock 90° clockwise. 21. Reinsert hinge bushing. 27 20 26 26. Unscrew the pin. Use the spanner provided. 27. Screw in the pin on the opposite side. 23 22. Turn the lock further - approx. 3° clockwise. 23. Insert pin. 22 Note on point 23 After insertion, the pin's cross pin must be engaged in the groove of the catch. 28. Unscrew hinge bracket. 24 28 29 24. Screw in the screw and attach the cover cap. 29. Remote the cover, turn it through 180° and re-fit it on the opposite side.
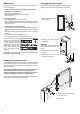
Adjusting the lateral tilt of the door GB If the door is at an angle, adjust the angle. 31 31. Insert the pin into the left-hand door mounting. Use your index finger to hold the pin while you are assembling the door. 35 32. Locate the door on the upper pin as shown in the illustration and guide it to the lower hinge bracket. Important As a result of its heavy weight, the door must be held secure by one person. 35. Remove middle screw from hinge bracket. This screw is no longer needed. 32 36.