
Installation Guide
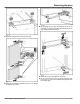


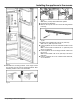
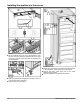
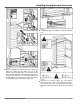
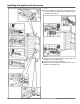
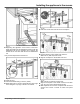
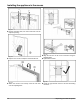
Table Of Contents
- enus
- 1 General safety information
- 2 Transporting the appliance
- 3 Setting up the device
- 4 Appliance dimensions
- 5 Recess dimensions
- 6 Cabinet door
- 7 Air circulation in the kitchen cabinet
- 8 Reversing the door
- 9 Water connection*
- 10 Installing the appliance in the recess.
- 11 Disposal of packaging
- 12 Connecting the appliance

Fig. 37
u
Supporting the appliance at the bottom at the back:
Insert the handle into the stabilization rail and push the
stabilization rail into the appliance floor. Remove the
handle and do the same with the second stabilization
rail.
Carry out the steps below for both doors:
Fig. 38
u
Close the door.
u
Check the default setting of 5/16 in. (8 mm).
u
Raise fitting aids to unit door height. Bottom stop edge
of the fitting aid = top edge of the door to be fitted.
Fig. 39
u
Undo the counter nuts and remove the crosspiece.
Fig. 40
u
Hang crosspiece on the inside of the unit door.
With a 22 in. (560 mm) wide recess:
u
align the crosspiece to the middle of the door.
Fig. 41
With a 22 3/4 in. (578 mm) wide recess:
u
align the crosspiece to the middle of the door and then
3/16 (5.5 mm) move towards the hinge side.
u
With chipboard doors fit the crosspiece with at least 6
screws and at least 4 screws for frame and panel
doors.
Installing the appliance in the recess.
* Depending on model and options 19