
Installation Guide
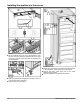
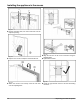
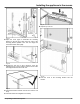
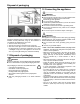

Table Of Contents
- enus
- 1 General safety information
- 2 Transporting the appliance
- 3 Setting up the device
- 4 Appliance dimensions
- 5 Recess dimensions
- 6 Cabinet door
- 7 Air circulation in the kitchen cabinet
- 8 Reversing the door
- 9 Water connection*
- 10 Installing the appliance in the recess.
- 11 Disposal of packaging
- 12 Connecting the appliance

Fig. 52
Check the following points to make sure the appliance is
installed correctly. Otherwise, icing up, the formation of
condensate and malfunctions may occur:
w
The door must close properly.
w
The unit door must not touch the body of the unit.
w
The seal on the upper corner on the handle side must
be fitted securely. To verify this, darken the room, place
a flashlight in top part of the appliance and close the
door. If you see light shining out, check the assembly.
11 Disposal of packaging
WARNING
Danger of suffocation from packaging materials and films!
u
Do not allow children to play with packaging materials.
The packaging is made from recyclable materials:
-
Corrugated card/cardboard
-
Parts made of foamed polystyrene
-
Films and bags from polyethylene
-
Packing bands from polypropylene
-
Wood frame nailed together with a polyethylene
window*
u
Take the packaging material to an official collection
point.
12 Connecting the appliance
WARNING
Electrical shock hazard!
u
Start-up should only take place once the appliance has
been installed according to these instructions.
u
Electrically ground appliance.
u
Do not ground to a gas pipe.
u
Check with a qualified electrician if you are not sure the
appliance is properly grounded.
u
Do not have a fuse in the neutral or grounding circuit.
u
Do not use an extension cord, power bar or a multiple
socket adapter.
u
Do not use a power cord that is frayed or damaged.
WARNING
Electrical shock hazard!
This appliance is equipped with a three-prong (grounding)
polarized plug for your protection against possible shock
hazards. Electrical Grounding Required.
u
Do not remove the round grounding prong from the
plug.
u
Use only an grounded adapter.
-
Wait 1 hour after installation before you plug in the
appliance. This allows the refrigerant and system lubri-
cation to reach equilibrium.
-
Make sure incoming voltage is the same as the appli-
ance rating. A 110-120 Volt, 60 Hz, 15 Amp electrical
supply (20 Amp for side-by-side installations) circuit
that is controlled by a circuit breaker or fuse is
required.*
-
We recommend using a dedicated circuit for this appli-
ance to prevent electrical overload.
-
Follow all Federal, State and local electrical, fire and
building codes and ordinances when installing the
receptacle and / or the appliance.
-
In some communities, a wall switch is required to turn
power to the appliance ON and OFF.
-
To reduce the risk of fire, electric shock, or personal
injury, installation work and electrical wiring must be
done by a qualified electrician in accordance with all
applicable codes and standards, including fire-rated
construction.
-
The Power Plug must be easily accessible so that the
appliance can be disconnected from the mains quickly
in an emergency. It must not be behind the back of the
appliance.
-
The top of the electric outlet must be located within
82-5/8 in. (2100 mm) from the top of the base in the
cabinet.
Disposal of packaging
22 * Depending on model and options