Installation Instructions For Wine Cooler HW 3000, HW 4800, HW 8000 7085 009-00
Table of Contents Please Read and Follow These Instructions These instructions contain Danger, Warning and Caution notes. This information is important for safe and efficient installation and operation. Always read and comply with all Danger, Warning and Caution notes! DANGER! Danger indicates a hazard which will cause serious injury or death if precautions are not followed. WARNING! Warning indicates a potentially hazardous situation which, if not avoided, could result in death or serious injury.
Safety Blocking for Safety WARNING! To avoid a hazard due to instability of the appliance, it must be fixed in accordance with the instructions. Disposal of Old Appliance DANGER! Risk of child entrapment. Child entrapment and suffocation are not problems of the past. Junked or abandoned refrigerators are still dangerous – even if they will sit for “just a few days.
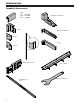
Unpacking Supplied Accessories Labels 2 pcs. - HW 3000 4 pcs. - HW 4800 8 pcs. - HW 8000 Cover Stabilizing rail handle Attachment bracket Spacer Cover Spacer Cover profile Attachment bracket Cover profile Stabilizing rail 2 pcs.
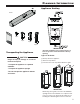
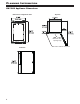
Planning Information Appliance Venting Cover 2 pcs. 2 pcs. 5 pcs. 2 pcs. IMPORTANT Transporting the Appliance The clear ventilation cross-section must be at least 31 sq inches from the bottom to the top opening. Types of Air Outlet CAUTION! Danger of injury or damage as a result of incorrect transport! 1 Directly above the appliance 2 Above the top cabinet 3 From the front of the top cabinet with decor grille - Transport the appliance in a packed condition. - Transport the appliance upright.
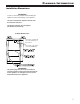
Planning Information HW 3000 Appliance Dimensions Dimensions of Appliance Door Top View Maximum door opening angle Side View 6 Dimensions without door panel
Planning Information Installation Dimensions IMPORTANT In order to avoid any problems when installing the appliance and to avoid damage to the appliance: The floor on which the appliance stands must be horizontal and level. The kitchen cabinets must be aligned horizontally and vertically. Cabinet Dimensions The power cord exits the rear of the appliance at this location.
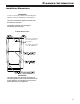
Planning Information HW 4800 Appliance Dimensions Dimensions of Appliance Door Top View Maximum door opening angle Dimensions without door panel Side View 8
Planning Information Installation Dimensions IMPORTANT In order to avoid any problems when installing the appliance and to avoid damage to the appliance: The floor on which the appliance stands must be horizontal and level. The kitchen cabinets must be aligned horizontally and vertically. Cabinet Dimensions The power cord exits the rear of the appliance at this location.
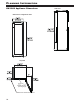
Planning Information HW 8000 Appliance Dimensions Dimensions of Appliance Door Top View Maximum door opening angle Dimensions without door panel 10 Side View
Planning Information Installation Dimensions IMPORTANT Installation Dimensions for 84" niche Custom panel dimensions for 84" niche In order to avoid any problems when installing the appliance and to avoid damage to the appliance: The floor on which the appliance stands must be horizontal and level. The kitchen cabinets must be aligned horizontally and vertically. Cabinet Dimensions The power cord exits the rear of the appliance at this location.
Installation Installing the Appliance The installation work should only be carried out by trained personnel. Two people are required for the installation work. Note Check the installation dimensions before installation. The intermediate panel and side wall of the kitchen cabinet must be perpendicular to each other. WARNING! Fire hazard due to dampness! If live parts or the power cord become damp, this may cause short circuits. 2. Route the power cord towards the electrical outlet.
Installation 7. Only if the wall thickness is less than 3/4" (19 mm): Fit the spacers. 5. Fit cover profile. 5. 5/8" (16 mm) On appliances with hinges on the left On appliances with hinges on the right 7. 3/4" (19 mm) 6. Remove the transportation safety component. 6.
Installation 8. Remove cover. 11. Fit cover profile. 8. 11. 12. Slide the appliance fully into the recess. Check that the distance is identical all the way round. 9. Screw on the attachment bracket. • Undo the screws 1. • Slide bracket towards the cabinet wall. • Tighten the screws 1. 9. 12. 10. Screw on the attachment bracket. 10.
Installation 13. Adjust appliance using the adjustable feet. 15. Snap off and remove the front part of the stop bracket. 13. 15. 14. Secure the appliance to the kitchen cabinet using screws through the hinges and attachment brackets. 16. Fit the covers. 14. 16.
Changing Over Door Hinges 17. Stabilize the appliance at the back at the bottom: Changing Over Door Hinges Fit the handle 1 to the stabilizing rail 2 and slide the stabilizing rail into the floor of the appliance. Remove the handle and repeat this procedure with the second stabilizing rail. Door hinges should only be changed by a trained expert. Changing the door hinges must be done by two people. WARNING! High door weight. Danger of injury and damage to property.
Changing Over Door Hinges 2. Remove covers. 3. Remove the door. The door must now be held secure by somebody. CAUTION! Risk of injury if hinges fold! - Leave hinges open. 3. 2. 4. Remove the upper retaining bracket and transfer to the opposite side. 4.
Changing Over Door Hinges 5. Transfer the stop to the opposite side. 6. Unscrew hinges and covers and re-fit on the opposite side at diagonals to the original position. 5. 6.
Changing Over Door Hinges 7. Fit the door on the appliance. 8. Fit covers and click into place. Notice The door must now be held secure by somebody. 7. 8. Check that the door is securely fitted to the appliance and closes properly.
For Service in the U.S. Liebherr Service Center Toll Free: 1-866-LIEBHER or 1-866-543-2437 Email: Service-appliances.us@liebherr.com PlusOne Solutions, Inc. 3501 Quadrangle Blvd, Suite 120 Orlando, FL 32817 For Service in Canada Liebherr Service Center Toll Free: 1-888-LIEBHER or 1-888-543-2437 www.euro-parts.ca EURO-PARTS CANADA 39822 Belgrave Road Belgrave, Ontario, N0G 1E0 Phone: (519) 357-3320 Fax: (519) 357-1326 *708500900* w w w. l i e b h e r r - a p p l i a n c e s .