Operating instructions combined refrigerator-freezer Page 10 GB 7080 531-01 KED/KID 110
Disposal notes The packaging is made of recyclable materials. - Corrugated board/board EPS moulded parts Polythene sheets Polypropylene straps • Keep packaging materials away from children - polythene sheets and bags can cause suffocation! • Please return the packaging to an official collection point. Your old appliance: This contains some reusable materials and should be disposed of properly - not simply with unsorted household refuse.
Setting up • Standard EN 378 specifies that the room in which you install your appliance must have a volume of 1 m3 per 8 g of R 600a refrigerant used in the appliance, so as to avoid the formation of inflammable gas/air mixtures in the room where the appliance is located in the event of a leak in the refrigerant circuit. The quantity of refrigerant used in your appliance is indicated on the type plate on the inside of the appliance.
Cooling Storage example ➊ butter, cheese ➋ eggs ➌ bottles, cans, tubes ➍ frozen food, ice cubes ➎ meat, sausage products, dairy products ➏ baked goods, pre-cooked meals, drinks ➐ fruit, vegetables, salad, Note • Food which gives off or absorbs odours and flavours as well as liquids should always be stored covered or in closed containers. High- percentage alcohols should be tightly sealed and stored upright. • Fruit, vegetables and salad can be stored unpacked in the bins.
Defrosting Refrigerator compartment The refrigerator compartment defrosts automatically. The water that forms on the rear wall drains into a reservoir at the back of the appliance and evaporates automatically through the compressor heat. Ensure that the water can flow without hindrance through the hole above the vegetable bins (see "Cleaning"). Freezer compartment After a long period of operation, a layer of frost or ice can build up inside the freezer compartment.This increases energy consumption.
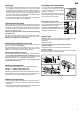
Instructions for installation and modification of flush fitting built-in appliances with decor frames Changing over door hinges • Unscrew decor frame ➊. • Lever out cover panel ➋ and hinge pin ➌ with a screwdriver. • Open door and lift out at top until hinge bracket ➍ is completely clear. Lift door off upwards. • Lever out cover panel ➎ with a screwdriver and use to close hole on the other side of door. • Unscrew hinge bracket ➏ and lift lower door off upwards.
GB Attaching inside a kitchen unit • Remove protective backing from cover profile ➌ and stick to body of appliance on the handle side. The profile must not protrude at the front, otherwise the door will not close properly. • If the unit is more than 568 mm wide, spacer ➎ must be placed on hinge bracket ➍. • Slide the appliance into the unit until stop plate ➊ touches the unit. • Insert screws (4 x 14) into unit through stop plate ➊ and hinge bracket ➏ and tighten. • Insert screw (3.
Instructions for installation and modification of appliances for integrated use Changing over door hinges • • • • • • • • • • • • • • • Unscrew hinge pin ➊. Open door and tilt out at top. Lift door off upwards. Lift off cover ➋ and replace on the other side. Remove hinge pin ➌ and lift lower door off upwards. Remove plugs ➒ and door connectors ➓ and replace on the other side of door. Press in cover ➎ at side and remove. Unscrew hinge ➏. Lift off plugs ➍ and insert on other side.
GB Installing in a kitchen unit Before installing in a kitchen unit, screw the attachment plate provided onto the appliance with screws (3.9 x 9.5). • Check the position of the unit doors and that they are opening and closing properly. Adjust hinges if necessary. • The mains socket must be positioned so that the appliance can be easily connected after installation. • If the gap between the top of the appliance and the unit is very small, remove cover ➏, otherwise leave in place.